


How to Batch Resize Multiple Images in Windows 10
If you want to resize a single image in Windows, you could open it in an application like Paint or Photos and make the change manually. But if you need to resize multiple images, this manual one-by-one method is incredibly time-consuming and inefficient.While there’s no simple way to resize multiple images using the built-in tools in Windows 10, there are a number of free third-party utilities that can do it for you. One of our favorites is Image Resizer for Windows, a nifty app that integrates directly into your right-click menu and offers a number of powerful options for image resizing and format changes. Here’s how to use it so that you, too, will never have to resize multiple images by hand again.
Resize Multiple Images with Image Resizer for Windows
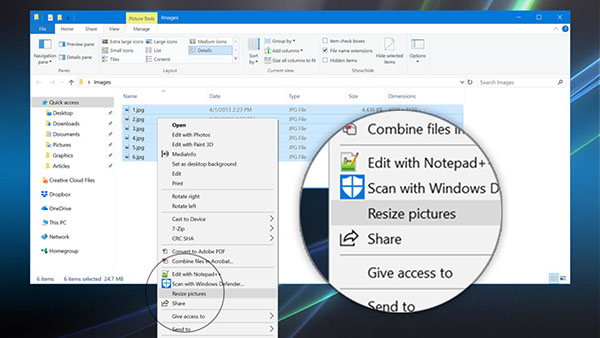
To get started, head over to the Image Resizer for Windows website to download and install the application. Once it’s installed, you’ll see its options in the context menu when you right-click on image files.
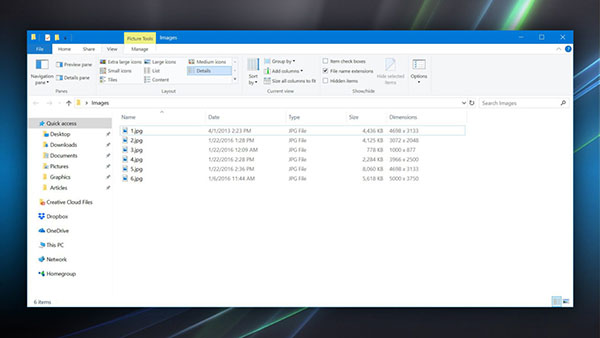
Let’s show how it works with an example. In the screenshot above, I have a folder with six JPEG images of various sizes. I’d like to resize all of them so that their longest dimension is no larger than 1600 pixels. With Image Resizer for Windows installed, I can select all of the files, right-click, and select Resize Pictures.
This will bring up the utility’s options window. There are four preset size options—small, medium, large, and phone—and a custom option in which you can enter any dimension.

In the example above, I chose the custom option and enter 1600 x 1600 pixels. With the Fit option enabled, this resized the images to have their largest dimension be no larger than 1600 pixels while maintaining the image’s original aspect ratio. You can also choose Fill, which will ensure that the images’ shortest dimension reaches your desired pixel size while maintaining the original aspect ratio; or Stretch, which will discard the original aspect ratio and stretch the image to be exactly the pixel ratio you set. If you’re working with photos, it’s generally best to avoid the Stretch option, as it will distort the image if the pixel ratio you enter does not match that of the original image.
Beyond setting a desired pixel size, you can also choose to make pictures smaller but not larger, which avoids enlarging small images and degrading their image quality. By default, the utility creates new copies of the images to resize, preserving the originals, but you can elect to replace the originals instead if you’re sure you won’t need them later.
Back in the example above, I set the pixel size to 1600 x 1600, with the Fit option selected so that my files will retain their original aspect ratio. I also enabled the option to avoid resizing pictures that are smaller than my desired maximum size. With everything set, just click Resize and you’ll have your new batch resized images waiting for you.
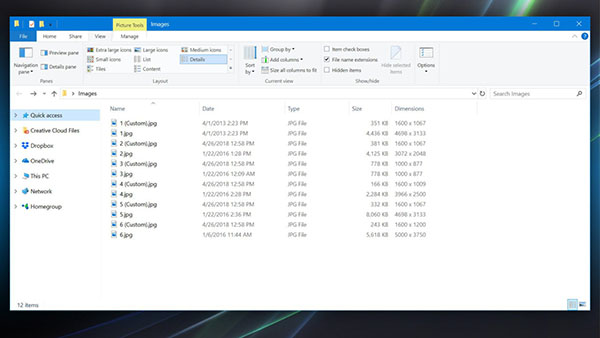
As you can see in the screenshot above, based on the Dimensions column in File Explorer, the utility resized my images so that the largest dimension is no longer than 1600 pixels. In the case of file 3, however, it didn’t resize the image because its original dimensions were already smaller than 1600 pixels. Now, my images are the desired size and I’ve also saved quite a bit of space with most images seeing a greater than 10x reduction in file size.
Image Resizer Advanced Options
The default options in Image Resizer for Windows are suitable for most situations, but if you need more control over your batch image resizing and format conversions, you can click on the Advanced Options button in the utility’s interface.
In the new Advanced Options window that appears, you can modify the small, medium, large, and phone presets, or create a new preset entirely. You can also change the file format of your conversions. JPEG is the default, but it can also opt for BMP, PNG, GIF, or TIFF.
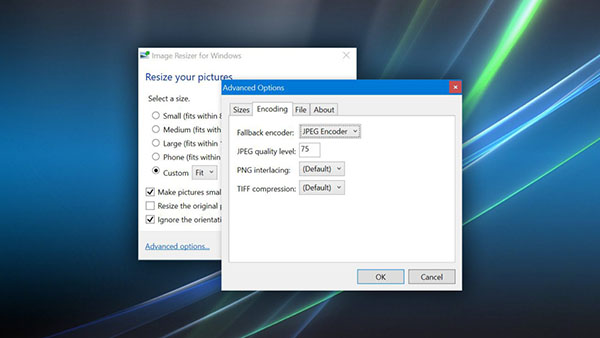
Finally, you can change the default file name for converted files. The default is to use the original file name followed by the resize preset name in parentheses, but you can choose to include the new dimensions, original dimensions, or create an entirely new file name.
The ability to batch resize multiple images in Windows seems like it should be something the operating system itself, or its built-in tools, could offer in a user-friendly way. Until that happens, Image Resizer for Windows is an excellent option that cleanly integrates into the File Explorer interface and offers users powerful resizing and conversion functionality for their images.


3 thoughts on “How to Batch Resize Multiple Images in Windows 10”