


How To Disable a Laptop Keyboard

A damaged laptop keyboard can cause a lot of frustration. Your keyboard may type random letters on its own, or cause your system to start behaving strangely.
The best thing you can do until you fix your laptop keyboard is to disable it completely. This will prevent it from acting on its own. Also, your laptop may not recognize the external keyboard if the built-in keyboard is still active.
Disabling the laptop keyboard on Windows laptops is easy. On the other hand, Mac and Ubuntu require far more effort. This article will explain what to do in all three cases.
Disabling Laptop Keyboard on Windows
On your Windows laptop, you can access the keyboard settings through the Device Manager menu. To do this, you should:
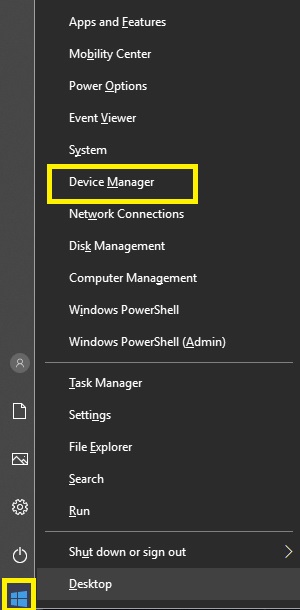
- Right-click on the ‘Windows’ menu on the bottom left of the screen.
- Click on ‘Device Manager’.

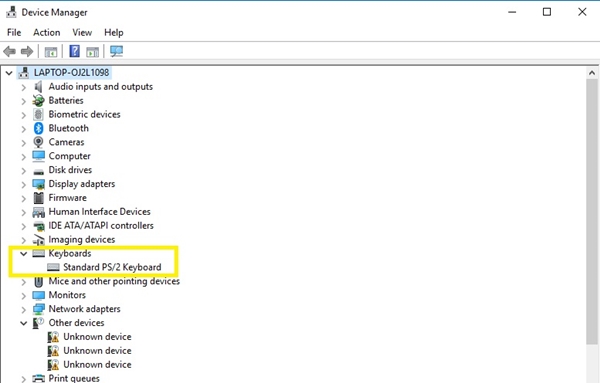
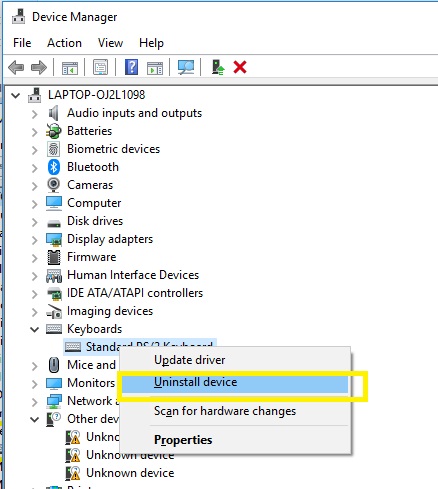
- Find ‘Keyboards’ and click on the arrow pointing down next to the keyboard icon. A list of all installed keyboards should appear. Usually, there is only one.Right-click on the keyboard.

- Press ‘Uninstall Device’. Once you do this, your keyboard will stop working.

- Keep in mind that Windows will automatically reinstall your keyboard when you restart the system. This happens because your laptop recognizes the lack of a keyboard once it loads.
To prevent this, install an external keyboard as soon as you remove the built-in one from the system. This way, your external keyboard will become the default on Device Manager and will load automatically. Once you plug it out and restart the system, your internal keyboard will install itself again.
Disabling Laptop Keyboard on Mac
If you want to disable the laptop keyboard on your MacBook, you will have to work harder. You can either use a script or install a third-party app.
Using a Script
To type in a script, you should:
- Open the ‘Applications’ folder on Mac.
- Enter the ‘Utilities’ menu.
- Double-click on ‘Terminal’.

- When the terminal opens, you should paste this script:
sudo kextunload /System/Library/Extensions/AppleUSBTopCase.kext/Contents/PlugIns/AppleUSBTCKeyboard.kext/ - Press ‘Enter’. This script should stop the keyboard completely.

To enable your keyboard again, follow steps 1-3 above. When the ‘Terminal’ opens, copy/paste the script below. Then press Enter.
sudo kextload /System/Library/Extensions/AppleUSBTopCase.kext/Contents/PlugIns/AppleUSBTCKeyboard.kext


Using a Third-Party App
You can find various keyboard-optimizing third-party apps. Karabiner is one of the most popular options.
To disable Mac via Karabiner, you should:
- Download Karabiner from the website.
- Find Karabiner-Elements.sparkle_guided in your ‘Downloads’ folder and open it.
- Drag and drop Karabiner-Elements.sparkle_guided.pkg to the ‘Applications’ folder. This will install the app.

- Open Karabiner-Elements.
- Type ‘Disable’ in the search bar to the left.
- A ‘Disable an internal keyboard while external keyboards are connected’ section will appear.
- Tick the box inside.
- Click ‘Close this window’ at the bottom-left of the screen.

Disabling Laptop Keyboard on Ubuntu
Disabling laptop the keyboard on Ubuntu requires a bit more skill. You should first identify your keyboard’s ID, and then manually disable it via command.
To find your device’s ID, you should run the ‘xinput -list’ command. This will display all the available devices with their codes on the right. Find your keyboard and read the code next to it.
To disable the keyboard, you should run this code:
xinput set-int prop [ID] “Device Enabled” 8 0
To enable it again, you should type:
xinput set-int prop [ID] “Device Enabled” 8 1
For example, if your keyboard’s ID was ‘10,’ you should type:
xinput set-int prop 10 “Device Enabled” 8 0
Disable Keyboard on Boot
You can also disable the keyboard on boot. In this case, you won’t have to type in the code each time.
- You should open the following file: vi /etc/default/grub
- Then look for: GRUB_CMDLINE_LINUX_DEFAULT=”quiet splash”
- Remove this file and type this instead:
GRUB_CMDLINE_LINUX_DEFAULT=”quiet splash i8042.nokbd” - Reboot your laptop. This will disable your keyboard for good.
To reverse the process, follow steps 1-2 from above, and then remove ‘i8042.nokbd’ from the code. Reboot the laptop and the computer’s keyboard will return.
Fix Your Keyboard
Regardless of the damage, you should always look to repair your laptop keyboard. Using an external keyboard shouldn’t be a long-term solution.
Since the keyboard connects to the motherboard, there is a possibility that the damage can affect your other hardware, especially if you spilled something on it. The liquid can remain inside and spread to other parts of your device.
You should disable your default keyboard only as a stopgap measure. Repair your laptop as soon as possible to prevent any further complications.


