How to Transfer Videos from Camera to Mac

The titular question is a bit too broad and it pays to narrow it down so you can get a better understanding of what to do. A Mac can receive videos from any camera, be it a 100K Red Dragon or an off-brand GoPro knock-off.
But then, you might just want to move videos from your Gallery or Camera Roll. Either way, there shouldn’t be too much of a problem to download a video. The following sections outline all the methods you can use to get your clip onto a Mac.
AirDrop
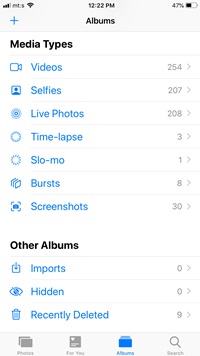
If you want to transfer videos from your iPhone or iPad into a Mac, AirDrop is the easiest way to do it. Launch the Photos app, select Albums at the bottom of the window, and tap Videos under Media Types.
Choose the video or videos you’d like to transfer by tapping on them. To remind you – when you want to send multiple videos, tap Select in the upper-right corner first, then tap on the videos. Now, you need to hit the Share icon (bottom-left) and tap the AirDrop option.
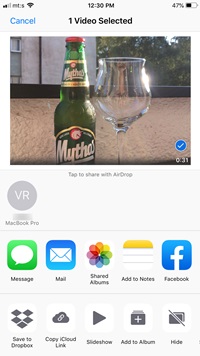
When the connection is made, your Mac’s name and model will appear under the circle. Tap the circle and your video will be sent almost instantly. Of course, if the video is larger. it might take more time for the transfer to complete. The same goes when sending multiple videos.
Troubleshooting AirDrop
Nine times out of ten, AirDrop works like a charm, but you might sometimes keep hitting the circle only to find nothing happening. The first thing to check is your Wi-Fi; both the Mac and the iPhone/iPad need to be on the same network.
Then, you should check the AirDrop settings and make sure that it’s allowed to send/receive files. On a Mac, press Cmd + Space, type AirDrop, and check the “Allow me to be discovered by” option. To do it on an iPhone/iPad, take the following path.


Settings > General > AirDrop > Everyone
Note: If everything looks good and you still cannot AirDrop, restart your Mac and/or your iPhone.
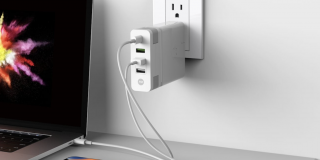
USB Cable
For the USB transfer to work, you need an additional piece of software. Most mainstream cameras like Canon, Fujifilm, GoPro, Leica, or Pentax work with the native iMovie software. It picks up on the camera’s flash drive and allows you to transfer videos and images.
Note: Cinema-grade professional cameras like Red or Arri Alexa require professional software, though the transfer is still done via USB cable.
Step 1
Connect your camera to the Mac via USB cable and then turn it on. In some cases, you might need to turn on the PC Connect mode on the camera. Otherwise, proceed to open iMovie unless the app launches automatically.
Step 2
Click or tap the arrow down icon to access the importing options. If there is no arrow down icon, select media from the toolbar, then click on Import. An “Image Capture…” window might pop-up; just x it away from the screen because you don’t need it.
Step 3

Select the Camera section in the Import sidebar and choose your camera. The videos and images will be displayed as thumbnails, which makes the selection/transfer much easier. Plus, you can preview a clip by moving the cursor right or left over the thumbnail.
Step 4
Now, it’s time to select the destination folder. By default, your videos end up in the iMovie Library and are named by the transfer date. If you want to change the name, click on the menu next to “Import to” and choose “New event,” then give your folder a new name.
Step 5
To import multiple videos, click/tap on each one while holding the Cmd key and choose “Import Selected.” If you want to import all of them, just select “Import All.”
As soon as you do this, a progress circle appears in the upper-right. The circle is white when the import completes, and the duration varies based on the number of clips, their format, and size.
SD Card
Older iMacs, as well as some MacBooks, feature an SD card reader. Take out the card from your camera, plug it into the reader, and your Mac should pick up on all the media. If the camera is using a micro SD, you also need an adapter for the card.
It’s worth noting that the card doesn’t go all the way in no matter if you’re using a reader or an adapter. Insert about two-thirds of the card and the software should immediately pick up on new media. Newer Macs don’t feature an SD reader, so you need to use an external dongle.
The important thing is to get an Apple or at least Apple-compatible dongle, but these don’t come cheap. Unless you are a professional videographer or photographer, it might be best to go with the iMovie method.
Third-Party Apps
A lot of third-party apps offer easy and quick video and media transfer and claim to work with multiple devices. However, we didn’t find any that are worth recommending. The best way to go is to use the software that comes with your camera or the native macOS options.
The Oscar Goes to…
Despite what you may have heard, it is very easy to transfer videos from a camera to a Mac. Most Macs come with iMovie preinstalled and the software recognizes all of the popular cameras.
What kind of videos do you shoot? Are you using your iPhone or a real camera? Tell us more about your preferences in the comments section below.