


How to Enable Parental Controls on Your Chromebook

At the beginning of 2018, Google discontinued its “Supervised User” program, which many parents used to keep track of their children’s actions while using their smart devices.
However, as a replacement, Google released a new innovative app called Family Link. This app offers similar features to the previous program, but has a bunch of other upsides.
If you want to enable parental controls for your child, you first need to set up the Family Link app. This article will help you with that.
Step One – Set Up a Family Link Account
The Family Link app allows you to observe and manage your child’s Chromebook activities.
Before you set up a Chromebook account for your child, you should download the Family link account on the device that you’ll use to manage and observe the child. You can download the Family Link app from the official website. Afterward, download the app on your Chromebook, too.
Keep in mind that you need an Android device that runs Android 5.1 or higher, as well as Chromebook with Chrome OS 71 or newer).
When you download the app, you’ll need to set up a “Parent” account, which should be your Google account. When you’ve done so, proceed with these steps:
- Select “Add” to add your child’s account.
- Tap “Yes” if your child has a Google account. Otherwise, you may tap “No” and you’ll be taken to the account creation window. Just follow the on-screen instructions. When you finish creating an account, you’ll be asked to find the device that you’ll control.
- Tap “Next.” You’ll get a nine-digit key.
- Open the “Google Family Link” app on Chromebook.
- Follow the on-screen process to set up the app.
- Type the nine-digit key when asked.
If you want to add multiple accounts, just follow the process again. You can create a separate parental control account for each of your children.
Step Two – Adding a Child Account to Chromebook
Now that you’ve set up Family Link on both devices, you need to add your child’s account to Chromebook. Whenever they sign-in to Chromebook with their account, you’ll have total control of their activities.
Here’s how to add the account:
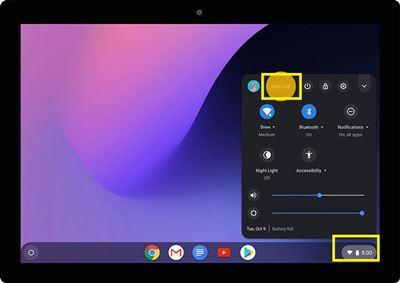
- Tap the time on the bottom-right of your Chromebook.
- Press “Sign out” to sign in from your account.

- Press “Add Person” on the bottom of the screen.

- Enter the credentials of your kid’s Google account (the existing one or the one you made during the previous step)
- Click “Next”.
- Press “Accept and continue”.
- Follow the on-screen instructions to finalize the account setup.

Tip: You need to disable guest mode and adding new accounts on the Chromebook device without your permission. Otherwise, your youngster may abuse these features and sign in to other, unsupervised accounts.
Parental Controls on Chromebook – What Can You Expect?
When you set up Family Link to Chromebook, you can track and manage all everything your child does on the device.
- You can block/allow the usage of any app.
- You can restrict all extensions in Chrome.
- Incognito mode (private mode) is disabled.
- You can allow Chrome to automatically block all websites with reported explicit, graphic, sexual, or other inappropriate content.
- You can restrict access to certain websites.
You may do all this through the Family Link app on your preferred device. The following section will explain the basics of parental controls.
Step 3 – Manage Your Child’s Activity
Google Family Link will allow you to manage most of your child’s activity. To access the parental control settings, you should:
- Launch the Family Link app.
- Tap your child’s profile.
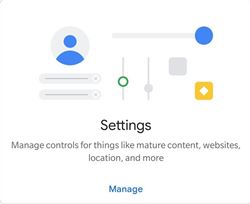
- Tap the “Settings” card.

- Select “Manage Settings”.


From here you can choose which websites your child can visit, and which websites you’d like to block. You may allow all websites, or tap “Manage websites” to manually block the website.
If you want to block certain apps, do the following:
- Follow steps 1-2 from above.
- Select the “More” icon under the “Apps installed” option.
- Select the app that you want to block/allow.
- Toggle the “Allow app” option on/off according to your preferences.
These are just basic parental control options. If you want to find out more, you may visit Google’s official support website for more Family Link tips. For example, you can also check your child’s browser history and request your approval if they try to purchase something on already installed apps.
Parental Controls Aren’t Teenage Controls
A major downside with Google Family Link is that it can’t supervise and manage accounts of children older than 13. Once they reach that age, they can request to remove Family Link connection, after which you won’t be able to manage the account anymore.
Despite that, this is probably the best available parental control tool. With Google’s good restriction policy and plenty of essential features, you’ll always be in touch with your children’s actions.
Would you add some other restrictions to Family Link app? Why? Share your thoughts in the comments section at the bottom of the page.


One thought on “How to Enable Parental Controls on Your Chromebook”