How to Enable Parental Controls on Windows 10

Setting up parental controls on your devices can help avoid a lot of problems. When kids are online without any control or supervision, it’s a recipe for a disaster. So much of readily available content is inappropriate and can confuse a young mind.
Plus, there are real dangers out there; you can never be too secure. If your computers at home run on Microsoft’s Windows 10, you might want to use that as a starting point when it comes to parental controls. There are lots you can do to cut out on excessive screen time and keep your children away from mature and dangerous content.
Screen Time
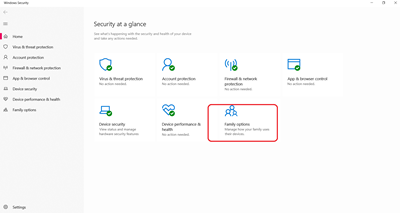
One of the main parental concerns when it comes to internet use, is just how time-consuming it is. It’s easy to get lost scrolling through social media or watching YouTube videos. You can set limits and make agreements, but sometimes you need help to make all of it a reality. Every parental setting from Windows 10 starts by going to Settings>Update & Security>Windows Security>Family Options>View Family Settings
This path will lead you to a Microsoft page where you can manage how your family uses their devices. When you’re there, you’ll be prompted to create a family group in order to access parental controls. If you want to set up the screen time limits for your child, this is what you need to do:
- Go to your family group and sing in with your Microsoft account.
- Select your child’s name and then select “Screen time”.
- In case you want to use the same schedule for every device in the household select “use one schedule for all devices”.
- In case you don’t want the same schedule for every device, scroll down and switch On/Off.
- If you don’t want to keep to the schedule but want to set how much time and when you allow your child to spend with their devices, select the row for each day.
- Type in the time you want and select “Add” then “Save”.
Block Inappropriate Websites
When you get the screen time under control, the next step is to ensure your kids don’t go wandering off into the wilderness that the online world can be. Certain websites are best not visited by children. And if you have some specific ones in mind, you can block them using the Microsoft family group.
You can only block websites on Windows 10, Xbox One, and Android devices running Microsoft Launcher if you use Internet Explorer and Microsoft Edge browsers. Here’s what you need to do:
- Sign in family group Microsoft account.
- Select your child’s name and then select “Content restrictions”.
- Scroll down to “Web browsing” and change “Block inappropriate websites” from Off to On.
- In case you want your child to only see websites you approve specifically, check the box next to “Only allow these websites”.
This can be an immensely helpful feature when your child needs online access to do their homework. You can ban certain websites and allow only those they need for their work. It helps them stay focused and keeps them safe at the same time.

Block Inappropriate Apps & Other Media
You can also block your kids’ ability to use certain inappropriate apps, games, and other media in Windows 10 by setting an age limit for content. This might not be ideal for older children, but it can work just fine for others. This is what you need to do:
- Log into your family group with your Microsoft account.
- Select your child’s name and then select “Content restrictions”.
- Go to “Apps, games & media” and change “Block inappropriate apps, games & media” from Off to On. Select the age limit for your child under “Allow apps and gamers rated for”
- Your child can request top use blocked app or a game and you can approve it by adding the app to the “Always allowed” list.
- In case your child downloaded something before you enabled these limits, you can still block it on the “Activity” page.
One of the awesome things about Windows 10 Family Options is that it lets you receive weekly activity reports from your children’s online activity. Sure, you might dread going over it from time to time, but it’s a useful tool to understand how much parental control you need to enforce in the first place. Just don’t let those reports overwhelm you.

Block Unauthorized Purchases
You must have heard horror stories about kids spending thousands of dollars in no time because of in-app purchases and online shopping. Sometimes it’s accidental, and sometimes it isn’t. Either way, if you want to make sure your bank account remains safe, it’s for the best to control what your child can buy online.
Windows 10 can help you make sure that your kids have asked for permission before buying anything. When it comes to Microsoft Store and all the wonders that cost money there, your approval will be necessary. Here is how you set it up:
- Log into your Microsoft family account.
- Select your child’s name and then select “Spending”.
- Select “Ask a parent”. Then change “Needs adult approval to buy thing” from Off to On.
- If you want to be able to approve or deny any of their purchasing requests, change “Email me when my child gets stuff” from Off to On.
You can also have access to their purchasing history and potentially get refunds for unauthorized purchases.

Windows 10 Is on Top of Things
There’s no perfect parental control. You can’t just let technology figure that out. Parents inevitably worry and get involved anyway. But it’s good to know that there are some things you can do with your devices to make it a little bit easier. All of which are new, and people are still figuring them out. The same goes for tech companies. And they do have a responsibility to participate. And Microsoft has done relatively well with Windows 10 parental controls.
Have you tried enabling parental controls in Windows 10 before? How did it work? Let us know in the comments section below.