Free Wi-Fi Analyzer On Mac OS X To Find The Best Internet Connection

Sometimes it’s common for Apple users Mac, iPhone and iPad to sometimes lose the Wi-Fi signal. The best way to fix losing your Wi-Fi signal on your computer, iPhone or iPad is to change the wireless channel your network is using to connect to the Internet. To figure out which is the best wireless channel to use to get a strong Internet connection, the WiFi analyzer Mac tool is great for those running any OS X before Mavericks. The new OS X release of Mavericks and Yosemite have seen this feature removed from the Wireless Diagnostics Utility. This will teach you how to open WiFi Scanner in OS X Yosemite and OS X Mavericks. The following will teach yo how to quickly get to the WiFi network analyzer on Mac for free.
For those interested in getting the most out of your Mac computer, then make sure to check out Apple’s wireless magic keyboard and mouse, external portable battery pack, and the Western Digital 1TB external hard drive for the ultimate experience with your Apple computer.
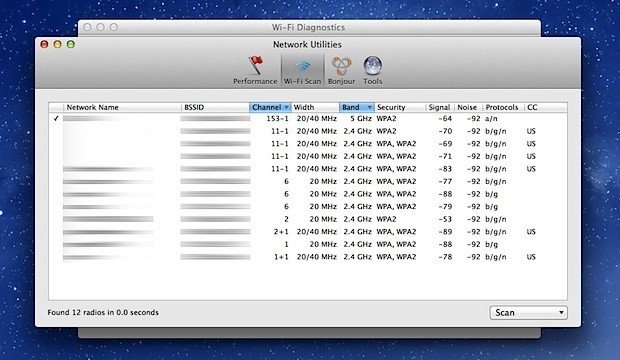
Mac OS X has a native WiFi analyzer tool that has many new features. A great new addition is the free built-in Wi-Fi scanner tool, that also has wifi stumbler to find and discover nearby Wi-Fi networks. You can look at the screenshot below for an example of the free Mac WiFi analyzer.
This feature is for advanced users who want to do more than finding a strong Internet connection. Instead other Mac OS X users may be better off not using the Wifi network analyzer and just use the Wi-Fi menu to find available wireless networks to join.
Get to Wi-Fi Diagnostics App:
// <![CDATA[
(function() {
var ARTICLE_URL = window.location.href;
var CONTENT_ID = 'everything';
document.write(
'’+’x3C/scr’+’ipt>’);
})();
// ]]>
- Open Finder
- Hold Command+Shift+G at the same time and type the path: /System/Library/CoreServices/
- Locate “Wi-Fi Diagnostics” (or “Wireless Diagnostics”, depending on OS X version) and drag and drop it into Launchpad or the OS X Dock for easy access
Now that you have the Wifi app in an easy to find location, using it is slightly different depending on your OS X version. Newer builds of Mountain Lion (10.8) changed it slightly, and those changes are reflected in OS X Mavericks (10.9) as well.
What to do if the app is called “Wi-Fi Diagnostics”:
- Launch Wi-Fi Diagnostics
- Hold Command+N to open the new “Network Utilities” window
- Select the “Wi-Fi Scan” tab to get started with the wireless stumbler tool
What to do if the app is called “Wireless Diagnostics”:
- Open Wireless Diagnostics
- Pull down the “Window” menu and select “Utilities”
- Select “Wi-Fi Scan” tab to summon the scanner and stumbler wireless networking
The Wi-Fi analyzer tool has a set default that will start scanning and displaying the found information. You can manually turn on Active Scan or Passive Scan mode to constantly search for new networks by clicking on the “Scan.”
You can use the wifi analyzer on Mac Yosemite, Mavericks, Mountain Lion and Lion for many different reasons. A majority of Mac OS X users use the wireless stumbler for optimizing networks or finding new network connections. You can also use the wifi network analyzer to monitor network traffic and send that data to your computer.
//