Google Authenticator is a super-handy app when you need an extra layer of data protection. Sadly, Google Authenticator is still only available on mobile devices, but alternative methods are available that utilize Google’s authentication protocol.

When it comes to two-factor authentication (2FA) codes, you have the Google Authenticator, or you have a third-party app that creates Google 2FA codes for apps or online accounts. These apps accept Google’s secret authentication code to serve up two-factor authentication (2FA). This process works for apps or online accounts that use Google Authenticator.
Other authenticator apps can manage authentication codes using an app’s 2FA setup code directly instead of using Google’s secret authentication code to create those 2FA codes.
Basically, Google Authenticator receives a scanned code from the app that is setting up 2FA, and then it produces a 2FA code to access the app or online account. However, since it only works on Android and iOS devices, it cannot work on desktop PCs directly. Therefore, you either add a desktop authenticator app that accepts 2FA setup codes from other apps and online accounts or let the third-party app handle Google authentication using Google’s secret authenticator code. Here are your options.
Copy Google’s Secret Authentication Code to a Third-Party Authenticator
Google’s secret authentication code serves as the doorway to creating 2FA codes that work with Google Authenticator, even though you use the code on a third-party app. Here’s how to obtain it.
- Go to your Google Account Security page, scroll down to the “Signing in to Google” section, then click on “2-Step Verification.”

- Verify it’s you by entering your login credentials. Choose the correct gmail account via the dropdown list under your name, then enter your password in the field provided. Click on “Next” to continue.

- Click “TURN ON” to enable two-step verification. If it’s already on, the button will say “TURN OFF,” so skip to Step 5.

- If you just turned on 2-Step Verification in Step 3, follow the prompts, including providing the phone information.
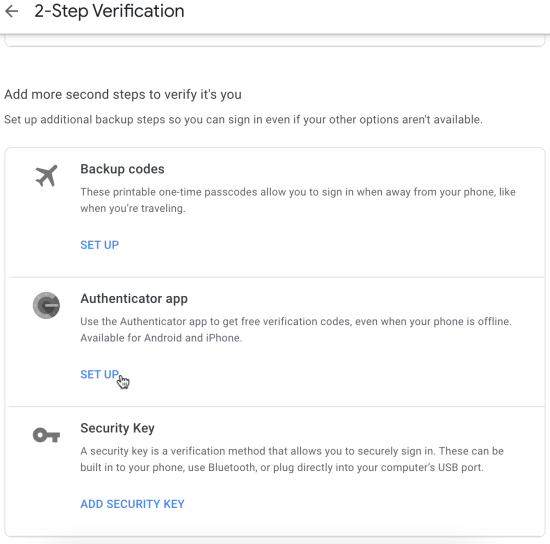
- In the “Authenticator App” section, click on “SET UP.”

- Proceed through the prompts until you reach the QR code scan. Click on “CAN’T SCAN IT?”
- Copy the secret authentication code that appears. You can paste it into Windows Notepad or Mac TextEdit in case the clipboard content gets lost in the next steps.
- Open your third-party authenticator and paste the code into the proper section where it asks for the Google Authenticator key.


By following the above steps to export your Google Authenticator secret code, you have the necessary information to set up your third-party authenticators.
Here are some third-party authentication apps that work with accounts or apps that use Google Authenticator.
WinAuth
WinAuth is one of many two-step authentication apps built for use on Windows PCs. The app is no longer updated (since 2017), but you can give it a try. For WinAuth to work, the Microsoft.NET framework is required. Here’s how to install and set up WinAuth.
- Once you’ve downloaded WinAuth, unzip the file and launch the application.
- Next, click on the “Add” button in the lower left corner of the application window.
- Select “Google” to use Google Authenticator.
- The Google Authenticator window opens. Insert your shared key from Google to obtain the TOTP (time-based one-time password).
- Go to your Google Account and open the “Settings” page.
- Enable the “Two-step authentication” option.
- Click the “Switch to app” button.
- Next, select your device.
- Click the “Continue” button.
- You will see a barcode. However, WinAuth doesn’t support these. Instead, click the “Can’t scan the barcode” link.
- Google will show you the secret key. Highlight the key and copy it.
- Head back to the WinAuth app and paste the key in section 1.

- Click the “Verify Authenticator” button in section 2. A one-time password gets generated.
- You should remember to name this authenticator if you have several Google Authenticator accounts.
- Copy the one-time password and head to your Google Account. Find the “Security Settings” page. Paste the password there.
- Click the “Verify and Save” button.
- Click the “OK” button once Google displays the confirmation window.

How to Use Authy on Linux, macOS, and Windows 10
Authy is a Google Authenticator solution for iOS, Android, Linux, macOS, and Windows operating systems. Yes, you don’t need a browser or a mobile device to use Authy—just the desktop app. Here’s how to set up Authy on your Mac or Windows desktop PC.
- Launch Chrome and download Authy.

- Select the download and choose “Open” or “Install.”

- On Mac, slide the app to the “Applications” folder in the window that appears. For Windows 10, skip to Step 4.

- On Mac, open “Launchpad.” For Windows 10, skip the Step 5.

- On Mac, double-click on “Authy” within Launchpad. For Windows, launch the app from your “Start Menu.”

- In Mac, Click on “Open” to confirm you want to launch the desktop app you downloaded. On Windows 10, skip to Step 7.

- In the “Twilio Authy Account Setup” window, click on the “Country box” and select your country from the dropdown options.

- Enter your mobile phone number and click on “Next.”

- Select “SMS” or “Phone Call” to receive your verification code.

- Enter the verification code sent to your mobile phone number.

- Authy returns to the main account window, displaying any currently retrieved two-factor authentication (2FA) accounts, if any.

- Click on “Settings” at the bottom, then select “General.”

- In the “Master Password” row, click on “Enable” if one is not already present.

- Enter your desired Master Password ih the field provided and click “Enable.”
- Confirm the Master Password by retyping it in the field provided, then click on “Confirm” to save it.
- You now have a Master Password established in your Authy account. Next, click the “+ icon” to begin adding the desired authenticator account.

- Authy currently does not read QR codes. Follow the desired app’s procedures to set up 2FA. Copy the ASCII code provided. Paste the code into the Authy code box, then click on “Add Account.”


If you completed the above steps in Authy to add 2FA apps or login accounts, they should now appear in your Authy account list. Authy on a desktop PC doesn’t work with QR codes because it can’t scan them. Regardless, the nice thing about Authy is that it doesn’t require a browser with an add-on extension because it is an actual desktop/mobile app.
While not perfect, 2-step verification (a.k.a., 2FA, or two-factor authentication) significantly improves your online security on any desktop computer, whether Linux, Windows 10, or macOS. Authy is an excellent alternative to being stuck with a mobile app or browser extension/add-on. Add the 2FA option to your desired app and then head over to your Authy app to set it up!
Related Posts
 How to Sum a Column in Google Sheets [Mobile Apps & Desktop]
 Remote Desktop Connection Not Working? Try This
 How to Use the Full Facebook Site for Desktop from Your Phone
 How to View the YouTube Desktop Site from Your Phone
 How to Install a Second SSD on a Desktop or Laptop
 How To Remote Desktop to Ubuntu From a Windows PC
Disclaimer: Some pages on this site may include an affiliate link. This does not effect our editorial in any way.


