Headphones Not Working – Windows 10
Many users prefer to use headphones when playing games, listening to music, and watching movies. But sometimes, headphones go silent out of the blue. This problem is especially prevalent on Windows 10 computers.
Luckily, there are many things you can do to fix the problem on your own. In this article, we’ll explore some of the most common solutions to this inconvenience. Please let us know if we left out something important.
Auto-Update Audio Drivers
When an audio device stops working, chances are that the drivers are out of date or they no longer work. So the first thing you should do is check the audio drivers and update them.
To keep your drivers up to date at all times, you should set them to update automatically. Here’s how to do that.
Windows
- Right-click the Sound icon in the system tray.
- Click the Sounds option in the pop-up menu.
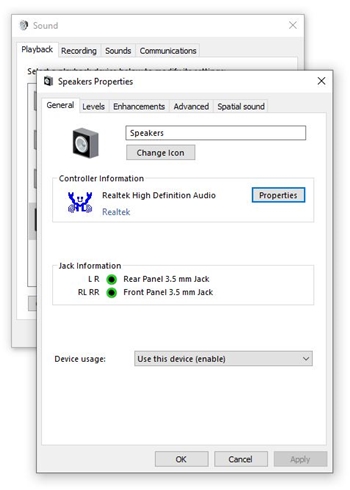
- When the Sound window opens, click the Playback tab.
- Select the Speakers/Headphones option, and click the Properties button at the bottom-right side of the screen.
- In the Properties Window, click the Properties button next to the High Definition Audio Device heading.

- In the General tab, click the Change Settings button near the bottom of the window.
- Navigate to the Driver tab.
- Click the “Update Driver…” button and let Windows update your audio drivers automatically.
Manually Update Audio Drivers
If you prefer to keep an eye on all of your system’s updates and installations, you can also update audio drivers manually. Here’s how to do it.
- Double-click the My Computer or This PC icon.
- Find the This PC icon in the list on the left side of the window. Right-click on it.
- Click the Properties option in the drop-down menu.
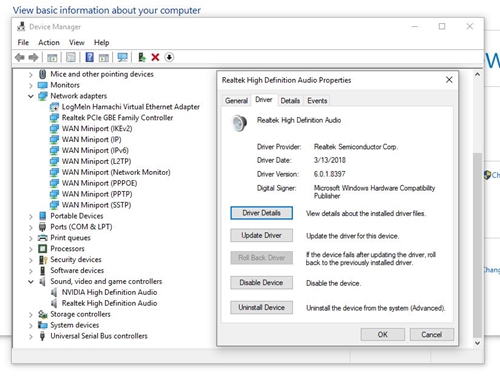
- Click the Device Manager link from the list on the left side of the System window.
- Expand the Sound, Video and Game controllers section.
- Right-click High definition Audio Device.
- Select Properties from the drop-down menu.
- When the High definition Audio Device Properties window opens, click the Driver tab.
- Click the Update Driver option.

- Next, pick the “Browse my computer for driver software” option.
- Choose High Definition Audio Device.
- Click the Next button.
- A warning will pop up, prompting you to confirm your choice. Click the Yes button.
Set the Headphones as Your Default Audio Output
In case there’s nothing wrong with the drivers and your headphones are still silent, you might want to try and set them as your default audio output. Here’s how it’s done.
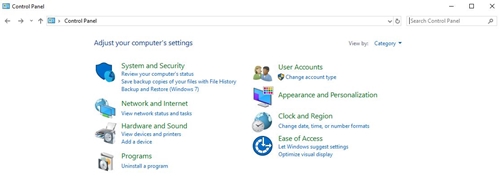
- Press together the Win and X keys on your keyboard.
- A menu will pop up. Click the Control Panel option. If it’s not on the list, click the circle next to the Windows logo and search for it.
- Once the Control Panel opens, switch to Category view.
- Click the Hardware and Sound tab.

- Click the Sound section.
- When the Sound window opens, go to the Playback tab.
- Select Headphones. In case the Speakers/Headphones option appears on the list instead, click on that.
- Click the Set Default button.
- Click OK.
Disable Front Panel Jack Detection
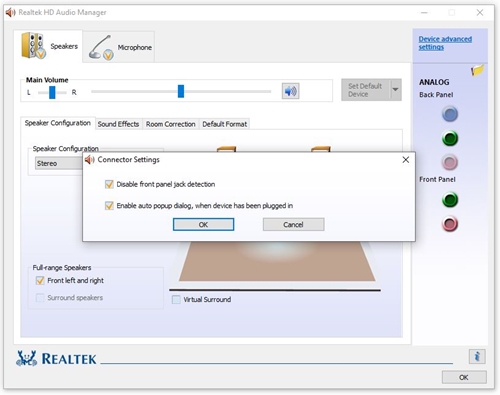
Many Windows computers have the Realtek HD Audio Manager app set as the default audio management option. Sometimes, the app can mix things up and speakers and headphones might stop working properly. To rule this out, you should disable front panel jack detection.


- Click the arrow pointing up on the far-right side of the taskbar.
- Right-click the Realtek HD Audio Manager icon.
- Click the Sound Manager option to launch the app.
- Click the yellow Folder icon on the right side of the window. It’s above the Analog label.
- Check the box next to the “Disable front panel jack detection” option.

- Click OK.
- Click OK once more to confirm the change and close the app.
Uninstall Your IDT Audio Device
In some cases, uninstalling the IDT Audio Device might fix a persistent problem with your headphones. Let’s see how to uninstall it.
- Press together the Win and X keys on the keyboard.
- Select Control Panel from the pop-up menu. If it’s not on the list, click the circle next to the Windows logo, search for Control Panel, and click on its icon in the results.
- When the Control Panel opens, switch to the Large Icons view.
- Click the Programs and Features tab.
- Find IDT Audio Driver on the list and select it.
- Click the Uninstall/Change button.
- When prompted, confirm your choice by clicking Yes.
- When the uninstallation process is done, reboot your computer.
Let There Be Sound!
Though comprehensive, the list of solutions offered in this write-up is by no means definitive. Have you ever had problems with headphones going silent on your Win 10 computer? How did you solve the issue?