How To Fix Samsung Galaxy S7 Black Screen Problem

Smartphones might be revolutionary tools, but they aren’t perfect. Like any computer, smartphones—like your Galaxy S7 or S7 edge—often run into bugs or other issues that can cause problems with your day-to-day usage. One of the most inconvenient problems: a lack of service from your phone to your carrier. Without service, you won’t be able to connect to the internet, send text messages, make phone calls, or use the phone to its fullest extent. For obvious reasons, this is a problem—what good is a phone without service?
The good news: it’s pretty easy to determine the cause of a lack of service on your S7 or S7 edge if you know what you’re looking for, and the solutions are easy to implement and test. With our guide, you’ll have your phone back up and running. So, without further ado, let’s take a look at how to fix a black screen issue on your Galaxy S7.
Reboot Your Phone
It’s a cliché, but the first step when you’re experiencing problems with your phone should always be the same: reboot the device . Though it’s a bit of a joke among the tech community—”Did you try turning it off and on again?”—rebooting any device experiencing issues or interruptions with day-to-day usage can help fix a number of issues. When you reboot your device, your RAM cache is cleared, and a misbehaving app might return to its normal function. So if your device is ever having problems with usability or connectivity, rebooting the device is one of the simplest and quickest fixes for your device.
Clear Your Cache Partition
Next up on our list of resets: clearing your S7’s cache partition. All in all, this is a fairly-technical procedure. If you’ve never wiped your phone’s cache partition, do proceed with caution and follow this guide closely. Wiping the cache partition of your S7 won’t wipe any user data or applications from your device. Instead, your cache partition holds any temporary data saved by the applications and software on your phone, allowing your phone to load app data faster. Unfortunately, this information can sometimes lead to problems or issues with your phone if something goes wrong with your cache. Clearing the cache partition should fix any minor issues with your device’s usability or connection.
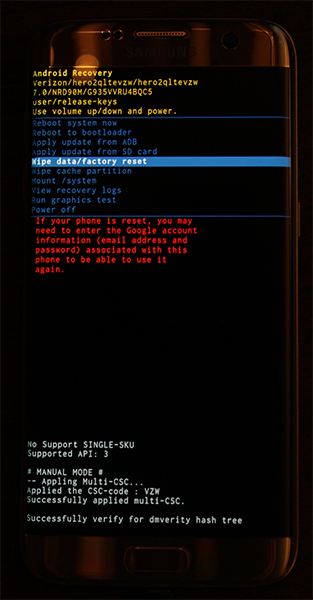
Start by powering your phone completely off. Once the device is off, press and hold the Home key, the Power key, and the Volume Up key. Once the words “Recovery Booting” appear at the top of your screen, you can let go of these buttons. A blue screen reading “Installing System Update” for up to thirty seconds; the display will then alert you that the system update has failed. This is normal, so don’t stress. Let the phone sit for another few seconds, and the display will switch to a black background with yellow, blue, and white text on it. At the top of your screen, the words “Android Recovery” will appear; you’ve successfully booted into recovery mode in Android. Using the volume keys to move your selector up and down, move down to “Wipe Cache Partition” on the menu.
In the picture above, it’s below the highlighted blue line—don’t select that option unless you want to wipe your entire phone. Once you’ve highlighted “Wipe Cache Partition,” press the Power key to select the option, then use the Volume keys to highlight “Yes” and the Power key once more to confirm. Your phone will begin wiping the cache partition, which will take a few moments. Hold tight while the process continues. Once it’s complete, select “Reboot device now” if it isn’t already selected and press your Power key to confirm. Once your phone reboots, play around with the device for a few minutes to ensure your black screen problem is gone. If not, it’s onto our final troubleshooting attempt.
Factory Reset Your Phone
As with most troubleshooting, the final step to fixing your device often involves a full factory data reset of your phone. While this isn’t a fun process by any means, it’s also a common method for fixing software-based issues with your Galaxy S7.

Before completely resetting your device, however, you’ll want to back your phone up to the cloud, using a backup service of your choice. Some recommendations: Samsung Cloud and Google Drive work best with your device, but if you’re interested in using something like Verizon Cloud, that will work too. You can also use apps like SMS Backup and Restore and Google Photos to backup your SMS messages, call log, and photos to the cloud. You can also transfer important files or information to an SD card installed in your device; factory resets don’t clear your SD cards unless you check a specific setting.
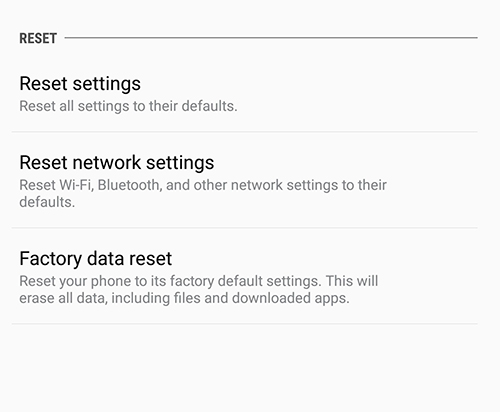
Once you’ve backed your files up, open your settings menu and select “Backup and Reset,” found under the “Personal” category in the standard settings menu and under “General management” on the simplified layout. This time, select the third reset option, “Factory data reset.” This will open a menu that shows every account you’ve signed into on your phone, along with a warning that everything on your device will be wiped. As mentioned above, your SD card will not be reset unless you choose to select the “Format SD card” option at the bottom of your menu; whether you want to do so is up to you, but it isn’t necessary for this process. Before selecting “Reset phone” at the bottom of this menu, make sure your phone is either plugged-in or fully charged. A factory reset can use a large amount of power and can take upwards of half an hour, so you don’t want your phone dying during the process.
Once you’ve confirmed your device is either charging or charged, select “Reset phone” at the bottom of your scree, and enter your PIN or password for security verification. After this, your phone will begin to reset. Let the device sit and complete the process; don’t mess with your S7 during this time. Once the reset is complete—which, again, can take thirty minutes or more—you’ll be booted to the Android setup display. If the factory reset has worked, you shouldn’t have any remaining issues with your display.
If you’re still having issues with your device, you’ll want to consider reaching out to Samsung or your mobile phone carrier for a replacement device.