How To Speed Up Your Android Phone [December 2020]
![How To Speed Up Your Android Phone [December 2020]](https://www.techjunkie.com/wp-content/uploads/2017/06/bannerslowandroid-1280x720.jpg)
As with any computer, Android phones have the unfortunate habit of growing slower with age. For the first few months after you take your phone out of the box, everything is great—apps load fast, cached data is easily accessed, and loading everything from local files to games to apps is done in the blink of an eye.
But, over time, your device naturally grows slower, and that feeling of shiny new tech begins to wear away. Your phone’s RAM becomes oversaturated with apps both used and unused, and those same apps take up more and more room on your phone’s internal storage. Meanwhile, you store thousands of photos, videos, and screenshots saved on your phone, and after a while, loading anything, from a web page to pulling up your email can take an excruciatingly long amount of time.
If this is happening to you’re phone, you’re not alone. Fortunately, there are simple solutions to get your phone running properly again.
Quick Fixes
Your phone might be acting slow, but that doesn’t necessarily mean you need a multiple-step process to fix the issues causing the slowdown. Sometimes, the simplest solution to your problems is also the correct one, so we’ll start by taking a look at some of the easiest ways to fix the speed of your phone or tablet.
Restart Your Phone or Tablet
Yes, this is an obvious tip, but you’d be surprised how long people go without restarting their phones, tablets, and other Android devices. Hardware running Android requires the occasional restart, just to cycle out applications running in the background of your device.
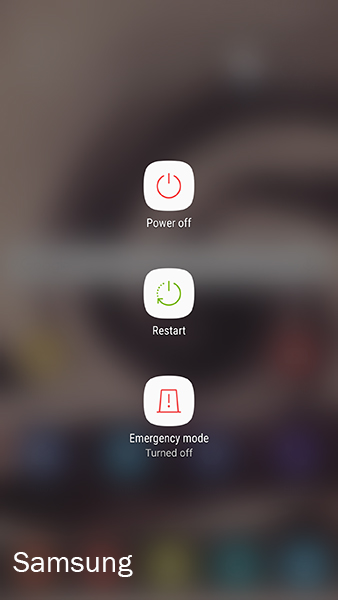
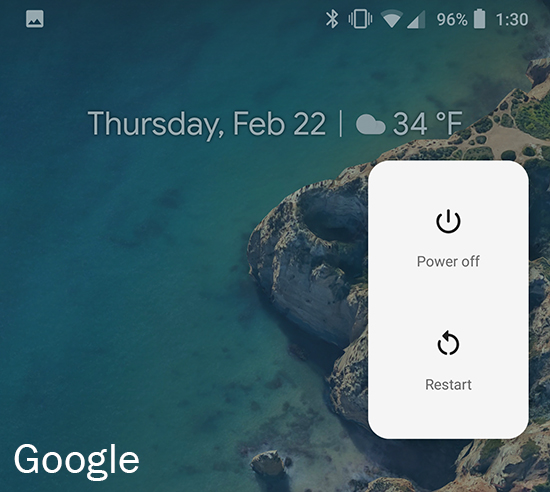
On most Android phones a restart can be accomplished by holding down the power button and selecting “Restart” from the popup menu; if your phone doesn’t have a restart option, simply power off your device and then power it back on.
For the best performance on older devices, let your phone sit for a few minutes after rebooting; typically, startup applications can slow down your device while everything initializes. Newer phones like the Pixel 2 XL, however, should be up and running in no time.
Uninstall Unused and Outdated Apps
Unused apps remain untouched on your phone, updating data, and checking for updates without your knowledge. While it might seem okay to leave that couponing app you downloaded around the holidays on your phone, the truth is, it’s probably best that you dump it, unless you use it every day.
A lot of us might like to think we keep our phones clean and clear of all unwanted or unused apps, but even the most tech-savvy of us have a couple of apps on our devices that we don’t use anymore.
If you aren’t sure what you’ve got hidden on your phone or device, newer versions of Google’s Play Store make it pretty easy to check which apps have and haven’t been used in a while.
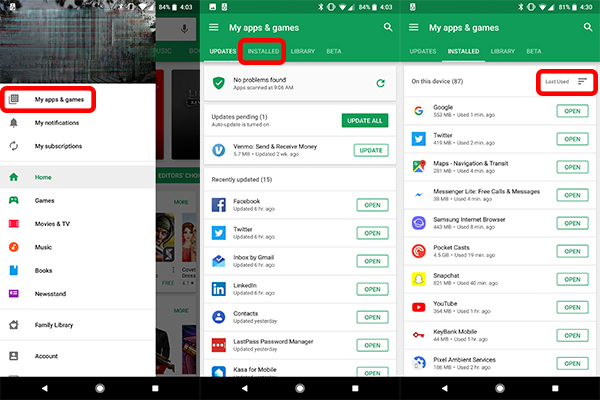
- Open up the Play Store from your app drawer or from your home screen, and slide the left menu open (or hit the menu button in the top-left corner).
- At the top of the menu, hit My apps and games to open the list of all your apps. By default, this page opens on your recently-updated apps—however, we need to view your installed apps.
- Swipe to the right or select the Installed tab from the top of the menu. Google Play will display every app you have installed on your device, along with sorting options shown off to the right of your device. Typically, Google Play shows this in Alphabetical mode but we want to select Last Used, which will show your apps from most-recently opened to least-recently opened.

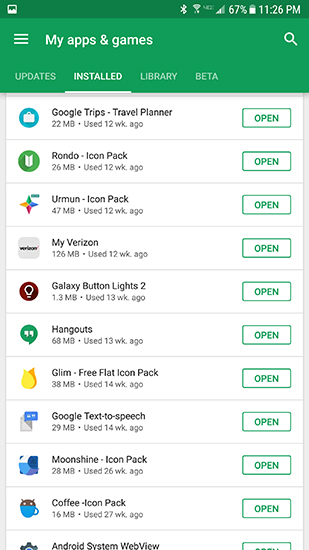
From here, you can view the apps most recently used by your device. As you scroll you’ll notice more apps than you originally thought.
Some of the apps at the bottom of your list might be system apps that can’t be uninstalled, and don’t worry, we’ll cover those further down this list.
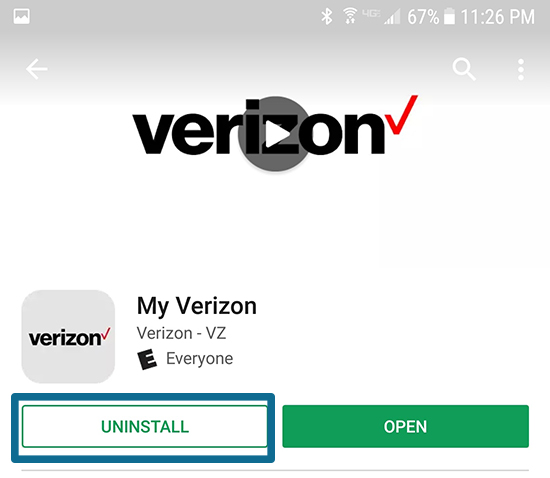
When you find an app you don’t want to keep installed on your device, tap on the application name in your menu. This will bring up an option at the bottom of the screen to open or update, but simply tap the name one more time, then hit “Uninstall” on the app page inside Google Play.
Continue uninstalling any apps you feel comfortable removing from your device. You’ll be surprised how many apps on your device go unused for months on your phone, especially if you’ve had your phone for more than a year.
Disable Unused System Apps
Even though Android manufacturers (and, to a lesser extent, carriers) have scaled back their inclusion of bloatware in the more recent versions of Android, it’s still a problem on Google’s operating system. And unless you’re running a Nexus or Pixel device—and, in some cases, phones from Motorola and OnePlus—you probably have a decent amount of bloatware on your phone.
This could be pre-installed apps, system applications, or your carrier’s sponsored apps.
Luckily, most system apps not required by the operating system to function can, at the very least, be disabled within your system settings. A disabled app will still take up space on your phone, but it won’t run in the background, saving your phone from the toll of too-many system apps using your phone’s CPU at once.
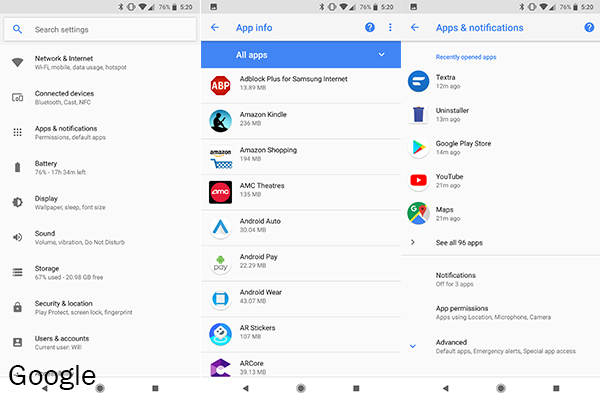
To disable pre-installed applications on your device, head into your settings menu either by using the Settings icon within your phone’s app drawer or by accessing the Settings shortcut from the quick settings at the top of your notification tray. This screen may look different, depending on which device you have, but the process will be largely the same.
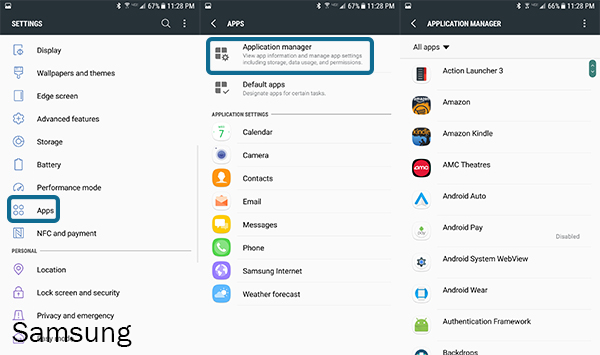
Scroll down your settings menu until you find “Applications” from the list of settings. Depending on your version of Android and your phone’s manufacturer, this menu might also be called “Apps.”
Once you’ve opened this menu, tap “Application Manager” from the top of the list (or simply tap ‘Apps’ for some Android devices), and you can view every app installed on your phone. System apps, or at least the ones required to run Android, will be hidden away from the user, but can be easily revealed by tapping the triple-dotted menu icon in the top-right corner of the screen and selecting “Show system apps.”
Most of the apps hidden under this menu won’t be able to be disabled by default, so you’re better off leaving these apps alone anyway.
While we’re viewing that menu, it’s important to note a few other selections for sorting our apps. Our system apps list is sorted by alphabetical order (as we saw above in Google Play), you can also sort by both size and memory usage. Sorting by size doesn’t matter too much for our current goal of speeding up your phone, but it’s good to know you can do this in the future if you’re looking to free up room on your device.
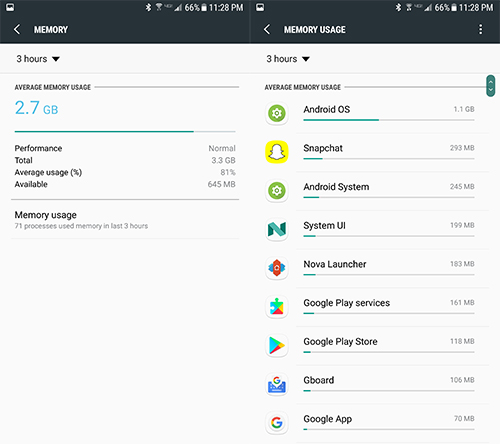
What’s more interesting to this guide is the ability to sort by memory usage (Samsung only; our test Pixel 2 doesn’t seem to have this option). Just tap “Memory,” and then tap “Memory usage” to view the apps using up your memory.
Unsurprisingly, you’re going to see Android OS and Android System at the top of your device, but look through your list of apps and see if anything is using up more resources than it should be.
Apps like Snapchat and Facebook are notorious for being memory hogs, so if you don’t use them often—or you can live without those apps installed on your device—you might want to consider uninstalling them.
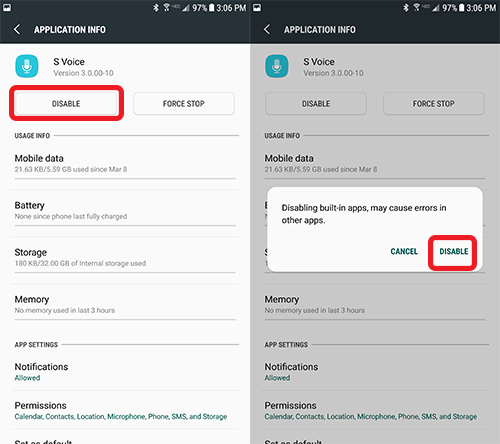
To disable apps on your application manager, you’ll want to find and select the app you wish to disable. We don’t have any specific suggestions since each phone includes different included applications, and what you use in your daily life is up to you. On our test device, we disabled apps like Slacker Radio and NFL Mobile—apps that couldn’t be uninstalled, but we had no use for them.
Just find the app you wish to disable, tap the “Disable” button at the top of the display,” and confirm “Disable” upon the pop-up warning about errors in other apps. Though the app will still take up room on your phone’s internal storage you’ll be satisfied to see that the app no longer can update, push notifications, or run in the background.
Clear Your Cached Data
Another app-centric trick, one well-known to the Android-enthusiast community, is clearing your cache. This simple process can help boost your performance on Android by cycling and cleaning out any cached data leftover from unused or rarely-used apps, as well as system apps that can’t be uninstalled from your system.
Most apps manage their cached data well enough, knowing when a cache-clear will be necessary for the system to continue running at a smooth and steady pace. Some applications, however, have absolutely no self-control and this can create some serious speed problems on Android.
So, to clear our app cache, we’ll want to head back into our system settings menu, and this time look for “Storage” along with our menu settings. If your phone uses an external storage option, like a microSD card, make sure you select “Internal Storage.”
Once your phone has fully loaded the menu displaying the list of apps using system memory, we want to find our “Cached data” option. This is typically listed towards the bottom of the display. Tapping this option will bring up an option to clear cached data for all of your applications.
Though you can clear your cached data on an app-by-app basis, this will wipe all your cached app data in one swing, making it much easier and faster than going through and individually selecting every single application on your device.

It’s worth noting that some devices, including Google’s newest phones, the Pixel 2 and Pixel 2 XL, lack the option to clear cached data for all apps all in one go like this. Instead, you’ll have to rely on using the All Apps menu to manually clear out content from your device as need be.
Other Miscellaneous Tips
Not everything fits neatly into a category like our suggestions above, so if you’re still looking for some quick fixes for your phone’s speed problems, try some of the following:

- Open the Recent Apps menu on your phone by hitting the square icon at the bottom-right of your navigation bar (for Samsung phones prior to the Galaxy S8, it’s the left hardware button). Swipe away all your recent applications to clear them from your memory.
- Try clearing some of the widgets kept on your phone if you don’t use them very often. Widgets can use up unnecessarily large amounts of RAM on your device, and most phone owners only use widgets on occasion.
- Check the speed of your SD card. If you’ve moved a lot of your apps over to the SD card, but you’re running on an older style of card, it might be too slow to reliably play files or load apps and games from the card.
Advanced Options for Speeding Up Your Phone
Everything we talked about above is good and all, but at the end of the day, they’re all temporary solutions to a major problem with Android. It isn’t a perfect operating system, and especially after a couple of years of system and security updates, things can start to feel a bit slow.
As with most problems on Android, there are really only two solutions to every problem on Android: clearing your cache partition, and wiping your phone entirely clean. And while clearing your cache partition is a fairly simple solution to speed up your phone, we really only recommend wiping your phone clean if the above steps didn’t help fix your speed problems.
Clearing your Cache Partition
We start by clearing the cache partition on your phone, which is a bit similar to clearing your app cache as we did above. Clearing the entire cache partition can iron out some of the problems often caused by an app or system software update, without the drastic measures of completely wiping your phone (don’t worry—we’ll get there).
While simple, clearing your cache partition does involve booting into your phone’s recovery mode, which can be daunting for those users new to smartphones or boot menus. Don’t stress too much though—we’ll walk you right through the boot process.
This process varies depending on the Make and Model. Most phones use the Volume Up and Power buttons, held down at the same time, before pressing the volume down button on the boot screen to access the recovery menu.
For phones like the Galaxy S6 and S7, using a combination of the Home, Power, and Volume Up keys do the same thing. Like we said, search for your specific phone and the phrase “boot into recovery” on Google to ensure you have the right steps; once you’ve reached the recovery menu itself, these steps will apply to every phone.
Newer phones that do not have a home button will have a combination using the Bixby button.
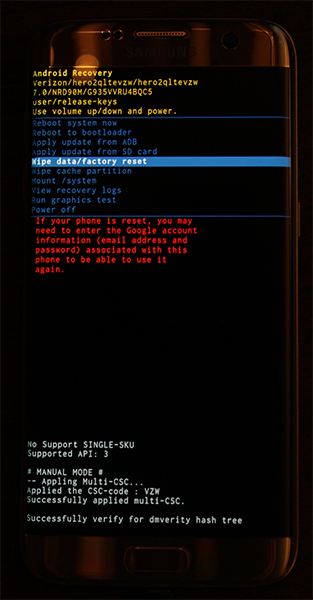
After your phone has reached the boot menu—which will look something like the display in our photo above—you won’t be able to use your touchscreen to control the menu on your display.
Use your volume keys to scroll the blue highlighted line down to “Wipe Cache Partition” on the menu above. Once you’ve selected “Wipe Cache Partition,” hit the Power button on your device to select the option and then use your Volume keys again to select “Yes” on the confirmation screen.
Hit Power to confirm your selection, and your phone will begin wiping the cache partition. This doesn’t wipe your storage or your SD card, so every application and photo will be safe on your phone. Once the process is complete, select “Reboot Device Now” on the following screen, and hit Power to confirm.
Just like with a reboot, give the phone a few minutes to sit and reboot its main processes, then try using the phone to see how fast or slow it feels in your hand.
Changing the Animation Speed on Your Phone
Sure, the hardware powering your phone determines how fast apps and games load on your device, but to an extent, the software also has a major impact on our daily experience. Companies like Google and Apple build their operating systems with a sense of fluidity and animation designed to make things look good, but sometimes overuse of animation can cause your phone to feel slower than it really is.
If you’ve owned your Android device for a few months now and you’re rather tired of all the animations and the slow transition times between apps and programs on your phone, you can use the developer options inside Android to change the speed of your phone.
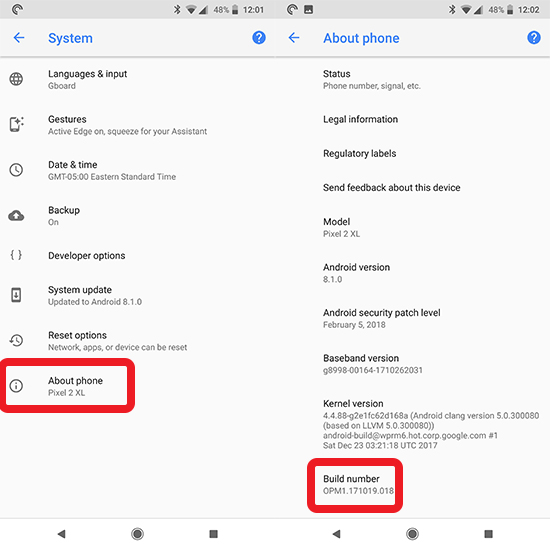
To start, scroll down to the System menu in your Settings and select “About Phone.” Find the ‘Build Number’ of your phone’s software inside the settings menu and tap on it seven times to activate the developer settings on your phone.
Head back to the main menu inside Settings and reselect “System.” Inside the System menu, a new option labeled “Developer options” will appear, with two brackets as the icon.
Inside the Developer options menu, you’ll find a large list of menu options, almost all of which you should leave alone unless you’re working on actively developing apps for Android.
By far, this is the longest menu in the settings menu in Android, and it is filled with plenty of options that can totally screw up your device if you aren’t careful. This is why the menu is hidden by default on Android.
Still, we don’t have much to do here except finding the correct options for our device. Scroll through the list of options until you find the animation scale settings—they’re under the “Drawing” category or use the search bar within settings to locate it.
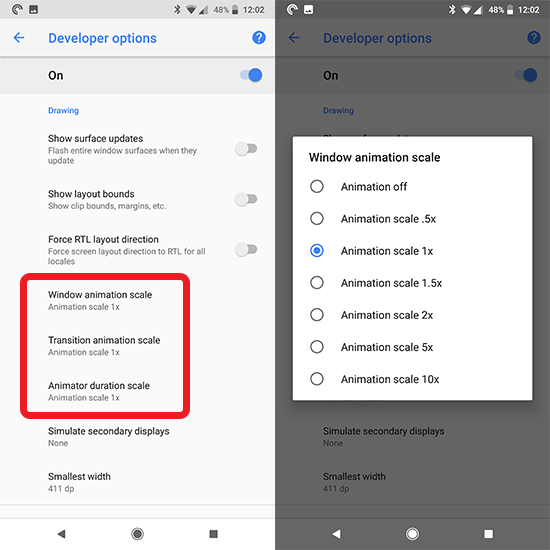
You’ll find three animation scales here: Window Animation Scale, Transition Animation Scale, and Animator duration scale. All three, by default, are set to 1x, which is the default setting for animations and generally strikes a balance between flashiness and usability.
Tapping on any of these options will display options to change the scales from 1x to something faster or slower. If you want to keep the animations on your device, but want them to speed up (recommended), set all three scales to .5x. If you want to eliminate the animations altogether, you can turn off all three animations.
To test the speed before deciding to keep a change, try tapping on home, then tap on the recent apps icon, and select settings. The difference in speed will be readily apparent in these animations, giving you an idea of how each option changes your device.
The other options, from 1.5x to 10x, will slow down your device’s animations. These aren’t recommended, especially once you get up to the higher numbers (though it is pretty funny to watch your device run on 10x animation speed, where everything moves in literal slow-motion.
Overclocking (Root Only)
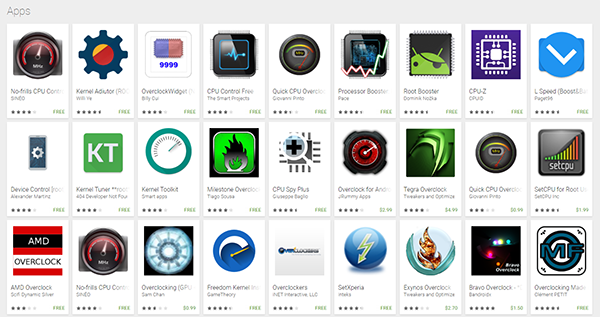
We won’t be covering this in detail, but if you happen to have a phone with root access and an unlocked bootloader, you can take advantage of these features to completely change the power of your phone. Overclocking is the process of raising the clock speed of your processor, in order to gain some extra performance from your CPU.
It’s typically referred to in the PC enthusiast market, but rooted Android devices have long had the power to boost their processor speed as well. Some custom ROMs allow for overclocking, while third-party apps also exist on the Play Store to increase your speed.
If none of these words made sense to you, it’s probably best to leave this option alone. Frankly, we don’t recommend overclocking your phone unless you absolutely think it’ll make a massive difference in your everyday usage. Overclocking doesn’t add a ton of increased speed to your processor, and what you make up in speed, you lose in battery efficiency (not to mention, you’re likely to feel your device get pretty warm).
If you’re interested in learning about overclocking on Android, you can find a 2015 guide from XDA Developers on that here, and our guide to rooting Android devices here.
Factory Resetting Your Phone
As with most troubleshooting guides, the best way to fix any software problems with your phone is a complete factory data reset. We understand this is typically preserved as a last resort—while it is one of the most effective troubleshooting routes, it also comes with the annoyances of having to fully backup and restores your devices, spend time reinstalling applications, music, photos, and everything else you keep on your device.
If the above tips aren’t helping, and your phone has become completely unusable, your best bet is moving forward with a full factory reset.
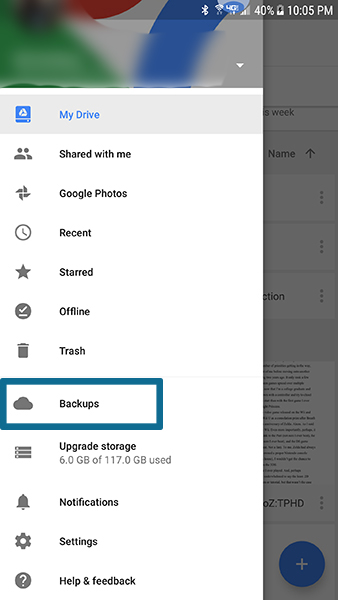
Start by backing your phone’s settings, apps, photos, and everything else up to the cloud, using the service of your choice. Google has its own backup service built into Google Drive, but there are a ton of other cloud services to choose from, including Samsung Cloud, Helium, and CM Backup. For photos, we recommend using Google’s Photos backup service—it’s one of our favorite photos apps out there—and for SMS and call logs, check out SMS Backup and Restore on the Play Store.
Open your phone’s settings menu and find the “Backup and Reset” menu. Depending on your version and manufacturer of Android, these settings may be found in a different section of Android, so if you’re having trouble, just use the built-in search function inside settings.
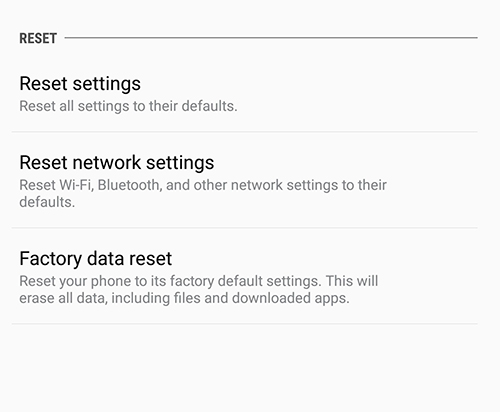
Once you’ve found the reset options, select “Factory data reset” from the list of options. The following menu will display every account you’ve signed into on your device, along with a warning reminding you that everything on your device—apps, etc.—will be wiped clean. The one thing this won’t wipe clean is your SD card unless you select “Format SD Card” at the bottom of this menu.

We suggest making sure your device is either fully charged or plugged in before beginning the resetting process; it’s a fairly battery-intensive process, and this is certainly a situation where you don’t want your phone dying before the process has finished.
Once you’re sure you have enough battery power to start the data reset, hit “Reset phone” at the bottom of the display, and enter your PIN or password for security verification. After you’ve done this, your phone will begin to reset. Just let the device sit and complete the process, which can take upwards of thirty minutes, and often involves a few restarts along the way.
Once the reset is complete, you’ll be returned to the original setup process for your phone. It might take a day for your phone to settle down after the reset, but once it does, you should see dramatically better performance in both speed and memory consumption. We advise slowly reinstalling the apps on your phone, and see if any of them create the same memory problems you had before. You might want to keep those specific apps off your phone in order to improve performance along the way.
One Last Tip on Your Phone’s Hardware
Most users accessing this guide are probably using relatively new smartphones, but if it’s been a while since you upgraded to a brand new device, you might want to consider doing so.
Newer phones have more RAM and CPU power, even low and mid-range phones shipping with 3 or 4GB of RAM. Plenty of older phones only use 1 or 2 gigabytes of RAM, which, in many cases, simply isn’t enough memory to keep the device moving at a fast pace with the number of applications and data used today.
We understand this isn’t a great point of advice for everyone—and we don’t want to pressure a reader into feeling like their phone needs to be replaced since even low-end models often run a couple of hundred dollars off contract—but if you can afford to drop the cash on a new model, 2019 has been a great year for phones.
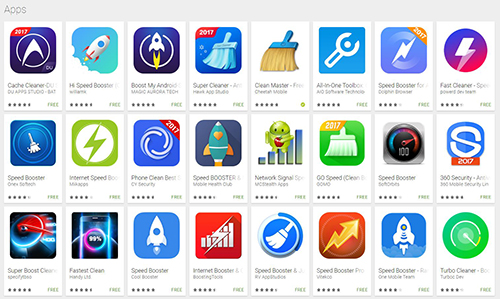
What You Shouldn’t Do
This might sound like a strange suggestion, but we don’t recommend using any of the “RAM” or “Speed Booster” apps you can find on the Play Store. While these used to be great utilities to access back in the early days of Android, these days they’re more of a hassle for your phone than anything else.
Android is pretty good at handling its RAM management since the days of Froyo and Gingerbread, with the operating system coming into its own right around the release of Android 5.0 Lollipop and, to a lesser extent, 6.0 Marshmallow.
The fact of the matter is, these apps just aren’t necessary for this day and age—in fact, they’re a hindrance to your phone.
When you use a RAM clearing or “speed-boosting” app on Android, all it’s doing is cycling out the applications loaded into your RAM for Android to access quickly. While this might present a quick speed boost at the moment, Android is smart enough to simply reload the apps into your device’s RAM again once it needs access—probably within a few minutes of you clearing the apps in the first place.
They don’t present any advantages over simply letting Android do its own thing and clearing apps from your own Recent Apps menu, and can often harm your device’s battery life in the process. Needless to say, stay away from these apps if you can.