How to Speed Up Your Mac [February 2020]
![How to Speed Up Your Mac [February 2020]](https://www.techjunkie.com/wp-content/uploads/2016/08/home-office-593383_1280-1280x720.jpg)
After a while, your Mac may seem to become sluggish or bogged down. Is it taking longer for programs to load, are applications freezing up, or are they becoming unresponsive? It can happen over time—or perhaps your Mac’s resources aren’t being utilized properly because things are running in the background that shouldn’t be.
There are some steps you can take to revive your Mac’s speed and performance levels that you may not have even thought about. That’s where we come in—we have some tips and tricks to share with you to get your Mac back in tip-top shape.
Find out what apps are Taking up the Most System Resources
A good first step is to find out what applications are taking up the most system resources and what’s running that does not need to be running. The Activity Monitor will show you resource usage in five categories: CPU, Memory (aka: RAM), Energy, and Disk. You’ll want to check each of these in turn monitoring for several minutes.
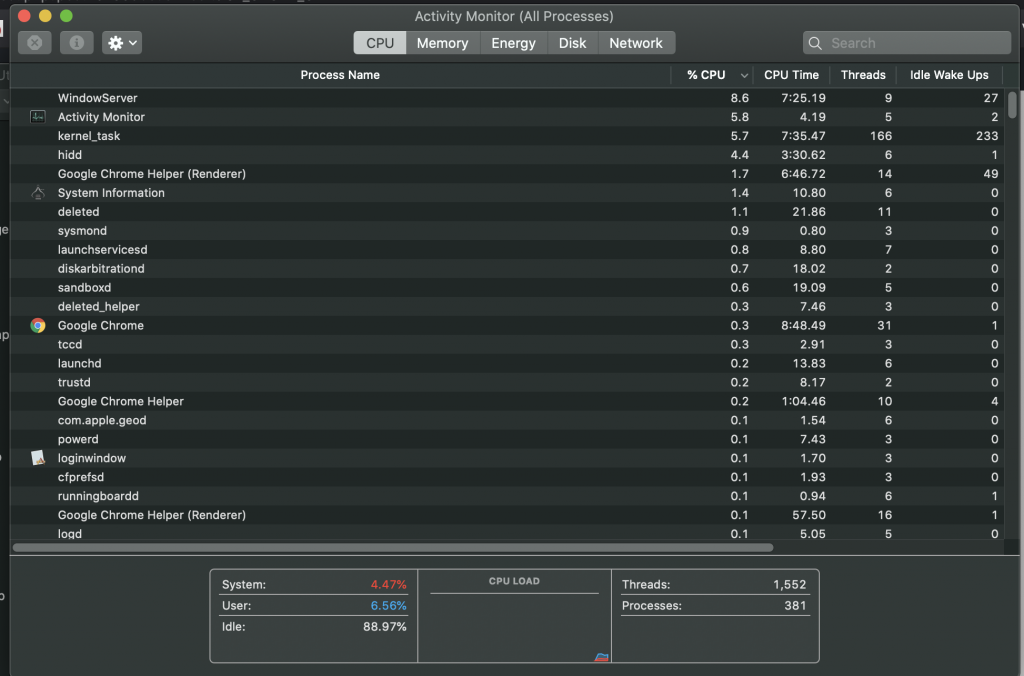
The output of the Activity Monitor can provide you information about what apps are taking up resources, which can help you make decisions about next steps such as deleting applications, removing apps that launch on startup, and so on,
Once you’ve reviewed the activity monitor, start taking some actions to reduce the load on your Mac to see if that speeds things up, starting with HardDrive space.
Check Your Hard Drive Space
It may or may not be obvious to you, but the fuller your hard drive becomes on your Mac, the more that can have an effect on its performance. If you want to check how much disk space you’ve got and how much is being utilized, do this:
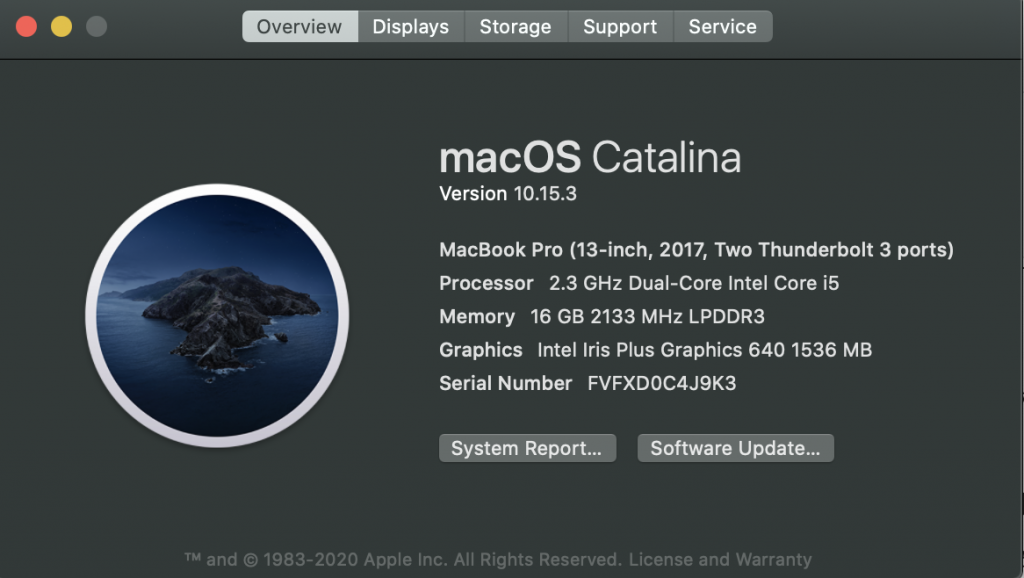
Click on the Apple symbol in the upper left-hand side of your display. Then, select “About This Mac.” 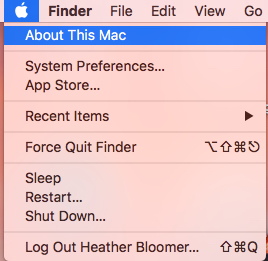
This will show you a popup with five options: Overview, Displays, Storage, Support, and Service.
Click the Storage tab for a graphical view of how you’re using your Mac’s storage.
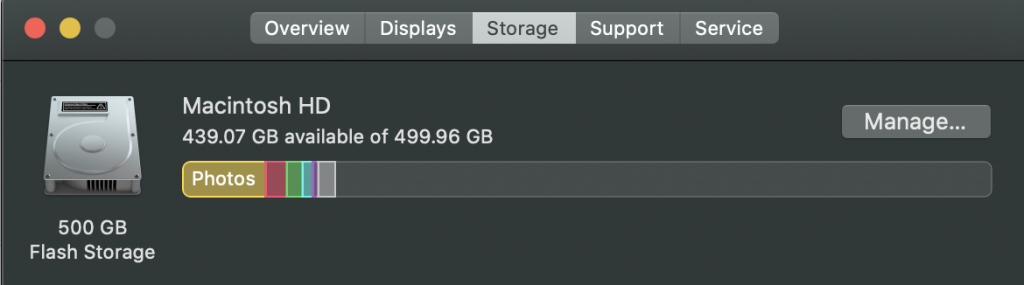
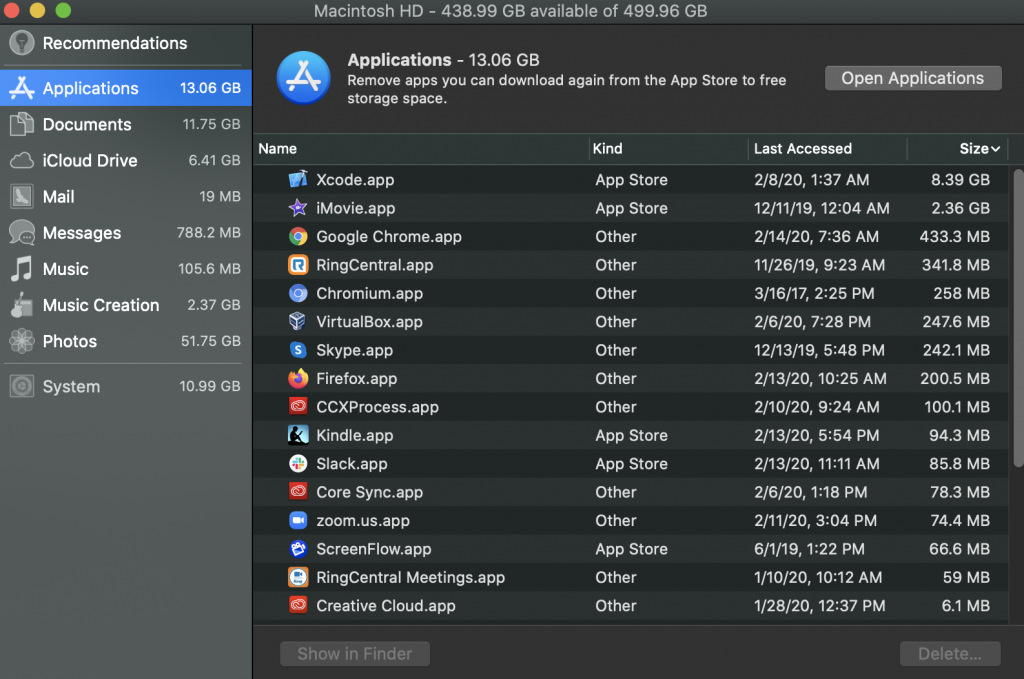
This report on how you are using your Mac’s storage can help you make decisions on what files and applications you don’t need to be storing on your Mac. You could move these files to iCloud and delete any applications that you do not need.
If you’re starting to run a bit low on storage space, you can remove programs, applications, and files that you no longer need to be stored on our Mac hard drive. This should give us back a little more speed and impact our system overall, in a good way. You can outright delete files or you can store them on iCloud or some other cloud storage solution or even an external hard drive. Many people find that videos and photos take up massive amounts of space.
Manage Your Storage
Go back to “About This Mac” and Storage then click on Manage…
This will give you options for freeing up disk space by enabling you to manage Applications, Documents, photos, and so on. Manage also enables you to turn on iCloud preferences.
Manage is essentially a short cut way to manage disk space rather than manually doing each of these separately. Starting with Applications then Documents, then Photos you can clear out items that you do not need to store on your Mac or that can flat out be deleted.
iCloud Storage Preferences
One of the options under Manage is iCloud, which is Apple’s iCloud storage solution that works very well with Mac’s and other Apple devices such as iPhones and iPads. While iCloud is mostly for backing your Mac up, iCloud can be used to store things like photos and videos to save on disk space on your Mac.
iCloud can backup files that you have stored on your hard drive or you can store files, photos, videos, etc., on iCloud instead of your hard disk.
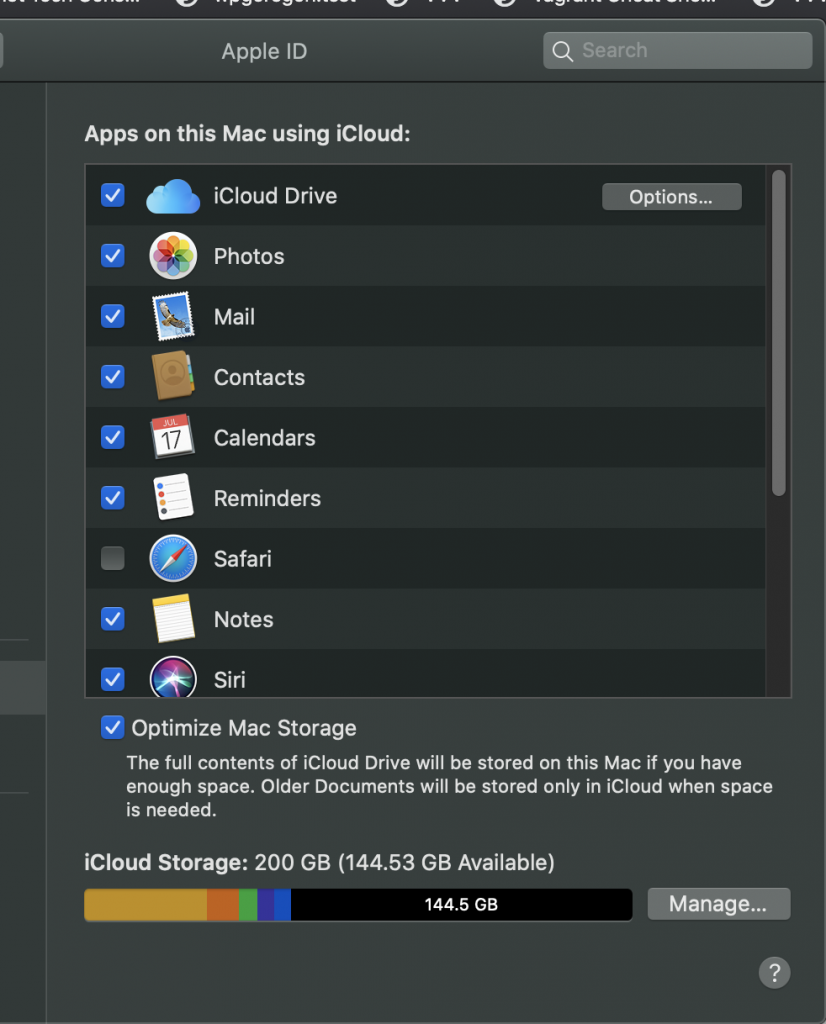
Next, click on Options to get more granular on your iCloud storage by checking boxes next to items you want stored on your iCloud.

To get to your iCloud account web interface go to iCloud where you can see and manage things you have stored there such as email, photos, etc., and you can use useful tools such as “find iPhone” assuming you have “find iPhone” turned on in the settings of your iPhone.
If you need more iCloud space, you can upgrade from the free service tier to one of the paid tiers that come with more disk space than the 5 GB free tier.
Here’s a summary of what iCloud backs up, see this Apple Knowledge Base article about what iCloud backs up.
Keep your macOS Up-to-date
A good thing to do is keep your Mac computer up-to-date, especially with operating system updates. When updates for the OS are released, they usually address bugs and security issues and provide more stability for your Mac. To check for OS updates on a Mac, you can follow these steps:
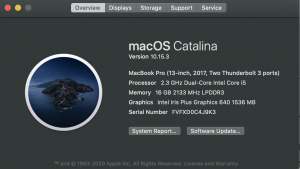
Click the Apple icon in the upper left-hand corner of your Mac’s screen and make sure the Overview tab’s selected. You’ll see your macOS version and two buttons: System Report and Software Update.
Next, click on Software Updates, which will either show you a new version to download and install or it will say your version is up-to-date.
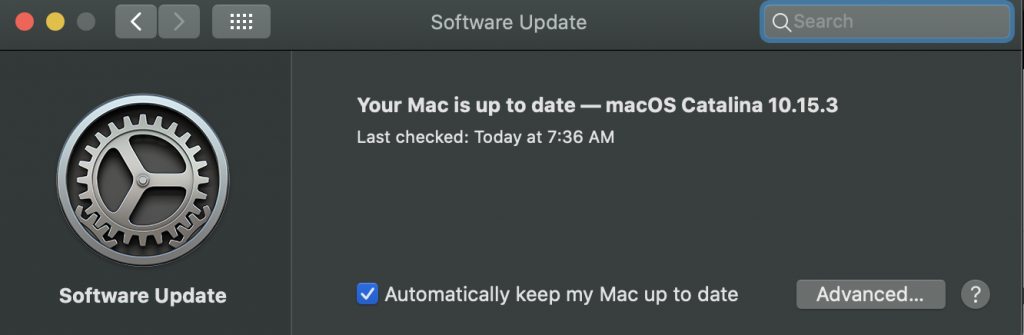
Make sure that Automatically Keep my Mac up to Date is checked so that in the future, you don’t have to update your Mac manually.
Once you’ve checked for Mac operating system updates, it’s crucial that you install any that are available. This keeps your Mac in tune with the most current fixes and makes your system more stable. It also gives your Mac more RAM (memory) back and helps to speed things up as well.
Do You Have Too Many Startup Applications?
When your Mac boots up, is it taking longer than it used to? That could be because you’ve got too many applications wanting to start at the same time when you turn on your Mac and login to your user account on your Mac.
Many applications that you install on your Mac also insert themselves into the start on login settings so that these applications launch every time you boot up your Mac and log in whether you plan on using that application or not.
These applications consume working memory (RAM) that you could use for applications that you are actually using and for the system processes that your Mac needs to run. Over time, Macs tend to build up a lot of applications that launch on login to the point where it really starts to act as a drag on the machine’s performance.
The best thing to do for a quicker startup speed is to remove some of those applications that are bogging down your boot time to get into macOS.
Let’s take a look at how you can prevent some of those apps or programs from starting when you boot up your computer or remove them completely, to decrease your startup time back to a decent amount.
Go to the System Preferences in your Mac’s dock (it’s the gear-shaped icon).
Then, click on Users & Groups. 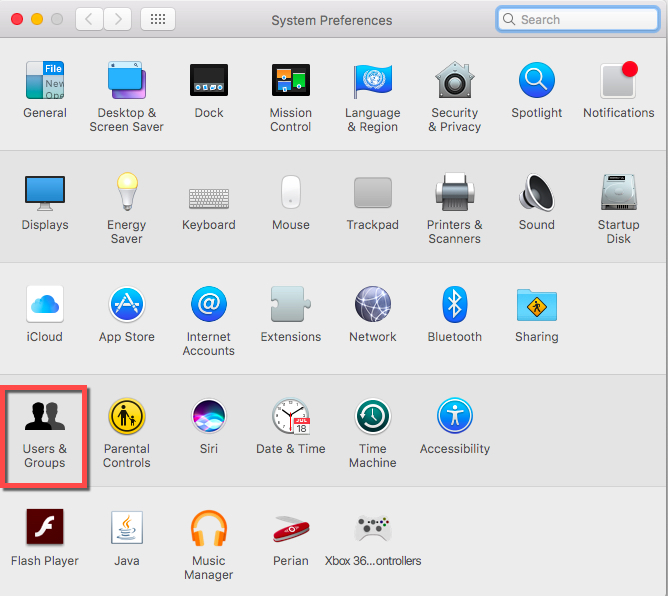
On the next screen, click on the gold lock in the lower left-hand corner
Then, enter your user password so you can make changes to startup applications and programs.
Click on your Username and select Login items next to Password in the upper middle of the user screen, which will show you apps that launch on login to your user.

You don’t want to just hide the startup applications; you want to completely disallow them from starting once your Mac is booting up.
Click on the apps or programs you no longer want to start upon startup of your Mac. Then, at the bottom of the list of startup applications, click on the minus (-) symbol to remove them. 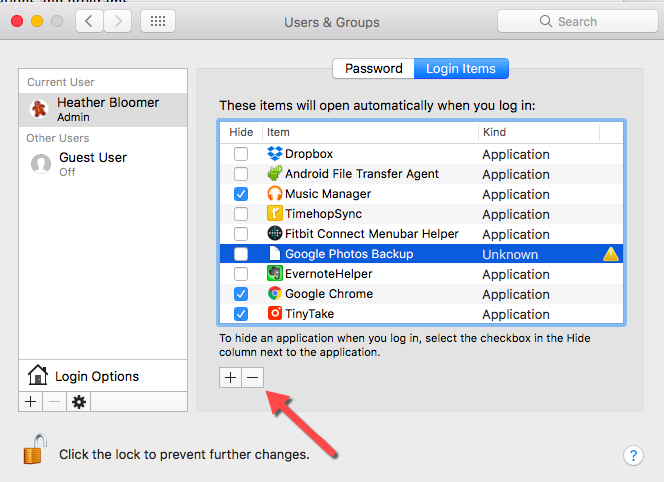
Now, the next time you power on your Mac, the startup time should be much better without all those programs and applications trying to start with the operating system startup. This also increases your boot time speed and will free up working memory while your Mac is running enabling your Mac to run faster and other applications to run faster.
For the most part, there are no “Login Items” that must be set to launch on startup unless it’s an app that you always use and want to be running and ready for you to use. Otherwise, setting applications to start up when you log in to your Mac is a waste of system resources.
Uninstall Applications You Don’t Use
We tend to accumulate apps over time that take up unnecessary space and system resources. Periodically, check your Applications folder for apps you don’t need or use. While some of these apps came with your Mac and can’t be installed, you may be surprised by how many apps you have installed but no longer use.
While you may have gone through this exercise above using Manage, it’s a good idea to also go directly to Applications as you’ll likely spot applications you didn’t see before that you simply don’t use and don’t need.
Here’s how to uninstall apps on your Mac:
- Open the Applications folder.
- Review the list of applications for apps that you do not use.
- Click to select applications (one at a time) that you don’t need and drag them to the trash.
- Empty the trash.
Retrieve Information From All the Right Places on Your Mac (for Older Mac OSX versions)
Note: If you use a newer version of the macOS such as macOS Catalina, skip down to the disk utility section of this article for how to use the “Disk Utility.” The Disk Utility started with macOS El Capitan.
What do we mean by this? This means making sure that your Mac is going to the correct places within the system and on your hard drive to get the information it needs for permissions. To do this, you’ll need to use the Terminal application on your Mac and type a simple command.
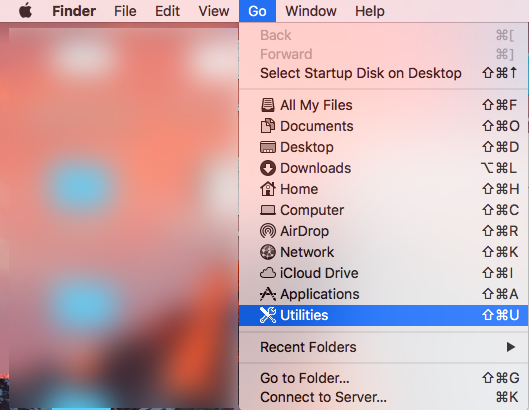
- Go to the Terminal application on your Mac. If it’s not located in your dock, then in Finder click “Go” and then scroll down to “Utilities” and click on it.

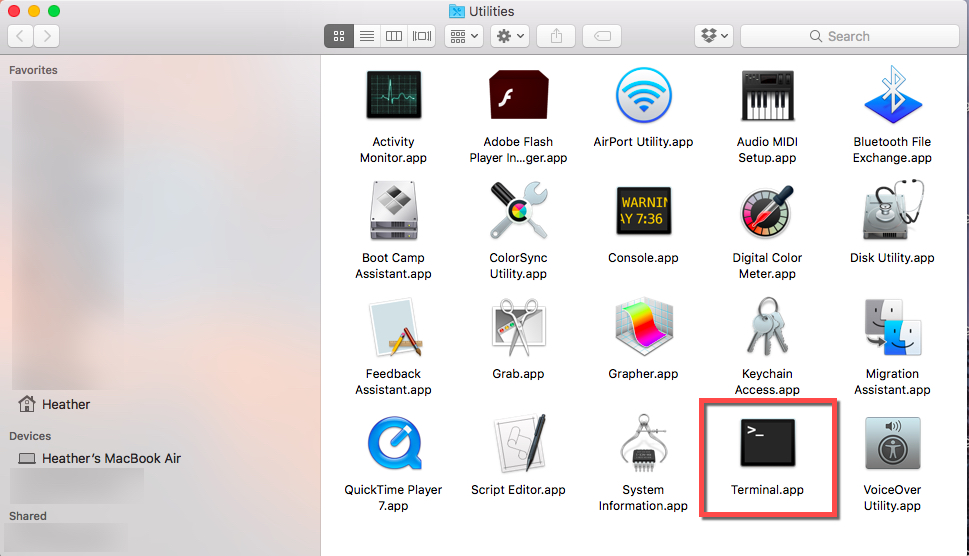
- Once the Utilities window opens, navigate to the Terminal application and double-click on it and it’ll open on your Mac’s display.

- Type this command in the terminal: “sudo/usr/libexec/repair_packages –verify –standard-pkgs/” and push the “Enter” key on your keyboard. You’ll now be asked to enter your user password to continue; input it, and press “Enter” again.
- As noted above, his feature doesn’t work on macOS El Capitan and above, as it has been removed. See Run Disk Utility below.
By typing the above command, you’ll be verifying permissions settings on your Mac to ensure information is getting retrieved from the right place. Do you see many items or some items marked as “Permissions Differ”? Then, you’ll want to type this in the Terminal window: “sudo/usr/libexec/repair_packages –repair –standard packages –volume/”
Overall, this method works on many Macs (unless you’re running Sierra) and has a real possibility of helping to boost the speed of your Mac, too.
Run the Disk Utility to Find and Fix Harddrive Problems (newer macOS versions)
Starting with macOS El Capitan, Apple added the Disk Utility to replace the need for the command line utility above.
The macOS Disk Utility can find and fix disk problems that can be affecting the performance of your Mac. It’s best to run Disk Utility routinely to keep your Mac’s hard drive running fast and problem-free.
Here’s how to run the macOS Disk Utility:
- Go to Applications
- Open the Utilities folder
- Open Disk Utility by double-clicking on it
- Select the disk volume you want to check
- Click the First Aid icon
- Then click Run to run first aid on the harddrive volume
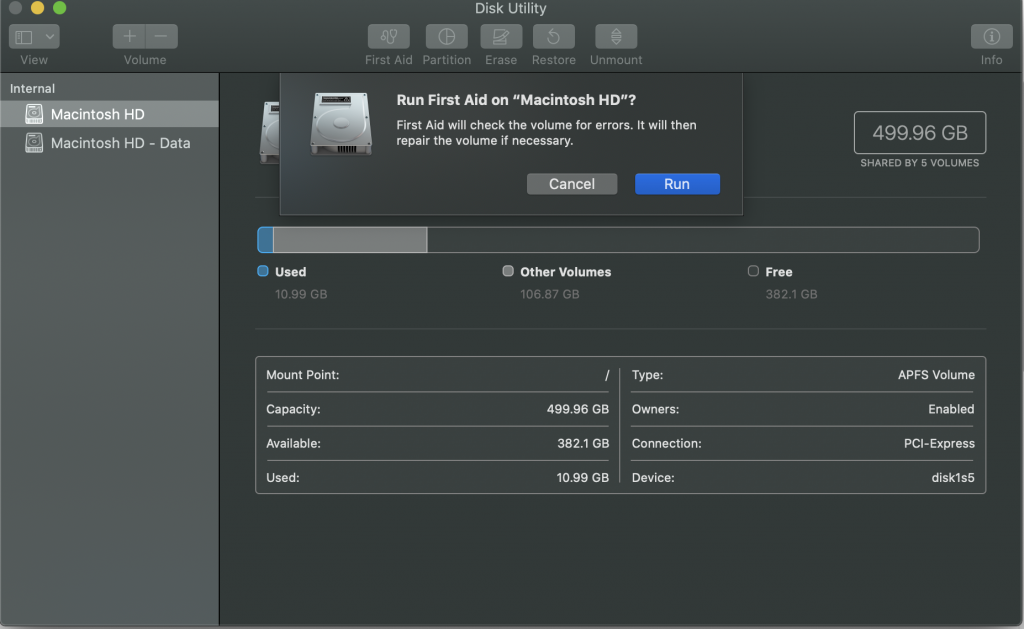
This process will identify and then fix disk problems, including permission issues and corrupted files that could be negatively affecting the performance of your Mac. You should run Disk Utility regularly. You might even want to automate running the Disk Utility using your Mac’s Automator.
Check for Malware that Might be Slowing your Mac Down
Every Mac user, whether their machine is running fast or slow, should routinely check for Malware and viruses. Malware could be slowing your Mac down and worse.
The most well-regarded anti-Malware and anti-virus program out there for macOS is Malwarebytes. It has a free version you’ll need to update and run manually and a premium version that enables you to automate the process. Regardless, it’s crucial to run a scan for Malware and viruses regularly as part of your maintenance program along with Disk Utility (described above).
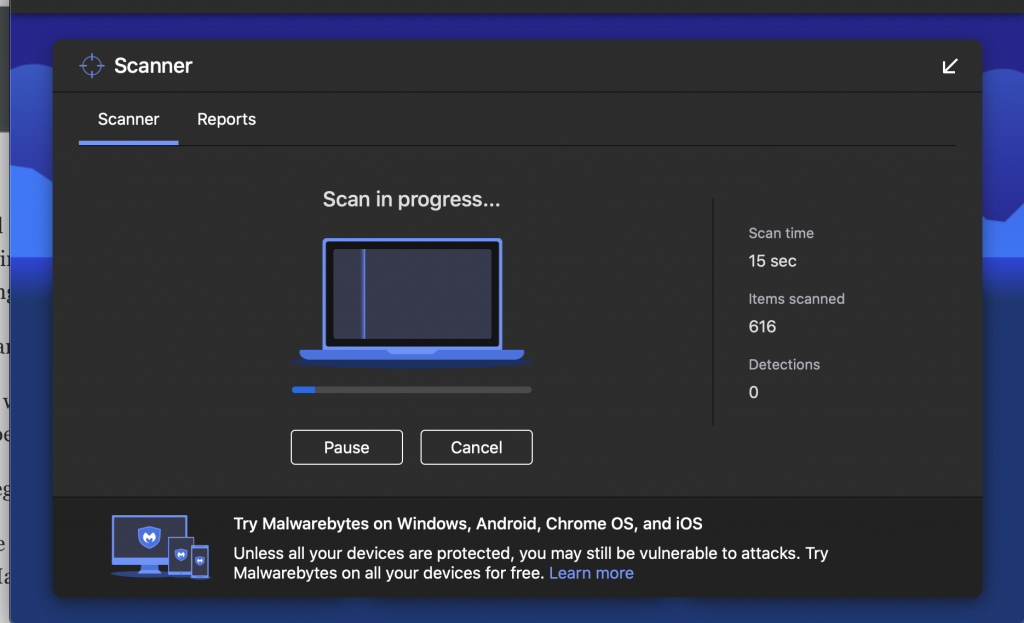
Keeping your Mac free of Malware will help prevent problems that can greatly slow your Mac down and protect your Mac against worse problems that can make your Mac completely unusable.
As long as you’re willing to put in a little bit of time and effort and follow the steps we’ve given you, you’ll regain speed on your Mac.
If you found this article useful, you might want to check out other TechJunkie macOS articles, including How To Edit The Hosts File On macOS (Mac OS X) and Service Battery Warning On Mac – Do You Need To Replace The Battery?