When working on a Google Sheet with different collaborators, it’s crucial to track all changes. That way, everybody can refer to new information and stay up-to-date.

Tracking and managing changes in Google Sheets is quite simple. There are different ways to do it by enabling different functions or by using an add-on. Let’s explore them.
Track Changes by Enabling Notification Rules
The neat feature that exists in Google Sheets “Notification rules” allows you to always be informed of the changes made to the document. Once you enable it, you’ll receive emails every time there’s a change to the sheet. You get to decide whether you want to receive notifications every time someone makes a change, or get a summary of all the edits.
Let’s see how to do this:
- Open the sheet you need and look for “Tools”.

- Scroll down and click on “Notification rules”.
- Select “Any changes are made”.
- Next, under “Notify me with…” choose between getting emails right away or getting daily digest.
- Click “Save”.


Track Changes by Enabling Version History
Another useful method to track changes in Google Sheets is by enabling “Version history”. This function gives an overview of all edits, along with details like who made the edits and when. Here’s how to do it:
- Open the sheet you need and navigate to “File”.
- From the dropdown menu, select “Version history” and click on “See version history”.

There’ll be a bar on the right side of the sheet showing the names of the editors in different colors. Now, all new changes will be highlighted in a color representing the person who made the changes.
Track Changes with Sheetgo
There’s an add-on called Sheetgo that allows you to easily track changes in your Google Sheets and have data automatically imported every day. First, you’ll have to install the add-on. Then you should open the sheet where you wish to track daily changes and the one with the necessary data. Here’s how to start using the add-on:
- Navigate to “Add-ons”.
- From the dropdown menu select “Sheetgo” and then “Start”.
- A bar will automatically open on the right side of the sheet.

Now that you’ve done that, let’s see how to import data from the current sheet to the one where you want to track changes.
- Navigate to the sheet where you want data imported.
- Click on the “Start connecting” button and then “Import data”.
- You’ll be able to see different sheets, so select the one you need.
- Once you click on it, you’ll see “Settings” option.
- Expand the “Settings” tab and you’ll see different options.
Once you perform these steps, you’ll also have to enable “Append data” to finish the process. By doing so, the add-on automatically appends the data below the previously imported data. You should also tick on “Enable transfer formatting” so that both your sheets look the same.
You can choose to name the connection for future references. Under the “Automatic update” section, you can decide how often and at what time you want the data import to happen. Enabling this option and selecting the frequency of data imports allows you to get daily updates of the changes.
Finally, click on “Finish” to finish the process. The new data will now be appended below the existing one on a daily basis. Every day you open the sheet, you’ll get fresh information, allowing you to track the changes.
This add-on’s useful as it only requires a one-time connection. Once you make it, you’ll be able to keep up with changes in your Google Sheets automatically and on a daily basis.
Note: You may decide to turn off “Automatic update” or change how often you want data to be imported. Refer to the section above if you want to do that.
Track Changes by Enabling “Conditional Formatting”
A visual representation of changes can be a very simple way to track all the edits. There’s an option in Google Sheets to do so – you just have to enable it. Here’s how you can do it:
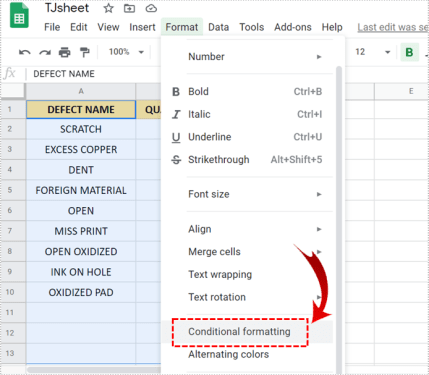
- Select all data (the cells) where you’d like to use conditional formatting.
- Navigate to “Format” and find “Conditional formatting”.
- In the dropdown menu, under “Format rules”, you’ll see “Format rules if…”.
- Here you’ll have to select “Is not empty”.
- Next, under “Formatting style” you can choose the background color or font of the letters.
- Click on “Done”.
Let’s say you choose blue as a background color. If a person enters data or makes changes to the formatted cells, the cell where they do it turns blue. Simple as that!
Track Changes by Enabling “Cell History”
If you wish to track the changes made to just one cell, you can do it by enabling the new “Cell History” option. This allows you to see the name of the collaborator who made the change and the timestamp of the change. Here’s how to do it:
- Right click on the cell and click on “Show edit history”.
- You’ll see the arrows which you can move left to right to see the edits.

Congratulations!
Now you’ll have no problem turning on track changes in Google Sheets. There are various methods to do so. You can enable “Notification rules”, “Version history”, “Conditional formatting”, “Cell history”, or get an add-on such as Sheetgo.
Have you tried any of the methods before? Which one works best for you? Let us know in the comments below.
Related Posts
 How to Track a Phone That Is Turned Off
 The Best Templates to Track Personal Expenses in Excel
 How to Convert Rows to Columns in Google Sheets
 How to Use AirTags to Track Dogs or Cats
 How to Get Absolute Value in Google Sheets
 How to Find Slope in Google Sheets
 How to Disable Rounding in Google Sheets
 How to Add Numbers in Google Sheets
 How to Calculate Days Between Dates in Google Sheets
Disclaimer: Some pages on this site may include an affiliate link. This does not effect our editorial in any way.

