


How To Use Free VPNs on Android

Like most of us, you probably use the internet nearly every single day in your life. Whether you’re working over the internet, watching movies or playing games, streaming content from around the world, or checking up on the activities of your friends, you’re probably a regular user of the internet. Unfortunately, as the internet grows more and more necessary for the majority of actions in our daily lives—banking, planning trips and major purchases, writing drafts of term papers, and so on—we have to consider the real-world implications of our lack of privacy on the internet. Now more than ever, online privacy concerns are at an all-time high, with growing questions about what advertisers should be allowed to know about our browsing preferences. Nearly every step you take on the internet is tracked in some form, and some users have frankly had enough.
If you’re one of them, you might want to consider using a VPN—not just on your computer, but on your phone too. Blocking both wireless hotspots and your mobile carrier from seeing what you’re viewing is not just a good idea, but a great one—it’ll stop advertisers and data providers alike from monitoring what you do online. Unfortunately, most VPNs are either paid services or—as many Hola users found out in 2015—are actively using your bandwidth for immoral or illicit acts like botnet attacks, or straight-up reselling your data to those same advertisers you’re trying to avoid. Yes, it’s a dangerous world out there for users looking for a free VPN to use without risking their data—but luckily, we’ve found the best solutions for your woes.
There’s a few various steps required for selecting and setting up a free VPN. Finding a good selection can be harder than you think—sometimes it’s difficult to tell what exactly a VPN is doing with your data. We’ve spent the time researching and preparing this guide to ensure that your smartphone is safe from bloatware, botnet attacks, and shady VPN services looking to sell your data for a profit. Let’s take a look at using free VPNs on Android—starting with selecting a good VPN service to use.
Choosing your Free VPN
As we mentioned, this can be a difficult area, filled with shady characters and unclear information about what a VPN will do with the data it receives from you. Since we’re interesting in using a VPN to hide your information from prying eyes, we want to make sure we’re as careful with your data as we possibly can be. Typically, a paid VPN service is more reliably in both speed and security, but that doesn’t mean there aren’t some great free options out there too. While this is by no means a complete list, these are some of the VPNs we verified to be trustworthy while offering, at the very least, a free tier for users looking for a VPN service on Android.

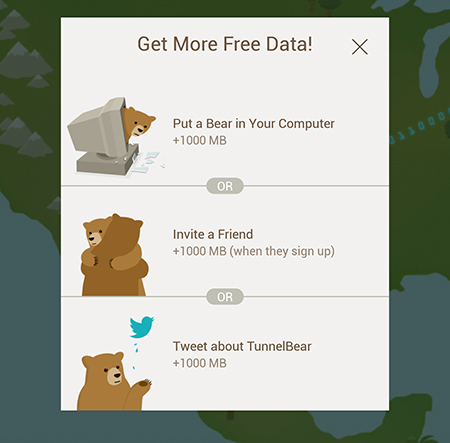
- TunnelBear: TunnelBear is one of our very favorite VPN apps for Android and PC. It isn’t a completely free application, with paid tiers available if you decide you want to get more out of the service. What makes Tunnelbear so great is the reliability of its service and recommendations from true tech professionals, including users like Linus from Linus Tech Tips. For free, TunnelBear offers you every single feature available through the service, including their 256-bit encryption, GhostBear VPN masking, and more. The only thing that differs between the free and paid tiers for TunnelBear is the amount of data you’re allotted per month. The free tier offers you 500mb of free data browsing while the VPN is active, enough to easily browse the web and check your email at a coffee shop while on public WiFi. If you’re looking to use a VPN for services like Netflix, you’ll want to check out other platforms that offer greater data amounts for free, but for the majority of VPN users out there, TunnelBear offers the perfect middle ground between unsafe free VPNs and expensive paid VPNs.
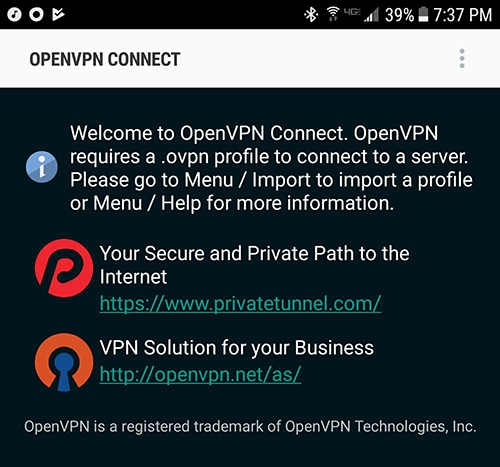
- OpenVPN Connect: Whereas TunnelBear focuses on being a simple plug-and-play VPN that works for most users without a problem, OpenVPN is on the exact opposite of the spectrum. OpenVPN is, as the name suggests, a totally open-source VPN available on both PC and Android that is free to use, though depending on your usage, may require a subscription plan to access the server. As is the case for the majority of open-source platforms, OpenVPN isn’t the best-looking VPN platform on the market. While the tech-savvy users on Android might not have a problem setting up and using the app, regular users might be a bit confused on the unexplained terminology and technical jargon that makes up a large portion of the app’s information. That said, OpenVPN is filled with features that will delight most users should they choose to use OpenVPN Connect, including a power-saving mode that detects when your phone is being used, multifactor authentication for added security, and modifiable VPN settings for any users that feel they can dive into the deep end of the VPN pool.
- OpenVPN for Android: Another VPN built on the open-source OpenVPN platform we discussed above, this client features a better appearance and design than most of the other platforms we’ve seen on Google Play—but that doesn’t mean it’s perfect. Like OpenVPN Connect, OpenVPN for Android (yes, the name scheme is confusing) requires a subscription to a VPN server that renders the app not entirely free for most users.
- TurboVPN: As the top result for “free VPN” on Google Play, and a high review score of 4.7 out of 5, TurboVPN is one of the community’s favorite, entirely-free VPN apps on the market—but that doesn’t mean it’s an instant download. For one, we’ve had trouble verifying exactly what TurboVPN is doing with your data, and this is cause for concern. While the speeds are decent and the design of the app itself is cute and easy to use, the app’s “official” site is a Facebook page, and it seems to be connected to a Chinese tech company that also makes speed test apps for Android. Many of their posts on Facebook, although regularly updated, are written in poor English, and it’s difficult to tell exactly who is behind the application itself. We’re not saying don’t use TurboVPN, but do be careful when choosing an app that has a mysterious background of where your information is going.
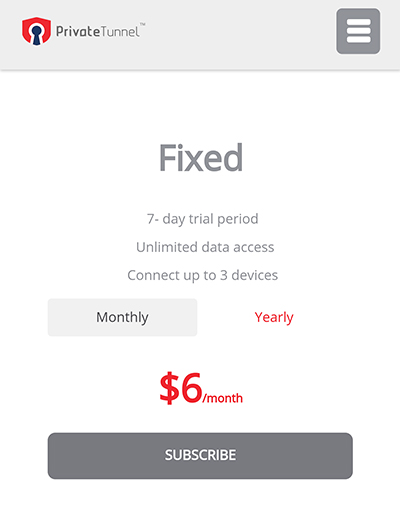
- Private Tunnel VPN: This app is actually directly built by the same team behind OpenVPN Connect, but happens to feature a newer, more modern user interface for communicating with the application. Unfortunately, that development time and improved UI come at a price: only the first 100mb is free with Private Tunnel, and the plans past that can get rather expensive. Though we prefer the look of the Private Tunnel app over something like OpenVPN Connect, they both use the same backend platform to connect users to VPN servers around the world.
We suggest going with TunnelBear over the other VPN services above. For most people, 500mb of protected browsing per month is the perfect free tier, and you can even earn additional browsing data by watching ads and sharing the service with your friends. Because TunnelBear is a paid service with a free tier, you don’t have to be as concerned as you might be about your data and bandwidth being stolen or used against you.
Setting Up Your VPN
Once you’ve chosen your selection from the above list—or whichever other platform you prefer, so long as it’s safe and secure to use—you’ll want to download it onto your phone from the Google Play Store. Each VPN sets up in its own fashion, with TunnelBear being the simplest to enable and use, and OpenVPN Connect being the most difficult. Since our top recommendation above was to use TunnelBear for all your VPN needs, we’ll be taking a look at how to set up TunnelBear on your device—especially because it’s so simple.
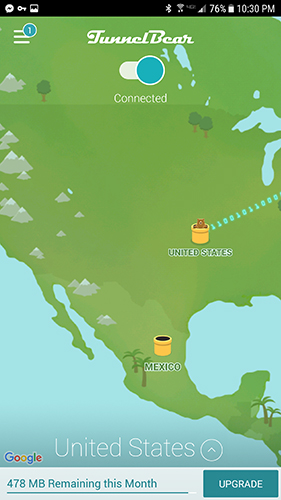
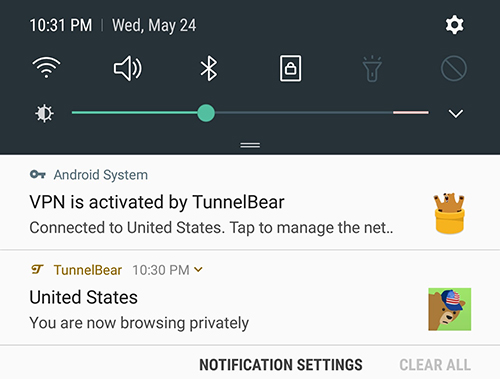
Once the app is installed on your phone, begin the process by creating a TunnelBear account (or if, for some reason, you happen to already have a TunnelBear account, logging in with your pre-established user identification). After signing into the app, you’ll be presented with TunnelBear’s main display: a map of your current country, several illustrated, animated tunnels running to different countries around the world, and an on/off switch at the top of the screen. The bottom of the display has two important notes: the country you’re going to be rerouting your data through (which you can change and select from the drop-down list by tapping on the arrow icon), and the amount of free or paid data remaining with your application for the month. Once you’ve chosen a country to choose from—or you’ve chosen to leave the app on its default connection—flip the switch along the top of the screen. You’ll receive a prompt from Android, alerting you that you’re connecting to a VPN (which, for obvious reasons, can be a security concern if you aren’t familiar with the VPN in question); allow the app to activate the VPN by accepting the message, and the “bear” will “tunnel” its way to a nearby state or country, connecting you to a VPN.
Most other VPN services outlined above follow a similar activation method: login into the app and service of your choice, select a country from the list of servers available in the app, activate the VPN, and give permission to Android to use the VPN connection for your information to be rerouted through.
Disabling Your VPN
If you have reason to believe something fishy or suspicious is happening with your phone because of your VPN connection, or you aren’t sure when your information is being rerouted through your VPN’s servers and when it’s not, you may want to disable your VPN from within Android itself. Some VPN apps can be filled with spam, ads, and data-trackers that use your information to make a profit; you’ll want to remove these apps from your phone. The simplest way to remove and disable a VPN on your phone is to uninstall the app, but if you can’t—or simply don’t want to—do that, you’ll want to disable the VPN inside your phone’s settings menu. Here’s how to do it:
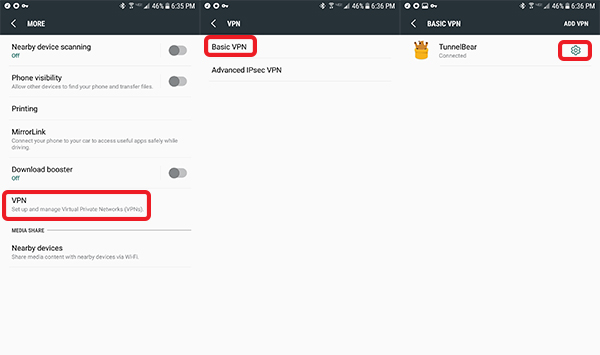
- Start by opening up your settings menu and finding the “Wireless and Networks” category inside settings. Select “More” from this category to load more specific network settings.
- Here, find the VPN menu and select it. If your phone supports more than one type of VPN, look for “Basic VPN.”
- From here, you’ll find the VPN you’ve set up on your phone previously (TunnelBear, OpenVPN, etc). Tap the settings menu.
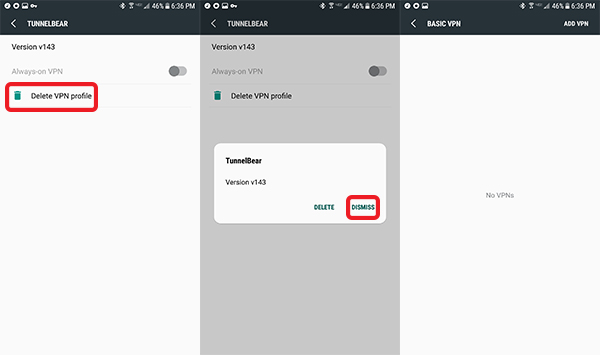
- This is where you’ll find some assorted settings for your phone’s VPN, including the option to leave it always-on, and the option to delete the entire profile.
- Tap “Delete VPN Profile.”
- On the prompt that arrives on your display, tap “Delete.” If you don’t want to delete the PVN, tap “Dismiss.”
This won’t remove the app from your device, but it will cease the app from running in the background (if it is running), and you’ll have to give the app permissions again to begin running its VPN services. This can be handy to revoke permissions if you want to ensure a rogue or potentially-rogue VPN isn’t snooping on your information without your consent or knowledge—simply delete the VPN from your settings when you aren’t using it, and reenable the app’s permissions when you need a VPN.
***
Here’s the bottom line when it comes to free VPNs: most of them have some fatal flaw. They’re either ad-support, bandwidth-limited, or sell and use your data in the background, making it a dangerous tool for most users to play around with. If you know what you’re doing—and you know what to look for when it comes to suspicious data usage or behavior inside an app—free and tiered VPNs can be a great utility to keep on your phone. From browsing around information on a public wireless hotspot to making sure your online shopping activity isn’t being tracked, VPNs are great way to hide your activity from snooping ISPs, data trackers like advertisers, and weak, unprotected wireless hotspots.
If you want the best of the best in VPNs—improved speeds, more stable connections, unlimited data usage over your VPNs servers, etc.—we do recommend stepping up to paid VPNs, including TunnelBear’s own service, or alternate services NordVPN (of which there is also a free trial available), Private Internet Access VPN, or PureVPN. That said, TunnelBear’s free tier is useful to test or use a quick VPN when necessary, and other VPNs on Google Play—like TurboVPN—provide free services, even if it’s uncertain what’s happening to your data through those services. The most important thing to remember when using free VPNs is this: be careful, just as you would on any unsecured network. Remember not to leave your account information logged into an unfamiliar device or network, and use a password manager to help protect your data. VPNs are a great tool for your internet privacy and security, so long as you’re careful with which platform you choose.


One thought on “How To Use Free VPNs on Android”