


How To Use Windows 10’s Nearby Sharing
One of the best features found on Apple products is AirDrop. AirDrop allows you to transfer files from one one device to another, and these files can be gigabytes in size. It’s truly amazing, because the transfer can happen in seconds. It makes things super efficient: For example, if you want to show a friend a video, but not necessarily on your phone, it’s as easy as telling them to turn AirDrop on. Then, you can send it over to their iPhone with the click of a button.
It’s a really neat feature because you don’t have to be connected to the Internet to use it. Apple’s system does it completely over Bluetooth and peer-to-peer Wi-Fi (this essentially allows two devices to connect to each other without a wireless access point). Again, super neat and helpful feature, but now folks that use Windows now have a similar feature.
As part of the Spring Creators Update for this year, Microsoft included a new feature in Windows 10 that they’re calling Nearby Sharing. For now, Nearby Sharing only works between two Windows 10 PC’s — you can’t do it from mobile to a Windows 10 PC or a Windows 10 PC to mobile; however, that feature is in the works, but we don’t know when it’ll arrive just yet.
Still, if you want to start sharing files over Bluetooth with peer-t0-peer Wi-Fi in Windows 10, be sure to follow along below – we’ll help you get things up and running!
Setting Up Nearby Sharing
Remember, Nearby Sharing is a new feature available in 2018’s Spring Creators Update. So, if you don’t see the feature, make sure you have the latest update downloaded and installed.
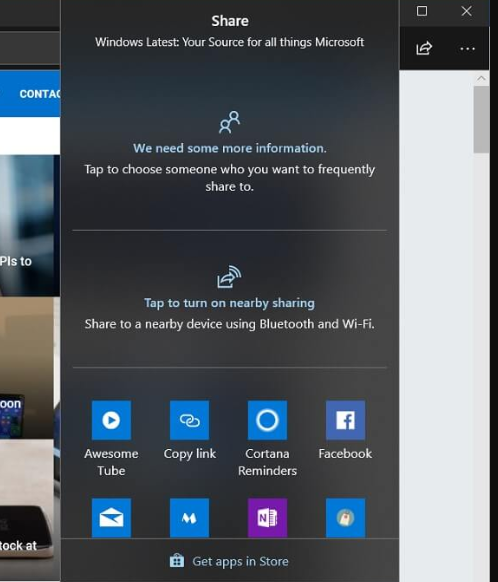
There are officially two ways to setup Nearby Sharing in Windows 10. First, you can click the “Share” button anywhere on Windows 10. For example, if you opened up Microsoft Edge and pressed the “Share” button on the top-right toolbar, a dialog will open. At the very bottom of the dialog, simply select the “Tap to turn on Nearby Sharing” option. It’s that simple!
But, by accessing Nearby Sharing through the Settings application, you get a few more options for specific customizations you might want to add.
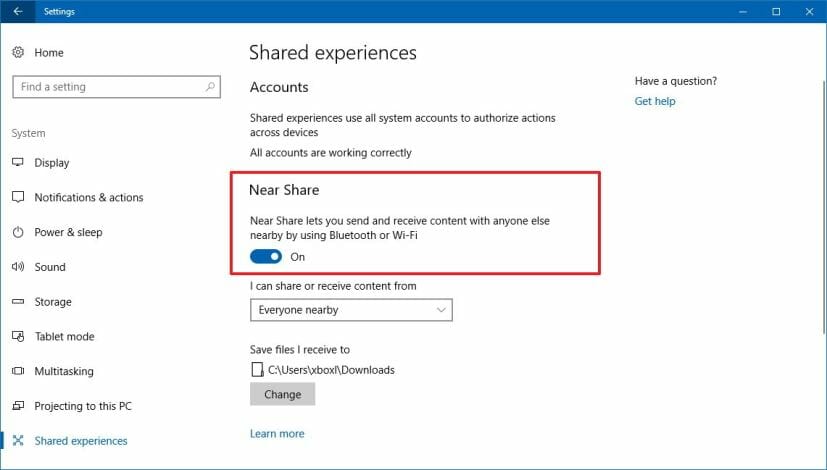
To enable Nearby Sharing this way, open the Settings app, and head into System. On the left navigation pane, click on Shared Experiences. To turn Nearby Sharing on, it’s as simple as moving the slider to the “On” position. And now, you’re ready to go!
Here, you can also choose who you send and receive content from. By default, Windows 10 allows you to send and receive content from any nearby Windows 10 PC. But, if you want to restrict it, you can click on the drop down box and change it to “My Device’s Only.” The way it tells if it’s your device is if the nearby Windows 10 PC is logged in with your Microsoft account. So, for the “My Device’s Only” portion to work, you’ll have to make sure your nearby Windows 10 PC’s are logged in with your Microsoft account, not a friend’s, not a work e-mail address or a family member’s Microsoft account. It has to be yours to work.
Lastly, you can also choose where received files are saved to. By default, files are saved to your Downloads folder — C:UsersYourNameDownloads — but if you want to change this, you can setup a specific location or folder for received files to be saved to.
Sharing a File
Sharing a file to another nearby PC is super easy. You can click on just about any file on your PC, and in the dialog box, just click “Share.” The Nearby Sharing dialog opens up and begins searching for nearby PCs that you can send your file to. If no PCs are found, make sure you have the Spring Creators Update installed on the other PC, as well as making sure Nearby Sharing is enabled on it. Not only that, but make sure Nearby Sharing is set to sharing and receiving from “Everyone Nearby” in the Settings option we were just looking at.
Once the PC appears that you’re able to share with, it’s as simple as clicking on it. Then, a notification appears right above the taskbar that’ll say something like “Sharing to NameOfPC” or “Sharing to Brad’s PC,” all depending on the name of your PC.
Moving over to the PC that the file is being sent to, you should see a notification appear above the taskbar. It will show up in the Action Center as well, which can be found at the bottom right corner of your taskbar. This notification will offer a few options — “Decline,” to refuse the file; “Save” to save the file to the PC (in the specified location we set earlier); and “Save & Open” to save the file in its designated location, and then automatically open it.
Keep in mind, that, while Bluetooth and peer-to-peer Wi-Fi is fast, once you accept the file, it can take a little time depending on the speed of things (i.e. the quality of the connection) as well as the size of the file. It can take a few minutes when you start getting into moving gigabytes of data at a time.
Beyond Files
We’ve shown you can share files with Nearby Sharing, and this process will work for almost any files on your PC, but Windows makes it even easier to share other types of content: links, photos and other types of files, too.
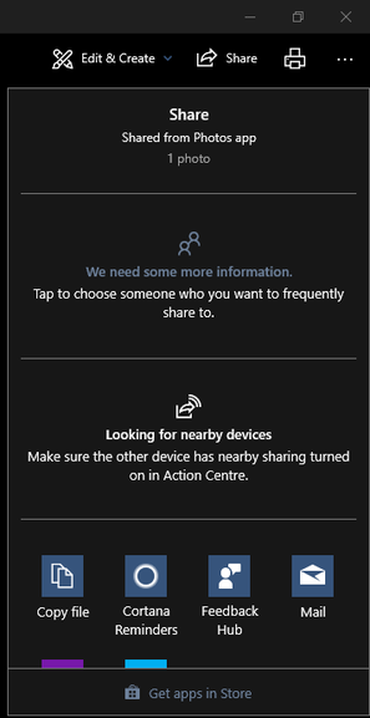
One of the more seamless options is in using the built-in Windows 10 Photos app. You can go through and select a photo or multiple photos, and click on the internal “Share” button in the Photos app. This opens up the Nearby Sharing dialog (if you have it enabled), and allows you to quickly send the selected photos to a nearby PC.
You can send URLs or links to other PCs easily, too. If you open Microsoft Edge and navigate to www.techjunkie.com, you can click the “Share” button. This will open up the Nearby Sharing dialog and allow you to quickly send a URL or link over to another PC. This is handy if you’re, say, talking to a friend about a website you found entertaining or interesting, and want to send them the link real quick. You could, of course, copy and paste the link to the friend via Slack or some other instant messenger the both of you are using, but Nearby Sharing makes sending the link over a little more efficient by reducing it down to only a couple steps.
Now, keep in mind that you cannot do this with other browsers. This is because the “Share” icon and Nearby Sharing features can only be found on Universal Windows Platform (UWP) apps, so basically your app has to be available in the Windows Store to be compatible with a feature like this; unfortunately, UWP versions of Chrome, Firefox and other third-party browsers just aren’t available from the Windows Store for a myriad of reasons (functionality reasons and red tape from Microsoft, such as Microsoft wanting users to only use Microsoft Edge as their primary browser).
However, you should still be able to use the Nearby Sharing function in other UWP apps, if the developer supports Nearby Sharing (i.e. if you wanted to use a custom, third-party Photos app).
Continue on PC
As we already told you, Nearby Sharing isn’t quite available on mobile yet. This means you won’t be able to use your Windows Phone or Cortana on Android and iOS to send files over to your Windows PC. However, you still have a couple options for retrieving files on mobile; although, it’s worth keeping in mind that the Nearby Sharing function will work with Microsoft’s Surface Book (and the Surface tablets as well, as they’re essentially full-blown Windows 10 computers, just in a smaller form factor).
First, you can use the new Windows Timeline feature that came with the Spring Creators Update. This works well with your Windows Phone, or Microsoft Apps on Android and iOS. You can read how to set that up here.
Lastly, you can use Continue on PC, a feature that came with the Fall Creators Update in 2017. This is exclusive for transferring URLs or links over to your Windows 10 PC, but you can learn how to set that up here.
Closing
As you can see, the Nearby Sharing feature is a neat addition to Windows 10. It makes transferring files between PCs so much more efficient, seamless and fast. If you’ve ever gone through the pain and agony of trying to figure out how to get another file over to another PC, Nearby Sharing makes it much easier — you don’t have to worry about finding a USB stick or connecting Cloud accounts to share a file. Nearby Sharing makes the process seamless.


