How to Make a Photo Collage in Paint.NET

For ages, Paint has been a staple Windows tool. It works as a simple, yet surprisingly versatile, graphics tool to create custom drawings, manipulate images, and design promotional materials. And despite the fact that Paint.NET might not be your first choice, it’s still a powerful application.
Just do a quick search on Pinterest and you’ll realize there’s an entire community of people who make amazing photo collages in Paint.NET. We’ve created a comprehensive step-by-step guide that takes you through the entire design process.
Photo Collage in Paint.NET
You should know that Paint.NET doesn’t come with a collage wizard or ready-made templates. This means you’ll need to design everything from scratch. But the final result is arguably superior to the collages you get from some smartphone apps, for example.
Step 1
First thing you need to do is set the file size for your collage. Click on File, select New, and set the document height, width, and resolution in the pop-up window.
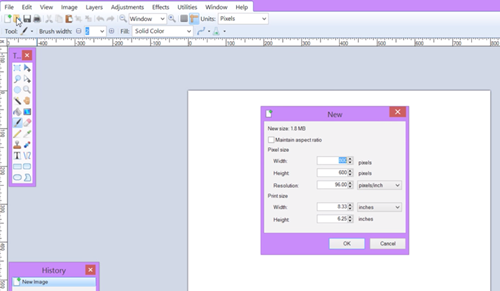
The file size may depend on the images you want to import. For example, if your images measure 300 x 300 pixels you should create, at least, a 600 x 600-pixel file.
Step 2
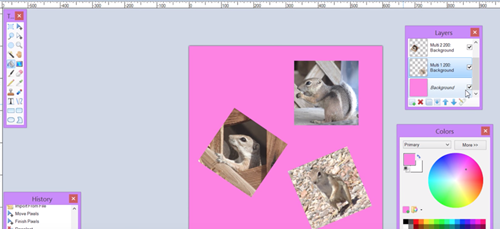
Select Layers from the menu bar and click on “Import From File.” Choose the image you want to use and click on it to bring it into the collage. You can drag the image around to reposition it and use the small dots on the outside to resize it.
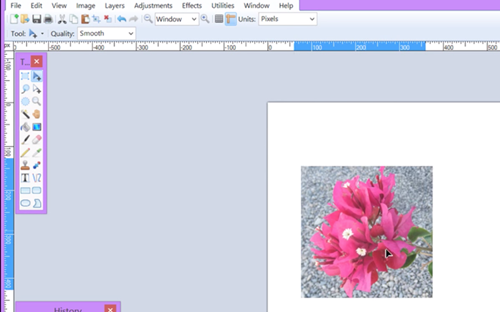
Repeat the process for each image you want to use in the collage.
Tip: Use the ruler grid outside the document to determine if an image is properly aligned. The grid turns blue when you select the image.
Step 3
With previous steps, your images align in squares on the collage document. But, what if you want to rotate and reposition an image?
After you import the image (Layers + “Import from file”), highlight the image layer, and click Deselect from the toolbar (red X icon). Select Layers and click on “Rotate/Zoom”, the hotkeys are Ctrl + Shift + Z.
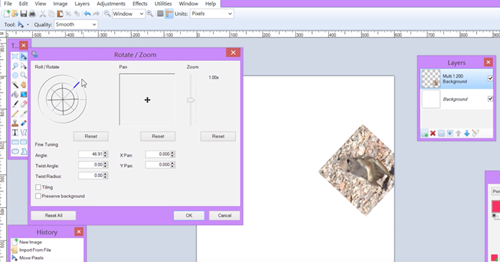
Use the Roll/Rotate wheel to angle the image and the Pan pointer to reposition it on the document. The Zoom slider resizes the image.
Step 4
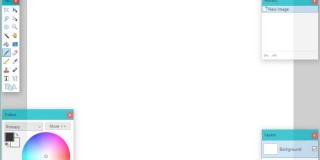
White collage background is OK, but you can liven up things with some color. Select the background layer, pick up the bucket tool, and choose a color from the palette. Now, just click on the background.
Tip: With the background layer selected, you can move the pointer around the palette to change the color.
Step 5
So far, the images you’ve uploaded don’t have any borders/outline. To get the borders, select an image from the Layers window, click Effects in the Menu bar, and choose Object. Click on “Object Outline” in the drop-down window.
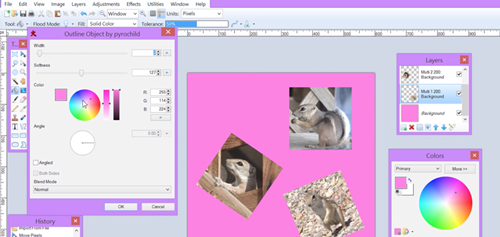
You can choose the border/outline width, softness, color, and angle. Drag the sliders for width and softness adjustment and move the pointer to the color you like. Once you are done, click OK and repeat the process for other images.
Step 6
To make the collage stand out a bit, you can add text over an image or the entire collage. Use the palette and choose text color first. Select layers and click “Add new layer,” this action ensures the text aligns well with the rest of the document.
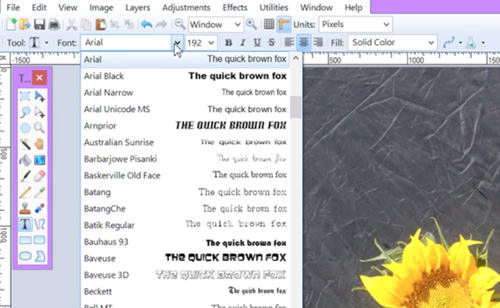
Click the “T” icon from Tools and select your font style and size. Place the cursor where you want the text and type. To manually move the text around, grab the arrows in a square and move it across the document.
You can further embellish the text by outlining it and the method is the same as described in Step 5. Selecting Angled from the Outline Object menu allows you to highlight just one side of the text and create a glow-like effect.
Step 7
Once you are happy with the design, click File, select “Save as”, and give your collage a name. Here it’s important to choose the file format from the “Save as type” menu because the document saves as Paint.NET (.pdn) by default.
For most purposes, JPEG, PNG, and PDF work great but if you’d like to print the collage it might be best to save it as TIFF.
Unleash Your Creativity with Paint.NET
This was just a quick guide on how to make a photo collage with Paint.NET and there are many more options. You can add objects, make cool cut-outs, use patterned backgrounds, etc. Whatever you do, the basic steps still apply, so feel free to unleash your creativity. How do you make collages in Paint.NET?