


How to Make a Photo Slideshow with Music

Did you ever wish you could take a bunch of family photos on your PC and stick them together into a slideshow with some music? Fortunately for you, that’s both very fun and easy to do nowadays.
Additionally, there are many programs that can do this. Adobe Premiere is the most advanced and thus also most convenient program to practice your video-making skills in, as there’s always room for improvement. Read on to see how you can feel like a slideshow-making master in a matter of minutes.
Creating a Slideshow in Adobe Premiere Pro CC
When it comes to video editing, Adobe Premiere is undoubtedly a household name. Although used mainly by professionals, its basics can be pretty easy to handle, and making a photo slideshow with great transitions accompanied by music is no exception.
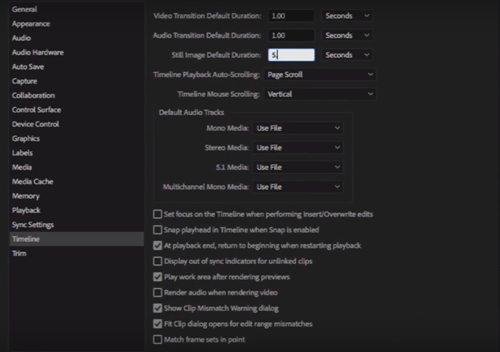
A good way to make this process even easier is to set up some timeline settings before getting to work. To open these settings, go to the “File” menu and open “Preferences,” then go to the “Timeline” tab. Here’s what to do next:
- First of all, the “Video Transition Default Duration” option adjusts how quickly transitions between images play. Setting this value to “.50,” or half a second, is a good idea.
- To adjust how long the images will stay on the screen before transitioning, change the “Still Image Default Duration.” The trick is not to keep images on the screen for too short or too long. Set this to just a few seconds, for example, two to four.

Once you’ve done this, make a Project and do the following:
- Import images to the project panel. You can do this either by clicking on Import in the panel or by dragging the images and dropping here.
Note: Keep in mind that you can hold Ctrl to select multiple pictures or hold Shift while clicking on the first and last picture in an array to select all images between these two. - Open the “File” menu, go to “New,” and select “Sequence” to create a sequence. You need it to be able to create the video. Choose your preferred resolution. If you don’t have any, the safest bet is to stick to the Full HD resolution, which has 1920 pixels horizontally and 1080 vertically.
- Select all images that you want to use and drag them all to the timeline. The most convenient way is by clicking on the first image, holding the Shift key, and clicking on the last one while holding it.
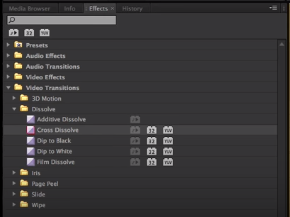
- Look up the transitions in the “Effects” panel. They’re located in the designated folder called “Video Transitions.” Play around with these to see which one suits your style the most.
 Note: One very good, but also very popular and already widely used transition is the “Cross Dissolve,” which is located in the “Dissolve” folder.
 - If you’ve found a specific transition that you like the most, you can also right-click on it in the Effects panel and choose “Set Selected as Default Transition.”

- Adobe Premiere even has a shortcut for applying transitions, which is Ctrl + D. Press Ctrl + A while working in the timeline to select all of the items in it, then press Ctrl + D. This will instantly apply the transition to all your images.
- The easiest way to select a different transition for certain images is by selecting another transition and making it the new default. To apply it to one or more images, select them and press Ctrl + D. You can do this with however many transitions you like, but keep in mind that using too many might make the video uglier and more confusing.
 Note: One very good, but also very popular and already widely used transition is the “Cross Dissolve,” which is located in the “Dissolve” folder.
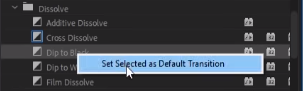
Adding Music
The only thing that remains is adding music to the sequence. You generally add music just like adding pictures, either by importing it through Premiere or dragging and dropping it there. Drag it to the timeline after that.
There are two main things that you should keep in mind: firstly, make sure that the music style fits the style of your imagery and the transitions. Secondly, the music should not last longer than the slideshow; they should have the same length. If you can’t fit them because the music stays on for too long, reduce the audio duration.
You can do this by selecting an audio’s end in the timeline and dragging in the desired direction. For example, if you want to reduce the duration of the song, select the right end (your cursor will change) and drag to the left.
Exporting the Video
To save a video, select the timeline and do the following:
- Open the “File” menu, go to “Export,” and click on “Media.”
- In the Export window, find the “Source Range” list and choose “Entire Sequence.”
- Select “H.264” as your format.
- Choose a template. If you don’t know which one to take, go for “YouTube 1080p HD.”
- There will be linked text next to “Output Name.” Click on it to open the “Save As” menu. Use this to name the video and decide on its location.
- When you’re done, click on “Save.”
- In the previous menu, click on the “Export” button.
Enjoy the (Slide)Show
There are many programs that can create slideshows and they come with various price tags, but Adobe Premiere is possibly the most complex among them. Although it doesn’t need an introduction, it might need an explanation when it comes to creating beautiful slideshows. There are free alternatives, but most, if not all of them, are generally easier to use than Premiere.
What are you making a slideshow for? Do you think slideshows will ever go out of fashion? Share your thoughts in the comments below.


