Most Windows PCs are now powered by multi-core processors, and recent versions of Windows generally do a very good job of automatically divvying up your PC’s total processing power to best accommodate your running apps and games. But sometimes the user and Windows may have different ideas when it comes to making decisions on how to best use a PC’s CPU power, and that’s where advanced users can step in and manually restrict certain apps or processes to specific CPU cores, thanks to a feature called Processor Affinity. Here’s how to do it.
When it comes to consumer-level versions of Windows, the ability for a user to manually configure an app’s use of specific CPU cores dates back to the Windows XP/2000 timeframe, although the steps differ slightly in each version of Windows. For the steps and screenshots in this article we’re using Windows 10, but readers running older versions of Windows, particularly Windows 7 and Windows 8/8.1, should be able to follow the basic steps in the face of slight differences to the Windows UI.
It’s also important to note before we proceed that modifying processor affinity for a particular process or app may cause stability issues, and it will likely degrade the performance of modern multi-threaded apps and games. Therefore, make sure you experiment with non-crucial apps and data first, and make sure to save any open work or game progress before modifying any settings discussed here, as application or system crashes are possible.

Why Limit an App’s Access to CPU Cores?
As mentioned above, most users will want Windows to automatically handle the PC’s processing power, making sure that apps that can utilize all cores are given access to them. This generally results in better performance, so the primary question is why a user would ever want to limit or restrict a certain multi-threaded app to less than the total amount of physical and logical cores that a PC has available.
There are two basic answers to this question: 1) to ensure compatibility and performance with older software, and 2) to run an otherwise heavily-threaded processor hog while still reserving enough resources to simultaneously perform other tasks.
We’ll start with the first answer: compatibility and performance. Some Windows apps and games were coded long before consumer-level multi-threaded and multi-core processors were a reality. The creators of older games in particular may have never envisioned that someone playing the game would have anything more than a Windows PC powered by a single high-frequency CPU core. When software of this era encounters modern CPUs packing four, six, eight, or even more cores, it can sometimes result in performance issues, or even the inability to launch the program at all.
Many apps and games still run just fine, of course, even when powered by the latest 8-core/16-thread monster desktop CPUs. But if you’re trying to play an older game and you’re having issues, using processor affinity to manually restrict the game’s process to just one of your many cores may be a good troubleshooting step to try.
The second answer is likely more useful for more Windows users, and it will form the basis of our step-by-step instructions below. While many Windows apps, particularly games, still can’t take advantage of more than one or two cores, content creation apps such as video encoders and 3D rendering tools have been optimized in recent years to be able to use every ounce of processing power that your PC can throw at them. You generally want these apps to go as fast as possible, but sometimes speed or completion time aren’t the primary factor, and you’d rather keep some portion of your PC’s processing power available for another task while your demanding media app runs in the background. This is where processor affinity really comes in handy.
Step By Step: Our Example
One app that can eat up all of the CPU cores you throw at it is an x264 video encoder like RipBot264 (or HandBrake, or any of the myriad of x264 and x265 encoder tools available). For our example, we want RipBot264 to encode a video file, but we also want to work on other projects in apps like Photoshop and Premiere at the same time.

By default, an app like RipBot264 will use all processing power available.
If we started our RipBot264 encode and then launched Photoshop and Premiere, Windows would do its best to prioritize and accommodate each app’s needs, but Windows will also occasionally make a mistake, resulting in slowdowns or temporary freezes in our active apps. We can try to avoid this by using processor affinity to limit RipBot264’s use of our CPU cores.
To get started, first make sure you’re logged in to a Windows user account with admin privileges. Then go ahead and launch the app you wish to restrict. In our case, that’s RipBot264.
Next, launch Windows Task Manager, either by right-clicking on the taskbar and selecting Task Manager or by using the keyboard shortcut combination Ctrl-Shift-Escape. By default, Task Manager in recent versions of Windows starts off in a “basic” view. If your Task Manager doesn’t look like the one in our screenshots, click More Details to reveal the full interface. Once that’s done, make sure you’re on the “Processes” tab and now find your app or process.
This last step is potentially easier said than done. In many cases, you’ll simply find your desired app in the list. In other cases, some apps may use unique processes apart from the primary application process for certain tasks. The key is to find the process or processes that are responsible for the CPU usage you wish to limit. A good way to test this is to fire up the demanding activity (in our case, start encoding a video file), and then sort Task Manager by the CPU column to find the processes that are using the highest levels of CPU resources. If the process name (again, in our case it’s an H.264 encoder process) matches up with your target app, you’re all set.
With the correct process identified, right-click on it and select Go to Details. This will jump you to the Details tab of Task Manager and automatically highlight the correct process.

Now, right-click again on the process and select Set Affinity.

A new window labeled “Processor Affinity” will appear filled with checkboxes and a numbered list of CPUs, the number of which is based on the total number of physical and logical cores packed in your specific CPU. Our example system is running an Intel Core i7-5960X, which has eight hyperthreaded cores. We therefore have a total of 16 CPUs listed in our Processor Affinity window.
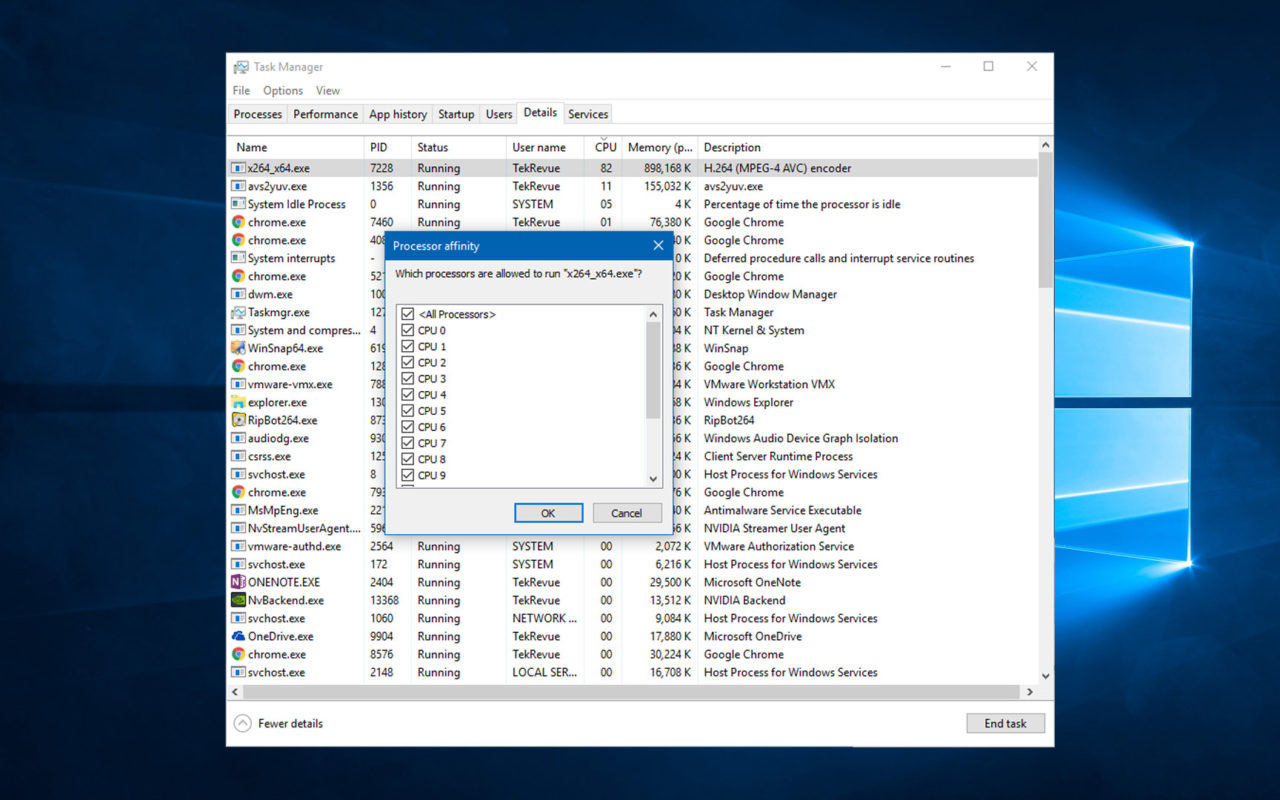
Next, it’s time to decide how much you want to restrict your app. Click the checkbox next to All Processors to de-select all CPU boxes and then choose at least one CPU box to check, with each one representing a physical or logical core. Absent any CPU defects or unique overclocking scenarios, it generally doesn’t matter which cores you select.

In our example, we want to limit RipBot264 to four cores, leaving plenty of room for our other more time-sensitive tasks. Once you’ve selected your desired number of cores, press OK to close the Processor Affinity window. Your changes will take effect immediately and if the app was already engaged in a CPU-heavy task, you’ll see its processor usage plummet on all but the cores you selected.

Once we configure RipBot264 to use only 4 of our 16 cores, CPU usage drops immediately on the remaining cores.
With this setup, we can let RipBot264 encode as fast as possible on those four cores, but the remaining twelve cores in our system are free to handle other apps. If we later finish our other work and want to restore full performance to RipBot264, we can simply repeat the steps above to head back to the Processor Affinity window and then check the All Processors box to once again grant the app access to all of our CPU’s cores.
Caveats
In addition to the stability issues mentioned earlier, there’s one other big caveat you’ll need to consider. Any changes you make to processor affinity are reset whenever that process is restarted. This means that, at a minimum, you’ll need to repeat these steps each time you reboot your PC. Some processes are even more troublesome, however, as they reload automatically depending on the app’s instructions. In our RipBot264 setup, for example, the H.264 encoder process we modified starts over each time the app moves on to encoding a new video file.
You may be able to work around this limitation by creating custom scripts that set your app’s processor affinity via a command line-based batch file or shortcut, but some apps may use unique or random processes that make such efforts difficult or impossible. It’s therefore best to experiment individually with each app you wish to restrict to find the best way to manually configure processor affinity.
Related Posts
 What Happens When You Restrict Someone on Instagram
 How to Fix Kernel_task High CPU on a Mac
 How to Check the CPU Temperature on a Windows 11 PC
 How To Fix Microsoft Compatibility Telemetry High CPU
 How to Check the CPU Temperature on a Mac
 How to Disable Your AdBlocker Temporarily or For a Specific Site
 How to Perform a Search Within a Specific Subreddit
 How To Link to a Specific Tab in Google Sheets
 How to Reply to a Specific Message on an iPhone
Disclaimer: Some pages on this site may include an affiliate link. This does not effect our editorial in any way.


