How to Use Screencastify on Chromebook


Chromebooks don’t work exactly like Windows-based devices. That’s because they use the Chrome operating system.
While this makes them an excellent alternative to some other higher-priced laptops, it does mean that there’s a learning curve involved.
The Chrome OS works with applications from the Chrome web store. As Screencastify is one of those applications, you’ll need to get it from the store before you can use it.
Keep reading to find out how to both install and use the app.
Installing Screencastify on Your Chromebook
Your Chromebook is tied to your Google account. Screencastify will also use that account to save and manage your videos.
The first thing you need to do is install Screencastify. Open Google Chrome on your Chromebook and follow the steps below:
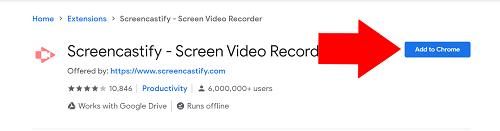
- Go to the Screencastify Chrome web store page.
- Click on the “Add to Chrome” button at the top right of the screen.

- You’ll get a popup window explaining everything you’re giving Screencastify access to do. Click on “Add extension” to continue.
The download will start automatically and complete within a few seconds. Screencastify is then ready to use.
Once it’s downloaded, the Screencastify extension will create an icon in your chrome browser. Note that extension icons can always be found just to the right of the Chrome search bar.
Using Screencastify on Your Chromebook
With the extension added to your browser, you can start using it immediately.
Whenever you want to start recording, click on the extension’s icon in your browser. The first time you click on the icon, you’ll be redirected to a setup page.
First, select whether or not you want Google Drive to save your videos. It’s a good idea to do this since you get 15GB of storage for free on Google Drive with your Google account.
Then, click “Sign in with Google” to select the Google account you want to use for Screencastify.
After you’ve signed in, you’ll be asked to grant permission to Screencastify to use your camera and microphone and drawing and annotation tools. Both of these are required to use all Screencastify features. Therefore, you don’t really get a choice. Make sure the boxes are checked and click “Next”.
Chrome will ask you again if you want to grant permission. Click “Allow” in the popup.
When you’re done, you’ll be redirected to a welcome page with three options.
You can watch a video explaining the features of Screencastify, take a set-by-step tutorial of how to make a video, or access the Screencastify knowledge base.
If you don’t feel like doing any of those, here’s how to start recording:
Making a Video with Screencastify
The first thing you want to do when you finish setup is prepare to record a video.
Screencastify can record what’s on your screen, so you want to make sure that you’re ready for that. Remove anything you don’t want in the video from the display.
Next, walk through everything you want to have in the video briefly and execute the steps to make sure it all works as you expect it to.
When you’re ready to record, click the Screencastify extension icon.
From the menu, you can choose to record a) only the browser tab you have open, b) everything that happens on your screen, or c) only your webcam.
If you select “Embed Webcam” you’ll also record your webcam in a small window, in addition to the other options.
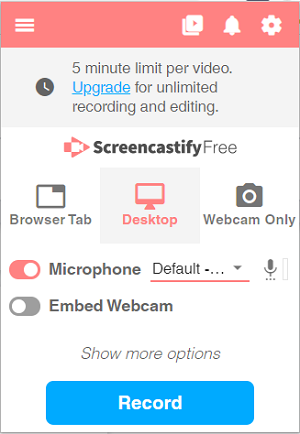
Click “Record” to start recording and you’ll get a countdown to show you when recording starts.
When you’re done, click “Stop Sharing” at the bottom of your screen and you’ll be redirected to the video editing screen.
The first time you record a video, you’ll be offered a tour of the editing and sharing tools. This will take less than a minute and it’s a good idea to take the tutorial.
Videos will be saved on your Google Drive by default. You can share them from your drive directly with a shareable link. Alternatively, you can upload them to YouTube or even download them to your Chromebook and send them however you want.
Chromecastify
As you can see, using Screencastify on a Chromebook is a simple process. Screencastify is designed specifically for the Chrome browser, so it’s probably your best choice for recording software on Chromebook.
Once it’s installed on your browser, a simple setup is all it takes. Then, simply click the extension icon and start recording!
As you learn more about the application, you can start adding annotations and other cool features to your recordings.
Have you ever had any problems using Screencastify on Chromebook? Let us know in the comments section below?