How to Fix Screencastify Not Recording Audio

With the Screencastify app, you can turn your Google Chrome browser into a screen recording studio. You can even record your own voice with a microphone, as well as film yourself when you connect a camera. Being essentially an extension for Chrome, using Screencastify is really simple.
The great thing about this app is that it can use both integrated and external devices, be it a microphone or a video camera. Unfortunately, sometimes you might encounter certain issues when trying to record audio with your microphone.
Solving the Audio Recording Issue
When having trouble recording audio with Screencastify, it mostly comes down to issues with a microphone. Thankfully, there’s a couple of things you can do.
First, you should check if your microphone is setup properly in your operating system. If it is, the next step is to check the microphone settings in the Chrome browser. Finally, check the microphone options in the Screencastify browser extension.

Recording the Microphone Audio
Microphone audio are the sounds that you capture directly over a microphone. It can either be a microphone integrated into your laptop/desktop computer or an external microphone.
If you plan on recording the browser audio while narrating over your microphone, you should use headphones instead of the computer speakers. If not, the microphone will pick up any sounds coming from the speakers, thus causing distortions. This will essentially make your audio recording useless.
1. Setting Up the Integrated Microphone
If you’re using an integrated microphone on your computer, it’s necessary to enable it in the audio settings of your operating system first. To do so, follow the steps below:
- Press the Windows key on your keyboard. You can also click the Windows logo on the taskbar in the lower left corner of the screen.
- Now start typing “sound”.
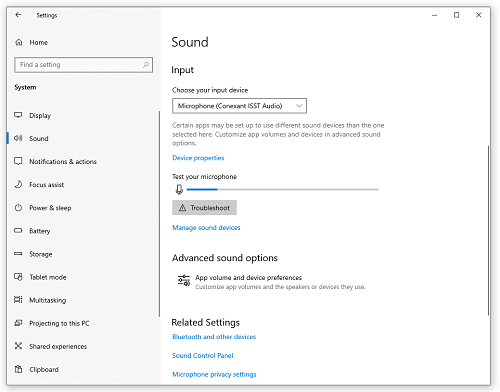
- The “Sound settings” option should appear. Click it.
- Scroll down to the “Input” section.
- In the “Choose your output device” drop-down menu, select the integrated microphone from the list. It’s usually the one called simply “Microphone”, with the manufacturer’s name next to it. For example, it may look like this: Microphone (Conexant ISST Audio).
- If the drop-down menu shows “No input device found”, it may be because you haven’t enabled the integrated microphone. To enable it, click “Manage sound devices” beneath the drop-down menu.
- In this menu, scroll down to the “Input devices” section.
- There you should see the list of disabled devices. If your integrated microphone is on this list, click the icon. If you don’t see it, then perhaps you haven’t installed the right set of drivers to make it work. To do so, please follow the instructions on your laptop manufacturer’s website.
- Now that you’ve selected your integrated microphone, click the “Enable” button. This will cause the microphone to jump up above the “Disabled” list of devices.
- Click the “Back” arrow in the top left corner of this window to return to the “Sound” menu.
- The “Input” section should now show the “Test your microphone” option. There you should see a bar that represents the level of the audio your microphone is currently picking up. Say something to see the effect.
- If everything seems ok, you can now close the “Sound” options window.
With the integrated microphone working properly, you can now move to Step 3 to enable it in Chrome.
2. Setting Up the External Microphone
Depending on the type of external microphone you’re using, it may connect via the microphone jack on your computer or over a USB port. Before you start recording your voice over the external microphone, make sure to properly connect it to your computer.
Once you do, your computer should automatically recognize it and set it up for you. If the system failed to automatically detect your external microphone, please consult the microphone manufacturer’s website on how to set it up yourself.
When your external microphone is up and running, you can proceed to the next step.
3. Enabling the Microphone in Chrome
Now that you’ve set up your microphone, be it internal or external, it’s time to enable it for Google Chrome as well.
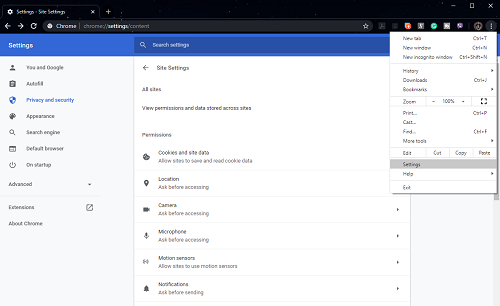
- Click the three dots in the upper right corner of Chrome.
- Click “Settings”.
- Scroll down to the “Privacy and security” section and click “Site Settings”.
- In the “Permissions” section, click “Microphone”.
- Select from the drop-down menu the microphone you want to use.
- Just make sure that any sites you plan to visit aren’t in the “Block” list. If you find some, click the little arrow next to the site’s address to open the related settings. In the “Permissions” section, find the “Microphone” entry and select “Allow” from the drop-down menu next to it.
Once that’s done, you can close the “Settings” page and restart Chrome before proceeding further.
4. Enabling the Microphone in Screencastify
Finally, it’s time to confirm that Screencastify is using the proper microphone as well.
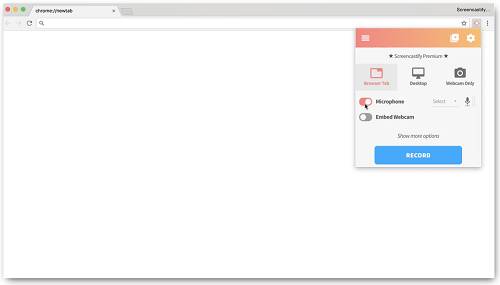
- Click the Screencastify extension icon. You can find it to the right of the browser’s address bar.
- The options menu will pop up.
- Next to the “Microphone” entry, you should see the check box. If it’s greyed out, click it to enable the microphone.
- Next to the “Microphone” entry, a drop-down menu should appear. Click it to select the microphone you want to use.
- Once you select it, you should see the green bar flashing. This indicates that you’ve successfully connected your microphone to Screencastify.
With the entire procedure finally complete, it’s time to start recording your voice along with everything you’ll be doing in the browser.
Audio Recording Solved
Hopefully, the advice outlined above helped you resolve audio recording issues. Now you can start creating comprehensive video tutorials on any topic you wish. Thanks to Screencastify’s user-friendly interface, it’s easier than ever to record any actions you perform in the browser and add your commentary to it.
Have you managed to solve the audio recording issues? What was causing the problem? Please share your experiences in the comments section below.