How to Add a Collection on Shopify

If you chose Shopify as the eCommerce platform for your online store, you’re probably aware of the different ways to organize your products.
Adding a collection helps give your online business a better structure. This won’t just make your job simpler, but your customers will appreciate it too.
In this article, we’ll show you how to add a collection to your Shopify store.
Creating a Shopify Collection
All online stores have categories of products that are separated into collections. For example, you can create a collection of products that are currently on sale.
Or if you’re selling clothing, you can have fashion for men, women, and children. If you’re selling one type of product, you can organize it by color or material. When you create a Shopify collection, it will be displayed on your webpage as a gallery with products.
However, keep in mind that the Shopify theme you’re using will determine the final outlook of your collection. There are two types of collections on Shopify, manual and automated.

Manual Collection
Let’s start with how to add a manual collection. Just follow these steps:
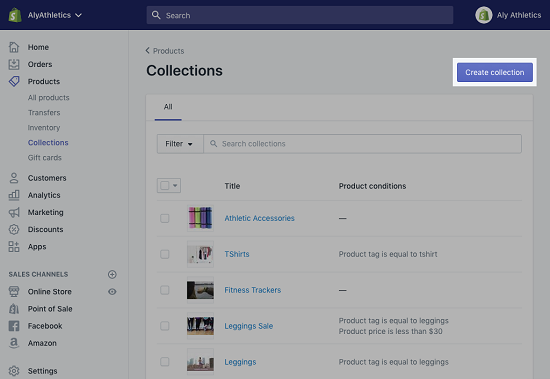
- Go to your Shopify admin panel and then select “Products>Collections”.
- Select “Create collection” and then enter a title and description for your collection.
- Select the Collection type “Manual”.
- Select “Save”.
- Go to the Product section and select “Browse”. Start adding all the products you want in your collection manually.
- Drag the product to arrange them in the order you want them to appear in the store.
- Select the “Sales channel” and then “Manage” to decide where you want to collection to be available.
- Select the “Collection image” and then “Add image” when you’re ready to upload all the pictures for your collection.
- Select “Save”.

Automated Collections
With manual collections you have to add products yourself, and that’s usually a preferred option when your store doesn’t have a big inventory yet. However, most Shopify stores use the automated type of collections.
With automated collections you get conditions that will automatically include all the matching products. But you’re the one who decides what those conditions are. When you have an automated setting, all future products are automatically added.
The downside of this automated collection is that you can’t go back and delete specific products. You have to change the conditions first. Therefore, let’s see how to add the automated collection. You can follow steps 1-3 in the manual collection steps and then:
- In “Collection Type,” select “Automated”.
- Make sure that you:
- Select how many conditions products need to match.
- Select from the drop-down menu which conditions you want in your collection.
- Select “Save”.
You can check the “Product” after you save changes to see if all the correct products have appeared in the collection. Also, you can go to “Collection image” and upload pictures.
Adding a Link to the Collection
When you’ve created your collection, the next step is to ensure that all your customers will be able to find it. That means you have to add the link to the collection itself. Here’s how to do so:
- Go to your Shopify Admin panel and then select “Online Store>Navigation”.
- From the “Navigation” page, select the title on the menu where you want the link to go.
- Go to “Menu items” and then select “Add menu item”.
- You’ll see the “Name” section. Give your collection a name that your customers will see.
- Next to the “Link” list, click on “Collections”. And then click on the collection you want.
- Select “Add”.
- Finally, select the “Save menu”.


Editing Website SEO
When you’re creating either a manual or automated collection, you can edit the website SEO features. That means that you can impact how your page will show up in the search engine results. The Shopify system will use the default setting with your title and description of the collection.
But you can edit it any way you want. You can write your own metadata description, change URL, page title, and make the most of using keywords that accurately define your collection.
You Can Hire a Shopify Expert
Did you know that you can hire a Shopify expert? What does that even mean? Well, once you start building your online business with Shopify, you might be surprised at just how much work goes into it.
Even with all the automated features an excellent website like Shopify offers. Sometimes you have to be your own accountant, CEO, marketing strategist, and everything else in between. And even if creating your collections takes up too much of your time, an external expert can be of great help.
A Shopify expert is a person who can give you professional advice and help you get your business going. Shopify has a directory of experts that you can browse through and evaluate.
Optimizing Your Shopify Collection
When you start creating your collection, the Shopify system will set it to “automated” by default. That’s because it’s much easier to let the website do all collection organizing. If you have a large inventory, you won’t be able to do everything manually.
However, the manual collection works best when you first start learning about how to manage Shopify. If you get stuck, hire a Shopify expert. Also, don’t forget that your SEO settings will make a lot of difference in how your page is perceived.
Have you ever tried adding a collection on Shopify? Let us know in the comments section below.