
Snapchat—How to Screenshot Without Them Knowing

There are a lot of different chat applications out there, and each usually has its own distinct demographic; the under-30 set seems to pretty much live on Snapchat. The app has become massively popular over the past few years, mainly because it allows users to share photos and videos that automatically disappear after a set amount of time once they’ve been viewed. Though the feature was originally intended to be used for not-safe-for-work photos and videos, over time the way people use the app has moved away from that early focus. Snapchat has become a more open social network for teens and twenty-somethings to share what’s happening in their lives without having to worry about the reactions from family members or future employers, because the images are transient and self-deleting. Instead of placing an emphasis on the “permanence” of the Internet that young people have been taught to fear since the mid-2000s, Snapchat gives its users a place to live out their lives without fear of being punished for what they put online.
Unfortunately for those seeking true privacy, however, all modern smartphones on the market have the capability to capture a screenshot of what’s on your display by hitting a specific key shortcut on your device. The specter of screenshotting has been around for the entire existence of Snapchat. Sure, you could post those photos from the party you’re at on Snapchat—but if someone screenshots them, there’s nothing you can do. You’re effectively out of luck. Now, most Snapchat users don’t worry much about people saving screenshots of their snaps, because Snapchat delivers a notification to the person who’s been screenshotted.
However, it turns out that there are several workarounds for avoiding detection when screenshotting. If you’re curious in learning how these methods work—either to use them on others or so you know what to expect from other, possibly-malicious users—you’ve come to the right place. Whether you’re using Android or iOS, we’ve developed a guide to learn just how to covertly screenshot all of your friends’—or enemies’—snaps. Let’s take a look.
Screenshotting Snaps on Android
It’s no secret that Android is a bit more open of a platform than what we’ve seen from Apple. Android allows for apps to be installed from outside sources rather than just the Play Store, while also giving those apps a bit more wiggle room in permissions and information. Since Android has these liberties, it can be a lot easier to bypass restrictions placed on certain apps, including the ability to discreetly screenshot a snap on Snapchat without notifying the original poster. Here are our favorite methods for screenshotting on Android.
Screen Recording Method (Recommended)
This is probably the most foolproof way to save a snap on Android. Using a screen recording application doesn’t require any hacking knowledge, additional tools, or risks. As long as you have the app running in the background of your phone when you access your snaps, you’ll be able to save photos and videos onto your device without anyone being the wiser. Currently, only Android phones can easily record screens without using an external source to record what’s happening on the screen, so if you happen to be the owner of something like the Google Pixel 3 or Samsung Galaxy S10, today’s your lucky day. Let’s take a look at how to save your snaps inside Snapchat through a screen recorder.

To get started, we’ll need a really great screen recording app to use on Android. Google Play has a dozen great recording apps, including AZ Screen Recorder and Mobizen Screen Recorder. While we’d typically recommend looking through the Google Play listings to find a screen recorder that fits your needs, instead we’re going to recommend our favorite app: DU Recorder. We’ve mentioned DU Recorder on the site before, but as a general rule, we find it to be our favorite overall recorder on Android. It’s fast, easy to use, and completely free of both in-app purchases and advertisements. We’ll be using DU Recorder for the rest of the demo below.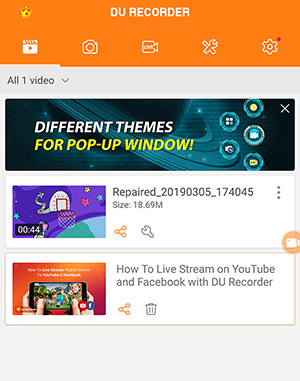
After you’ve installed DU Recorder onto your phone, launch the app from your app drawer. The main display will appear blank, because you haven’t recorded a video yet, but once you’ve recorded a video, you’ll be able to find it here. There are four individual tabs along the top of the screen here, which will display your videos, photos, an editor for your recordings, and a settings and preferences tab all the way to the left. Before we record a snap, head into settings here so we can update a few settings.
First, change your recording resolution to match your device’s resolution. For context, most mid-range and some high-end phones use a 1080p screen resolution (the Moto G6 and G7, the OnePlus 6T etc.), while most flagship devices use a resolution of 1440p. We suggest setting your device’s recording resolution at around 1080p or higher. Set your video recording setting to about 6Mbps or better, and make sure your FPS is set to “Auto.” Finally, make sure DU Recorder has permission to record audio through your phone’s microphone for any video snaps you might want to capture. Once you’ve changed these settings and you feel acclimated to the app, you can head back to your home screen. All we needed to do for now was have the app launch for the first time.
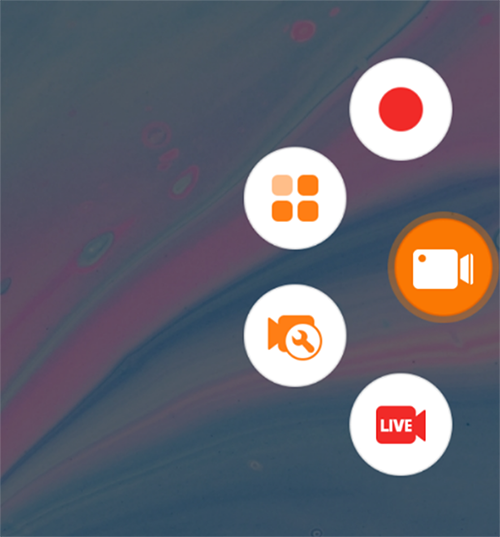
On your home screen, you’ll find a small, translucent-orange icon sitting on the right of your display. Tapping on this icon will open the quick-launch menu for DU Recorder. Depending on what type of snap you’re looking to save—either a photo or a video—the tool you want will be here. At the top of the wheel, you’ll find a red “Record” button that will automatically start recording your display once pressed. At the bottom of this wheel, you’ll see a red “Camera” icon, which will allow you to take a screenshot of your display. While you can theoretically use that screenshot button to take a screenshot of your display, we recommend using the screen record option instead, for photos and for videos. Though it may take a bit more work to save your photo than using the screenshot shortcut, we prefer the extra security provided by DU Recorder’s screen recording.
Make sure you’ve changed the settings on your device as we outlined above and hit the record button on DU Recorder’s quick-launch menu. After a countdown, your phone will begin recording. From here, dive right into Snapchat. Open any snap or story you’re looking to capture permanently. Don’t use the hardware screenshot keys—just view the snap for a few seconds and close. Repeat this for as many snaps as you’re looking to save. For video snaps, let the video play out in its entirety. Don’t worry about stopping the video recording to start a new one—we can edit these later. After you’ve captured what you need, leave the app and use the quick-launch menu to stop recording.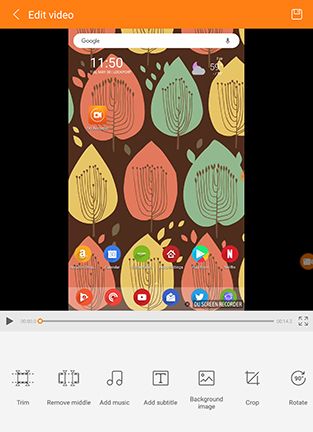
Okay, you’ve saved your snaps! Here’s the easy part: open DU Recorder again and you’ll find your video saved on the main display of the app. You can use this video to do a few things:
- Watch the video back on your phone. As the video plays back, screenshot any snap you wanted to save as a photo, effectively copying the video as a still and saving the snap to your phone’s internal storage.
- If you’re looking to save a video snap from this recording, you can use the included editor inside of DU to cut out and crop any parts of the video you don’t need, all while saving the file as a new copy. You can use the editor to trim the video’s ends and beginnings, remove any middle sections you don’t need, and even crop or rotate your newly-saved snap. If you aren’t clear on how the editor works, check out our full How-To guide for DU Recorder here, where we go much deeper into the included editor.
Once you’ve saved what you need from your recorded video, you can delete the original recording from the app and from your phone, removing any evidence you previously had of your Snap-saving while keeping your own copy and skipping the alert notification sent to other users. If you need to record a new snap, simply start a new recording before viewing your content.
No Data Method (Unverified)
We’re not going to lie—this is a difficult method to test. It definitely doesn’t work on iOS, and on Android it’s a bit of a toss-up on whether Snapchat has completely removed the capability from the app. Essentially, the thinking behind this method involves screenshotting the app while your phone is on Airplane mode. Since the phone isn’t able to connect to a network, it can’t send a notification to the other user. In theory, this is totally true. In fact, if you screenshot a snap while in Airplane mode, your phone won’t be able to send a notification to that user at all, and you might be able to get away with it. However, you’ll probably have to reconnect to data eventually, either over mobile networks or WiFi, and as soon as you reconnect your device to a network, that notification will be sent. In theory, you could use this as a method to delay the notification getting sent, but for better or worse, that user is still going to know.
While this method has been debunked on iOS, it’s a little less clear on Android devices. While we’ve seen notifications sent after getting reconnected to a network, we’ve also seen this occasionally not notify other users at all. We’d argue that, should you decide to try this method, you should proceed with caution, as the method seems to only work some of the time on Android phones. At worst, you should be able to at least delay the notification to other users, so give this one a shot if that’s something that interests you. Let’s take a look at how this works.
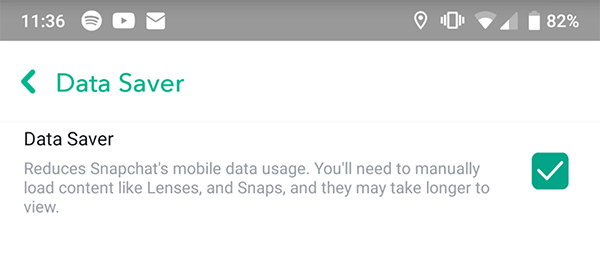
The first thing you’ll want to do is ensure Snapchat hasn’t been set in Travel Mode within your settings. Typically, we advise most users to keep Snapchat in Travel Mode. It prevents the app from loading snaps on mobile data in the background, saving both data usage and your battery life in the process. That said, you’ll want to make sure the app loads in the background, so dive into Settings by opening the camera interface on Snapchat and sliding your finger down the display, then hit the Settings cog icon in the upper-right hand corner of your display. From here, search through your settings menu until you find the “Data Saver” option. Click this and ensure this is turned on.
When you receive a new snap, don’t open it right away. First glance to see if the snap has been loaded by the application in the background. Underneath the snap, you’ll see text that either reads “Tap to view” or “Tap to load.” If the Snap reads “Tap to load,” tap the icon once and don’t tap it again. Wait for the snap to load in the background, at which point the icon will return to normal and then read “Tap to view.” Once the text has switched to “Tap to view,” don’t open the snap. Place your phone in Airplane mode to disable connections from your phone, then head back into Snapchat. Despite being in an offline-mode, you’ll still be able to open the snap you already loaded. Open the snap, grab a screenshot using your device’s predetermined button combination or shortcut (typically Power+Vol Down, though some Samsung devices user Power+Home) and exit the app.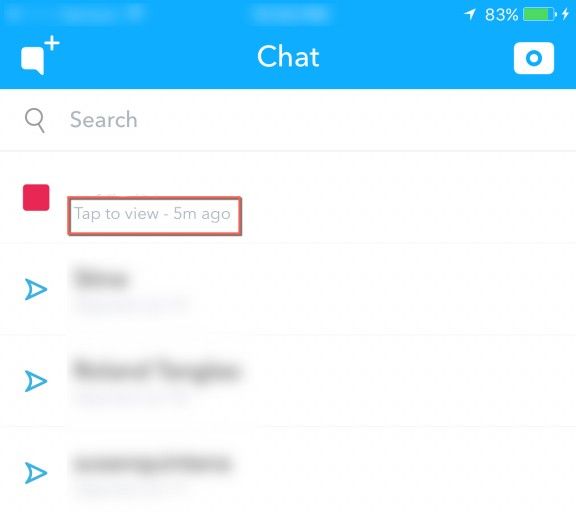
As we mentioned, there’s a pretty strong chance Snapchat will report the notification to the other user as soon as your phone is connected to a new network, so do be careful here. We have a couple recommendations for avoiding this notification being sent once reconnected to a network, but everything here seems to be pretty inconsistent.
- Wait several hours before reconnecting your device to a network. Time seems to have a correlation between whether or not the app reports the screenshot.
- Open Snapchat’s app management screen within your phone’ settings menu by hitting “Apps,” “Snapchat,” then “Storage.” From here, hit the “Clear Cache” button to remove recent memory storage of Snapchat’s own application data.
- Uninstall Snapchat from your device. The app can’t send a notification to the other user if it isn’t active. Wait some time, then reinstall the app on your phone to get the best experience before logging back in.
We also don’t necessarily recommend this strategy because Snapchat can, at any time, update the app to create an environment where this solution simply doesn’t work. So if you do decide to try to practice this method, proceed with caution. Otherwise, we recommend using one of the other methods on this list.
Screenshotting Snaps on iOS
iOS has had a built-in screen recorder since iOS 11, but unfortunately, you won’t be able to use it on iOS without alerting Snapchat to your activity. Unlike on Android, where a built-in screen recorder doesn’t currently exist (though you can expect it in the upcoming Android Q release this year), iOS will record your screen without an external app , but any time you do it, you’ll find yourself alerting your recording to the other person within the app. These restrictions make is a bit more difficult to capture screenshots without using an outside source, most typically a computer. Still, let’s take a look.
QuickTime (Mac Only)
While we’re all excited to have native screen recording on Apple’s own mobile platform, things are a bit more complicated right now. As it stands, you can’t record your display on iOS 10 unless you’ve jailbroken your phone, a process we don’t recommend due to stability, battery, and security concerns. Instead, you’ll be relying on an external recording device to grab your screenshots, and the easiest method of doing so—using Apple’s own QuickTime application—only works on Mac. Still, if you have a Mac, you’ll be happy to know recording your display is accessible in only a few steps. Let’s take a look.

Start by connecting your iPhone to your Mac using your Lightning cable. Open QuickTime Player on your computer, either from your apps folder or by using Launchpad to select the app. When QuickTime has loaded, hit ‘File’ in the menu bar and click “New Movie Recording.” A recording menu will load on your display, using the webcam on your Mac as its default video source. From here, click the arrow next to the record button, which will produce a drop-down menu for selecting the source for your recording. You should then select your iPhone, as well as your iPhone’s microphone for the sound recording options. Once you’ve entered your new video and audio sources for your QuickTime recording, it’s time to take a screen recording of your phone.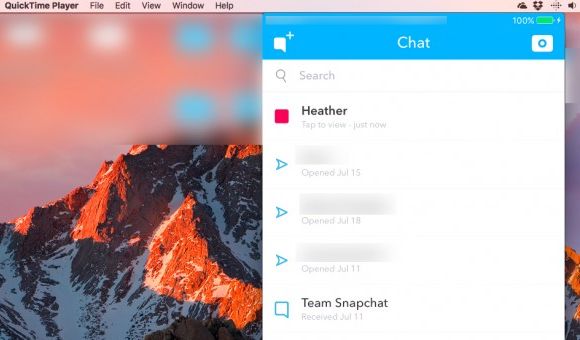
Now, click the record button. From here, you should be able to use your phone as you normally would—which includes opening and viewing snaps. Once you’ve viewed your snaps (as we outlined earlier in the article), you can stop your recording with QuickTime by tapping the stop button on your Mac. And of course, QuickTime will allow you to trim your video within the app. Hit the edit button on the menu bar above the app and select ‘Trim.’ Drag the playhead using the yellow handles to select the part of the video you want to keep, while leaving the other parts of the video out of your selection. Once you’ve made your selection, click the trim button to save your cut.
Once that’s done, you can save and exit QuickTime, with your newly edited screen capture from Snapchat saved on your Mac. Unfortunately, we’ve heard that the addition of a screen recorder in iOS 11 made this method detectable in Snapchat, so you might want to test the app on a non-important snap before using it regularly.
Apowersoft (Win/Mac)
Never ones to leave out the iPhone-owning Windows users, we’ve found Apowersoft to be our favorite screen recording app for most Windows users. The app has a few distinct advantages over using something like QuickTime. In addition to the obvious platform-agnostic approach, Apowersoft’s screen recording software essentially uses Airplay to gather the screen, meaning the app is totally wireless. As long as your phone and home computer share a network, you won’t run into any difficulties using the app on your device. Let’s take a look at how this works.
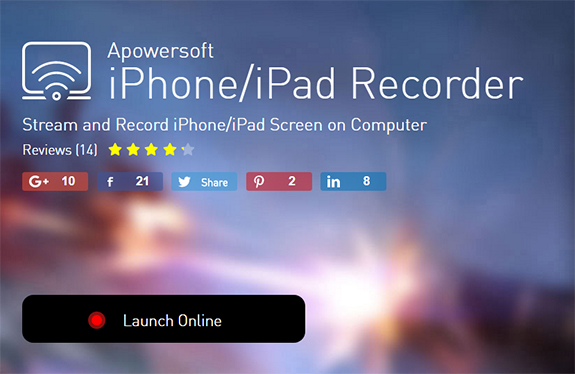
You’ll have to head over to Apowersoft’s website and grab the iPhone/iPad Recorder. It’s a totally free download, so don’t worry about having to pay for the app upfront. Once the app is installed and running, just like any other application on Airplay, you’ll swipe up into Control Center on your iPhone to access and connect through Airplay. Once your two devices are synced, you’ll see your iPhone’s display mirrored on your computer monitor.

With your device mirrored, all you have to do to use the Apowersoft app to record your screen is tap the red circle icon in the top-left corner. As soon as this button is pressed, you’ll begin recording your screen right to your Mac or PC. In our testing, this actually prompted a smoother and better recording than using QuickTime, so long as your network is fast and stable-enough to handle broadcasting over wireless internet. Once you’ve recorded the snap you wanted to save secretly, tap the recording icon again to stop. Your recording will pop up in a brand-new window on your desktop. You can then save or delete the video as you see fit.
Obviously, there are some upsides and downsides to recording with Apowersoft over QuickTime. The quality is a bit better, with less skips and stutters in the recording, and we always prefer wireless recording where we can. But otherwise, it typically seems to be about equal to QuickTime in recording. Transferring files over to your phone can be a bit obnoxious, and you have to find a separate app to edit and change how the recording starts and ends. But it’s worth a download, if only to try it out for yourself.


5 thoughts on “Snapchat—How to Screenshot Without Them Knowing”