How To Split Google Docs into Columns

As part of the Google Drive service, Google Docs offers a convenient way for users to create text documents online. In addition, real-time collaboration is possible, giving it enhanced functionality. As such, countless users have wholeheartedly embraced Google Docs, and the program is seeing widespread use in numerous areas.
However, as a word processor, Google Docs used to leave a lot to be desired. Many would refer to it as nothing more than a watered-down version of Microsoft Word because it lacked some well-established features. And to a certain extent, this holds true to this day. Simply put, Word has some capabilities that Google Docs does not.
But the gap between the two programs has reduced by quite a bit in recent years. And one notable example of this has to do with columns.
To be specific, for a very long time, Google Docs did not have a built-in feature which would allow users to split their documents into columns. This forced people to get creative and come up with workarounds. Seeing as columns are something that really is likely to come up in regular use, this represented a noticeable shortcoming.
Fortunately, Google has decided to listen to the pleas (or more likely, outcries) of the public and has since added this function. Although, truth be told, it did take them quite a while – this feature did not arrive until 2016. That is why there still may be quite a few Google Docs users who are not aware of it.
The Built-In Solution
As mentioned, columns are now a standard part of Google Docs. What is more, they are very easy to use, requiring nothing more than a few clicks to set up. This means you can split your documents into columns in a matter of seconds.
To do this, look at the menu at the top of the window. There, you will see the “Format” tab. Click it, and it will expand to reveal more options. Among them, you will notice the coveted “Columns” function.
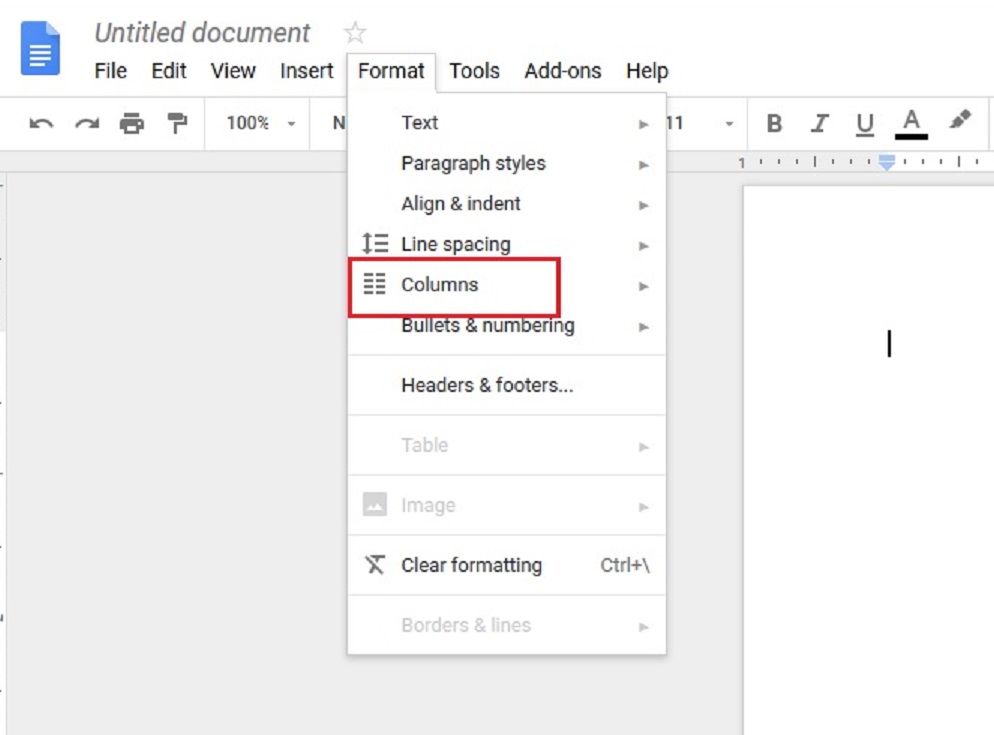
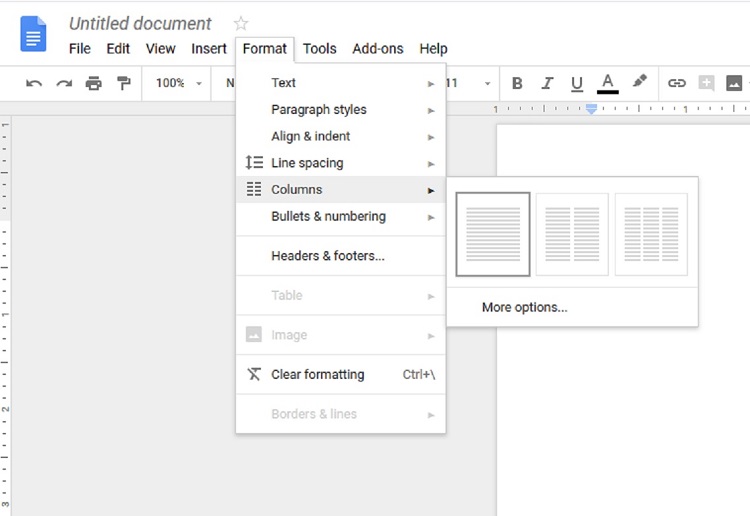
Hover over it, and a submenu will appear. If you simply want to divide the text into two or three columns, you can just click one of the provided presets. Considering it is quite possible that this is everything you need to get the job done, you might be able to call it a day right here. But if you want to tweak the layout some more, select “More options”.
This will take you to a completely new menu where you will have a couple of different options at your disposal to create a customized layout.
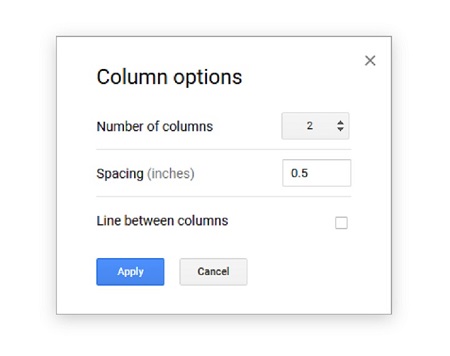
The first option allows you to specify the exact number of columns you want. Two or three tend to be the most popular choices (that is why they are the presets), but you may need more. Just keep in mind that the more columns you put in, the less space each one will have. Put in too many, and each one will only be able to carry an extremely small amount of characters.
Next, you can designate the spacing between the columns. By increasing this figure, individual columns will stand out more. Conversely, decreasing it will allow you to fit in more text per page.
Finally, you can choose whether you want Google Docs to display a vertical line between the columns. This is a useful option when you want a greater degree of visual separation and can help make the document more legible.
That is all there is to it when it comes to the layout of the columns. But, we will mention another small trick here. That is how to quickly start typing in the next column.
By default, you’ll type in the first column until you fill it out and only then move on to the second one (the same applies to any subsequent column). But if you want to leave a column partially empty and immediately jump to the next one, you need to use the option called “Column Break”.
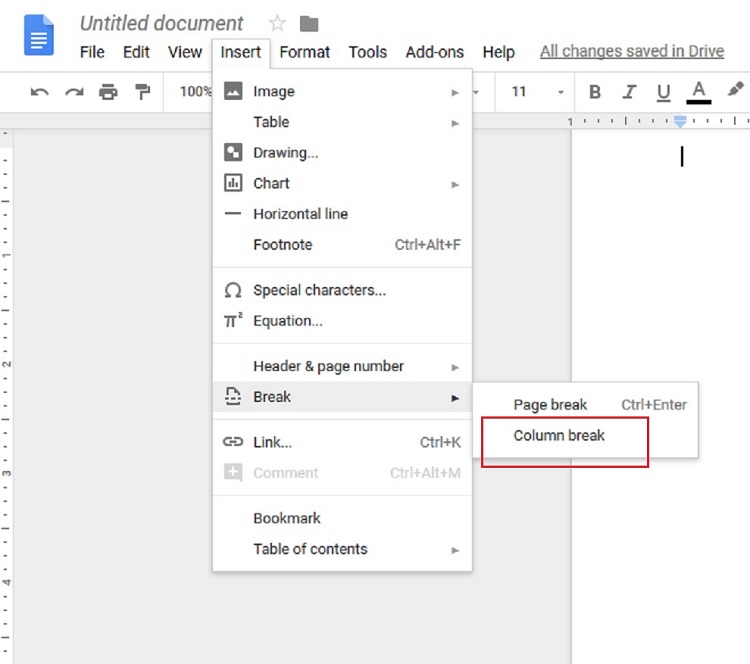
You can access it either through the “Insert” tab of the main menu or simply by right-clicking.
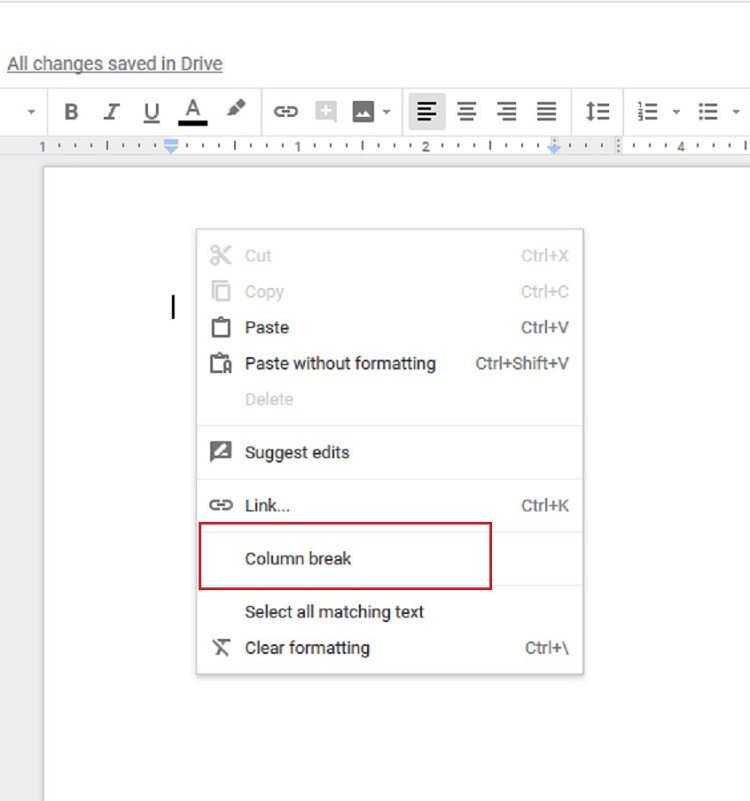
Either way, this allows you to quickly switch to a new column and continue working.
Conclusion
When it comes to Google Docs, this is everything you need to know about the built-in column function. It is very easy to use and won’t take you long to master.
But just in case you’re curious, the workaround people had to use before Google introduced this function involved tables. Specifically, you would create a table with one row and as many columns as you needed. Then, you would do a bit of formatting and write your text in there. Luckily, you now have a simpler option.