How to Use Conditional Logic with Google Forms

Conditional logic is not as complicated as it seems, but it looks hard in the beginning. Allow this article to be your guide on how to use conditional logic with Google Forms. Then, after reading this article, go to Google Forms and play around a little. Once you have discovered what the icons do and where the functions are, then things become rather self-explanatory.
Where to Start?
You will need to go to Google Forms.
Click on the blank document that has a large plus sign in the middle. Name the form, and it is time to add your first question.
A Thank You for Your Order Page
Let’s say your form says, “Thank you for your order.” Maybe you wish to ask the name of the person who made an order.
You need to click one of the dots on the right. You will see a plus button on the right. It will allow you to add a question.
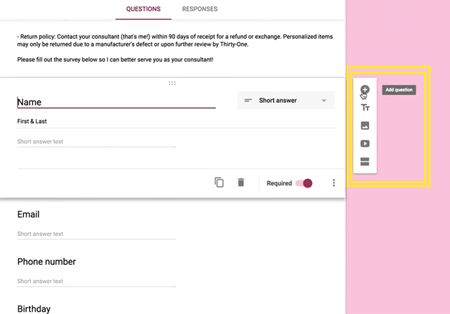
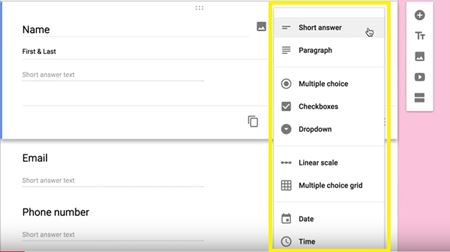
Once you have added your content, which in this case is the “Name” with “First & Last,” you may decide what type of answer you want. Obviously, with this form, a “Short Answer” is the best. But, you can click the question button and pick between several different options.
The short answer is the best one in this case because all the other options would either be unsuitable or would offer too much space for what is essentially a quick answer.
Is the Question Required?
If you click the three vertical dots at the bottom right of the form, it will allow you to show the description and date validation. The description, in this case, is just the words, “First & Last.”
Next to the three vertical dots icon, there is the word “Required” and a toggle button. If you toggle the button to “Yes” or “On,” then the user will be unable to submit the form without answering the question you just posed.
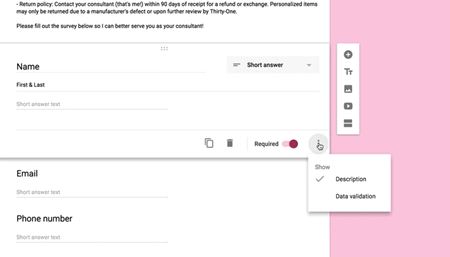
Next to the word “Required” is the Trash icon for deleting your question, and the Duplicate icon for duplicating your question.
Add Sections to Your Form
Click on the “Add Section” icon to create sections. Creating sections allows you to use conditional logic. The icon looks like a box split down the middle.
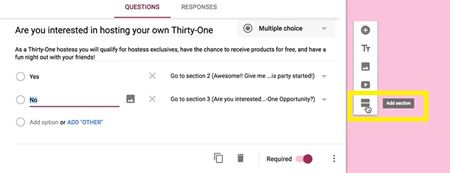
Let’s say that the form has two conditions. When somebody answers a question, they answer “Yes” and go to one section, or they reply “No” and go to another section.
Conditional logic determines which answer sends the viewer where. In the image shown above, you can see how answering “Yes” sends the visitor to “Section 2.” Answering “No” sends the visitor to “Section 3.”
You need to use the “Add Section” function to make the sections before you can start sending people to them.
Go to Section Based on Answer
Select the question, in this case, the “Yes and No” question and then go back down to the three vertical lines icon. It will now show a function called, “Go to section based on answer.” You may use this function to decide where the answer sends people.
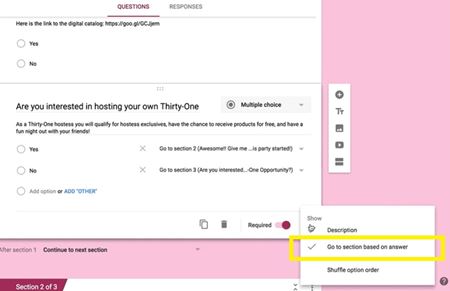
Once you create new sections, Google will ask you where to send people after each answer. All of the sections you have created will appear as options. Pick the one where you want to send the visitor.
You can also choose the “Submit Form” option, which is not technically a section, but it may lead to one that you created. For example, you may have written, “Thank you for submitting your form” or something of that nature.
Final Thoughts
Once you know what the icons do, the GUI seems almost to walk you through the process. If you add a section, you can always delete it. If you add a function, you can always remove it. Once you know what the icons do, working with Google Forms becomes a piece of cake.
Did this article help you with conditional logic? Were you hoping for a more complex system? Do you think this would work well for a sales funnel? Let us know in the comments.