


How to Use Windows Sandbox
To ensure that a program you’ve downloaded is free of viruses, you have to install it first. Anti-viruses aren’t perfect, and you really can’t be too careful. Fortunately, the newest version of Windows 10 has released a convenient tool to weed out malicious programs: Windows Sandbox.
In this article, we’ll show you how to install and use Windows Sandbox to keep your system safe.
What Is the Windows Sandbox?
Windows Sandbox is a virtual machine. Essentially, it’s a piece of software that acts like a separate computer. Because it’s an operating system that runs independently from Windows, you can run programs and any changes made won’t affect your actual system.
When you close the Windows Sandbox, anything you installed within it will be removed. When you start Sandbox up again, it will be like starting with a newly installed copy of Windows 10.

What Version of Windows 10 Is Required?
Windows Sandbox only comes with Windows 10, and even then, it has requirements that you must meet:
- Windows 10 Pro or Enterprise version only.
- OS Build should be 18305 or later.
- AMD 64, or 64-bit processor architecture.
- At least 4GB or RAM, though 8GB is recommended.
- At least 1GB of free hard disk space. SSD’s are recommended.
- At least Two CPU Cores. Four Cores with Hyper-threading is recommended.
How Do I Start Windows Sandbox?
If you meet the above requirements, you can install Windows Sandbox from Windows 10 itself. It’s not enabled by default, so you’ll have to turn it on yourself.
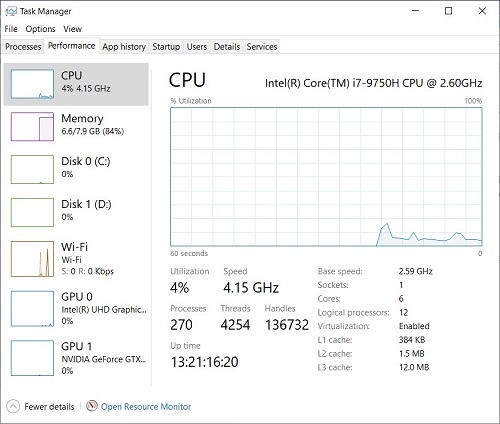
First, you’ll need to check if your Virtualization is on. To do this, right-click on the Taskbar and select Task Manager from the menu. Open the Performance Tab. In the lower right part of the Task Manager should be a list of performance specs, including Virtualization. If it says Virtualization: Enabled, you’re fine. Otherwise, you’ll have to turn it on via your BIOS settings.
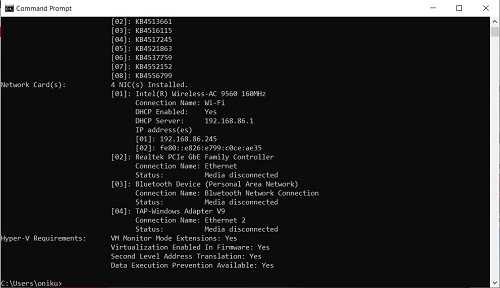
Alternatively, you can also check Virtualization through the Command Prompt. Just type in cmd in the taskbar search window, and select Command Prompt. Type in systeminfo.exe then press enter. In Hyper-V Requirements there’s an entry titled Virtualization Enabled In Firmware. It should say Yes.
Enabling Virtualization in BIOS
To enable Virtualization, you can follow the steps below. Note that your computer will need to restart to enable this.
- Click the Start Button on Taskbar.
- Choose Settings.
- Click on Update & Security.
- On the menu to the left choose Recovery.
- Under Advanced Startup click Restart Now
Once the computer restarts, it should show a blue screen with several icons. Do the following:
- Click on Troubleshoot.
- Click on Advanced Options.
- Click on UEFI Firmware Settings.
- Press Restart
The computer will restart again with a black screen this time. Several options will show up with corresponding function key assignments. Follow these steps:
- Choose BIOS Setup. This is usually F10. If not, press the corresponding function key.
- Go to System Configurations Tab by pressing right or left.
- Press down to highlight Virtualization Technology.
- Hit Enter and choose Enabled.
Pick the Save and Exit option at the bottom of the Screen. This would usually be F10. If not, choose the Function key it’s assigned to. Your computer should now restart with Virtualization turned on.
Turning-On Windows Sandbox
On the Taskbar Search Window, type in Turn Windows Features on or off. This should open a small window with a list of Windows features. Scroll down and find Windows Sandbox. Tick the checkbox and click OK. Sandbox will then take a while to install. Wait for the installation to finish. When done, click Restart Now.
Once your computer has restarted, just click the Start button on the taskbar and scroll down the applications and find Windows Sandbox.
Do note that if the option to select Windows Sandbox doesn’t appear in the Turn Features on or off window, then it means that you don’t meet the requirements to install the feature.
Using Windows Sandbox
Clicking Windows Sandbox form the Apps menu will open the application. It will look like a freshly installed Windows 10 desktop. You can drag and drop files into the window, including executable files, and let them run.
As said, Sandbox is a separate environment and it’s isolated from your main operating system. Any program installed in the Sandbox will be deleted when you close the application. From here you can test run any file you download to make sure that there’s no malware included with your file.
A Handy Screening Tool
Windows Sandbox is a very handy tool to screen the files that you’re not entirely convinced are safe to open. Having an isolated testing area where your actual Operating System is secure from any malicious software is surely beneficial.
Do you have any other tips on how to use the Windows Sandbox? Share your thoughts in the comments section below.


