How To Zoom Out on Mac and other Accessibility options

I was sat in a coffee shop the other morning contemplating ideas for a new tutorial for TechJunkie when someone on the table next to me began muttering into their MacBook Pro. Not an usual situation at first, but then the muttering quickly turned into frustration and then fingers began stabbing at the keyboard. Being the helpful type, I leaned over and asked what was wrong.
‘I can’t find out how to zoom out on this Mac.’ Was the answer. And there was the subject for my next tutorial. How to zoom out on a Mac and how to access the other Accessibility options within MacOS.
After helping the guy out, I wrote this tutorial. It helped him and I hope it helps you too.
How to zoom in and out on a Mac
Zooming in and out on a Mac is suitably simple and ideal for anyone who needs extra clarity on a portion of the screen or who is visually impaired. You can use a keyboard shortcut or a key and gesture on touchscreen devices.
- Zoom in – Option – Command – + (plus)
- Zoom out – Option – Command – – (minus)
Or if you have a touchscreen:
- Zoom in – Ctrl – Two finger swipe up
- Zoom out – Ctrl – Two finger swipe down
If you have a Magic Mouse:
- Zoom in – Ctrl – scroll wheel up
- Zoom out – Ctrl – scroll wheel down
Zoom works incrementally and each press of the + or – key will zoom in or out one increment. Hold the + or – key down to zoom in or out a considerable amount. The same for the gesture, the slower you move your fingers, the slower the zoom. The faster you move, the faster and further the zoom.
If zoom doesn’t work for any reason, you will need to make sure it is enabled in the Accessibility menu.
How to access accessibility options in MacOS
If you have particular needs, there is a suite of accessibility options you can use in MacOS. If you need specific assistance, you will need to enable it within the Accessibility menu first. The Accessibility menu is simple to find when you know where it is and can open up the operating system to many people with differing requirements.
To access the menu, select the Apple menu and then select System Preferences and Accessibility. You can also hit the Function – Command and F5 keys if you prefer.
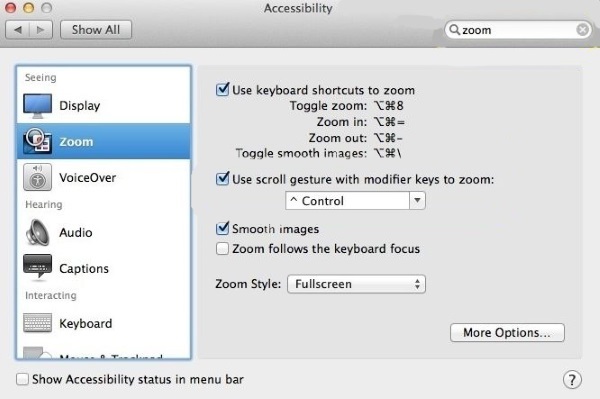
To make sure zoom is enabled, select Zoom from the left pane of the Accessibility menu and check the box next to Use keyboard shortcuts to zoom, Use scroll gesture with modifier keys to zoom and smooth images. You can then modify Zoom Style to best reflect your needs.
The other Accessibility menu entries offer different types of assistance depending on your needs.
Display
The Display entry can be used to invert the colors used on the computer or use grayscale if that works better. There are also contrast and cursor size sliders should they be of use.
VoiceOver
VoiceOver is designed for the visually impaired and is an advanced option that enabled braille display support, voice navigation and interaction and some very neat features. VoiceOver is very detailed and Apple have a very good guide right here.
Audio
Audio is for the hearing impaired and can turn on screen flash for notifications and modify sound to be stereo or mono.
Captions
Captions just allows you to change caption sizes depending on your needs and force Closed Captioning wherever available. There isn’t a lot else here.
Keyboard
Keyboard allows you to set up sticky keys, slow down keyboard response, set up modifier keys and enable an audio indicator for keystrokes.
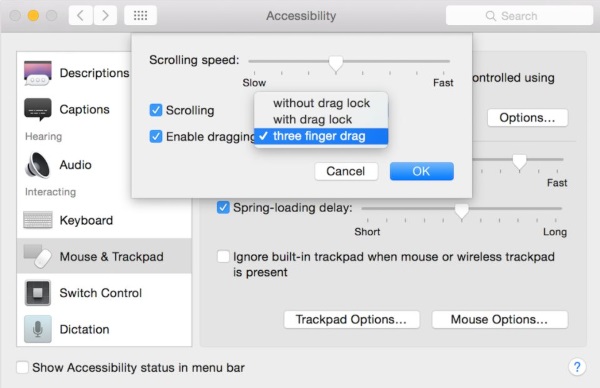
Mouse & Trackpad
Mouse & Trackpad is where you can modify the speed of the cursor, speed of mouse clicks and corresponding controls for the trackpad. If you want to forego the mouse or trackpad altogether and navigate purely by keyboard, you set that up here too.
Switch Control
Switch Control allows you to configure modifier keys that can be tied to specific functions. This is like a shortcut key that can be configured to do whatever you like. This might take a little setting up but can make your Mac much easier to work with.
The Accessibility menu opens up the Mac to almost everyone regardless of any special needs. With the addition of numerous Siri commands, most people with even the most specific requirements can be empowered to use a computer. Long may that continue!
Got any tips or apps that make the Mac easier to work with by those with special needs? Tell us about them below if you do!