


How to Use Breakout Rooms in Zoom

Breakout Rooms are a great feature for webinars and meetings with a lot of participants. They allow you to segment a meeting into fifty sessions and assign participants to sessions accordingly.
In total, up to two hundred participants can be inside all the Breakout Rooms on a single account. And of course, they get full video and audio, as well as screen-sharing options. But it’s worth noting that only the main room gets recorded via the Cloud, and local recording is also an option.
But first things first. Let’s check out the requirements and how to set everything up.
Before You Start
As you might guess, you need to be the meeting host to manage the rooms. This option is available via the desktop app, and you won’t be able to join a room through the Zoom web client. However, the system allows you to get an alternative session in the main room.
The good news is that you can join rooms on a mobile app and SIP or H.323 devices.
Enabling Breakout Rooms
The first thing to do is enable the option. You get to do this on your account, for a specific group, or as an end-user. The actions for these are a bit different and this article includes all the guidelines. But you might not need to enable everything right away.
Account
Step 1
Using the Zoom web portal, make sure to sign in with administrative privileges. Then, navigate to Account Management and click Account Settings.
Step 2
The Breakout Room feature is under the Meeting tab and you need to navigate there to confirm it’s on. If not, click on the switch next to the option to toggle it on.
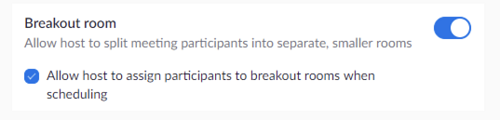
This menu also offers two optional settings. To assign participants to a room, click on the box in front of “Allow host to assign participants to breakout rooms when scheduling”. If you check this box, it enables the rooms for end-users. So there’s no need for a separate guide to cover this option.
Should you need to make the settings mandatory, click the padlock icon and confirm your choice.
Specific Group
Step 1
Assuming you’re already signed in, navigate to User Management and click on Group Management. Then, choose the name of a group and hit Settings to access more features.
Step 2
Thereon, the required actions are as previously described. Go to Breakout Room under Meeting, make sure the option is on and check auxiliary settings if need be.
How to Create a Breakout Room
After you enable the feature, creating a room is a walk in the park. Begin a scheduled or instant meeting and click Breakout Rooms in the upper right section of the screen.
Then, choose the number of rooms and the method to assign participants. “Automatically” assigns an equal number of participants into each room. And “Manually” lets you choose which participant goes to a specific room.
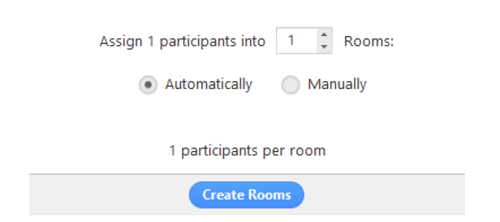
Afterward, click the “Create Rooms” button and that’s it. However, the rooms don’t start by default and it’s advisable to tweak additional options for better room management.
Additional Options
The Options button is located at the bottom left of the Breakout Rooms window. Click on it to reveal the pop-up window and check the boxes that match your room preferences.
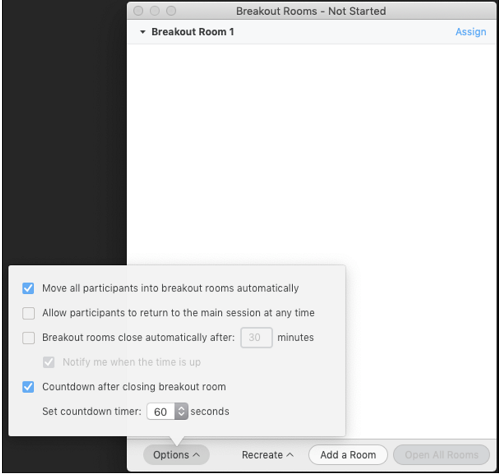
There are a few options – you can move all participants to a room automatically and allow them to return to the main session. You have a shut-down timer, notifications, etc.
Assigning Participants
Assign option is next to each Zoom room you create, click on it and tick the boxes in front of the participants’ name. When you finish, the number of participants in each room appears next to the room number.
Zoom allows you to move and exchange the participants. To do so, you need to click on the participant name and choose the desired action – “Move to” or “Exchange”.

In addition, the same menu offers a host of other options, which include:
- Delete Room.
- Recreate – removes all current rooms and automatically creates new.
- Add a Room.
- Open All Rooms – Starts all rooms and automatically assigns participants to respective rooms. The host is in the main room until he or she moves to one of them.
When the meeting starts, you can see which participants failed to join. There are also options to Leave a room and go back to the primary meeting. And you get to “Close All Rooms” – a sixty-second timer alarms the end of session and all participants go back to the primary meeting.
At this point, it may seem like there are too many options for rooms and that the UI is cumbersome. But, it’s not like that – the app layout is intuitive and easy to navigate. If you follow the instructions to the letter, it shouldn’t take you more than a few minutes to set it all up (participants management included).
What Room Is This?
You’d be hard-pressed to find another conferencing app that offers better meeting management and segmentation. This is one of the reasons Zoom is so attractive for business users. It allows you to have an entire floor of digital meeting rooms and it’s super easy to zoom from one to another.
Have you been in a Zoom Room before? What was your experience? Share your insights with the rest of the community in the comments section below.


One thought on “How to Use Breakout Rooms in Zoom”