When working with Excel worksheets, you’ll often need to adjust the size of the cells. Depending on how much data they hold, you can adjust both their width and height. Because Excel sheets consist of rows and columns, changing the width of your cell will affect that entire column. The same applies to the height of the rows.

To do this manually, simply drag the right border of the column header left or right. Column headers are located above the first row and marked with letters, starting with A.

When you want to change the height of a row, grab the lower border of the row header and drag it up or down. Row headers are marked with numbers, and you can find them to the left of column A.

Of course, Excel allows you to do all this automatically, thanks to the AutoFit option.
Automatic Resizing
When you open a new Excel sheet, you’ll notice that all cells are of the same size. Their size depends on the default font, so let’s suppose that you leave it at the default font – Calibri, size 11.
If you enter a value with 7 characters or less, you’ll end up with some blank space in the cell. If your content is longer than 8 characters, it will bleed over to an empty cell to its right. Also, if the cell to the right has some values in it, your cell’s content will cut off at the beginning of that next cell. Don’t be alarmed, your content is still there even if it’s not visible.

To quickly sort this out, double-click the right border of the column header and the cell will automatically resize to fit your content.

It’s the same for the rows as well. To let Excel change the row height for you, double-click the lower border of the row’s header.

If you need to automatically adjust the size of multiple columns, first mark the appropriate columns by selecting their headers. Then double-click the header’s right border on any of the columns. This will resize all of the selected columns to fit their respective content.
Selecting Columns and Rows
As a reminder, here’s a quick guide that can help you when selecting single and multiple columns:
- Single column
– Click on the header.
- Neighboring columns
– Click and hold the left mouse button on the first header.
– With the mouse button depressed, select the neighboring columns to the left or to the right. - Random columns
– Hold the Ctrl button on your keyboard.
– Click on the header of each of the columns you want to resize.
– When you’re done, release Ctrl and the columns will remain selected. - The entire worksheet
– Press Ctrl+A on the keyboard to select all cells.
– Or, click the upper left corner of the sheet where the triangle icon is. It’s where the first row and column meet.


Once you’ve made your selection, follow the guidelines from the previous section to auto-fit the rows or columns. Of course, the same logic applies to rows as well. Just select the row headers instead of the column headers.
Choosing Your Own Dimensions
If you want to precisely set the size of your rows and columns, follow these steps:
- Columns
– Right-click on the column header to open the settings menu.
– Click “Column Width…”
– Enter the desired value. - Rows
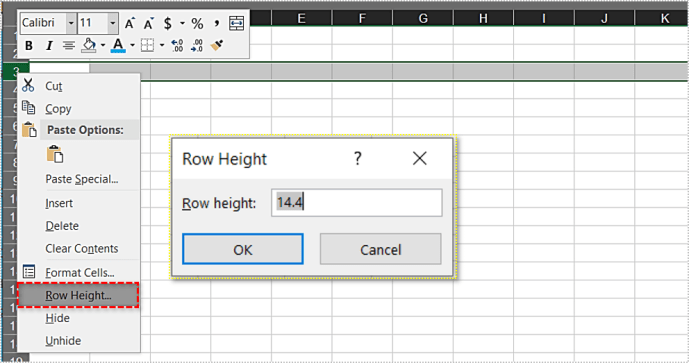
– Right-click on the column header to open the settings menu.
– Click “Row Height…”
– Enter the desired value.

The selection rules from the previous section also apply here. If you select multiple columns/rows, just right-click the header on any of them and you’ll resize them all.
How Does Excel Treat Row/Column Sizes?
When talking about custom dimensions, it’s important to address how Excel treats column and row sizes. To start, take a look at the default values.
The default column width is 8.43 points or 64 pixels. The row height is 15.00 points or 20 pixels. You can check that by clicking the right border of the column’s header.

Notice that these point values don’t follow the obvious logic. Even though the cell is shorter than it is wide, the width appears to be 8.43 points, against 15 in height. Judging by this, it’s safe to conclude that there is a difference between these two values. That’s because of the standard printing principles that treat these dimensions differently. And Microsoft has decided to incorporate that in Excel.
Font Size Defines the Default Dimensions
To clarify things a bit, the width represents the number of characters that can fit in a cell (default Excel font).
Excel’s default font is the one defined in the “Normal” style. To check which font is it, do the following:
- Go to the “Home” tab in Excel.
- In the “Styles” section, right-click on “Normal”. If your Excel is not in full screen, you might need to first click on “Cell Styles” to see the list of styles.
- Click “Modify…”
- In the “Style” menu, the “Font” section will show the default font and its size.


It should be Calibri, size 11. If you change the “Normal” font, the default values for column width and row height will change as well.
For example, if you change it to Calibri 15, the default column width will change to 8.09, or 96 pixels. The rows will increase to 21.00 points, which is 28 pixels.
It’s worth noting that if you enter the value in points, Excel might change it slightly. For Calibri size 11, if you define the cell to be 12.34 points wide, Excel will change this value to 12.29. That’s because points don’t exactly correlate to pixel units. In order to display the column on the screen, Excel needs to change the value to match screen pixels. It’s just not possible to use one half of a pixel.
If you want to precisely define how your cells appear on the screen, it’s best to use the pixel size, as it’s relative to screen pixels. Unfortunately, you can’t enter that value using the right-click menu on the column/row header. The only way to set the size in pixels is to manually resize the row or column to the desired dimension.
AutoFit Is a Gift
With AutoFit, you can really save a lot of time when organizing your Excel worksheets. If it doesn’t work as you’d like, you can always set the cell dimensions either manually or by entering the desired value.
Do you find this option useful? Would you like to share some tips regarding this or any other function in Excel? Please join the discussion in the comments below.
Related Posts
 How To Fix the “Unable to Expand Zip” Error on a Mac
 How to Count Cells with Text in Excel
 How to Tell if Two Cells in Excel Contain the Same Value
 How To Autofill Cells in Excel
 How to Lock Cells in Excel
 How to Automatically Number Rows in Excel
 How to Make Cells Bigger in Google Sheets
 How to Count Cells in Google Sheets
 How to Automatically Play Audio in PowerPoint
Disclaimer: Some pages on this site may include an affiliate link. This does not effect our editorial in any way.


