If you don’t use, or don’t want to use a mass mailer like Mailchimp, you can make powerful interactive emails yourself with minimal effort. If you’re marketing or promoting something, adding a survey, quiz, or an order form into an email can be a very effective way to encourage action from the user. This tutorial is going to show you how to embed a Google form in an email.

Large scale mail services such as Mailchimp have their own forms that you can embed if you use their service. If you don’t use Mailchimp or other mailing services, you can do much the same yourself within your own email.
Google Forms are growing in popularity because they’re very powerful and very well-conceived. They’re free to use and have some great designs and collate all results automatically for you. As far as marketing goes, it doesn’t get much easier than this!

Embed a Google form in an email
I’ll use Gmail as the email but you can use any email client to send the survey. You can send it embedded in the email or as a link. You can only embed the Google form in Gmail but can send the link using any email client.
One easy way around this is to send the document directly to your Gmail address and forward it to your workgroup, Outlook, or email groups from there. You can also post the form to your social media accounts for maximum exposure.
Setting up a Google form is very straightforward.
- Open your Google Drive and log in.

- Select New in the top left.

- Select Google Form.


You should see a new window with a blank form ready to be filled in. Give it a title, add your questions, and use the design tools in the small menu on the right to make it look as you want it to. You can even add images and videos using the toolbar on the right-hand side of the screen.

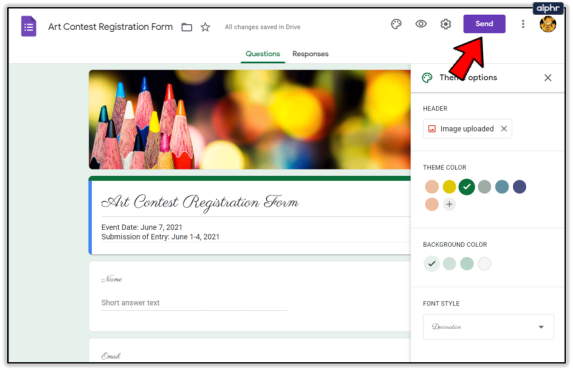
Select the paint palette in the top right to change the theme, add your logo as a header, and change the font style. It doesn’t take long to customize the form to fit your branding or look exactly how you want. Then use the small eye icon to preview your form so you can see if it needs adjustment.

Once complete, select the cog icon at the top and check the box next to Collect Email Addresses. You can also customize other functions of the form from within the Settings popup. You might like to also enable ‘See summary charts and text responses so you can quickly see the answers people gave.’ Select Save once finished.

Now select the Send button in the top right of the main form window. This brings up the Send Form popup. Here you configure the email around the form so it looks good, contains an effective call to action, and gets people filling it in. Make sure to check the ‘Include form in email’ box to embed the form in the email.
All you need to do now is add the recipient’s email address and hit Send. You will be asked if you want to be able to see responses. A Google Sheet will be created in your Drive that will collate all answers to your form for you to check.

You may also get email notifications telling you when someone has filled in the form. That notification won’t tell you what they answered, only that they did answer.
Sharing a Google form on social media
As well as embedding a Google form in an email, you can also share it via social media. If you’re marketing a business or venture, you want as much exposure as possible so this is a must. It is also very simple to do.
Create your form as above but instead of checking the box to ‘Include the form in email’, you leave it blank. You then select Facebook and or Twitter from the gray icons in the Send form box to add the form to those networks.

If you want to share it elsewhere, get the link from the tab within the Send form box and post the link everywhere you want the form to appear. It will appear just as a link but will open the form in its own browser page and will compile the answers in the same way as the email.

Google forms fit the same mold as Google Sheets and Slides. It is simple to use but powerful in its execution. It also works seamlessly with other Google products to provide easy operation and allows anyone to market their venture in truly effective ways. As long as you can come up with an interesting quiz or survey and convince people to answer, the rest is easy!
Get the Link to Your Google Form
Perhaps the most useful thing to know is how to get the Google Form link. This makes it possible to share or embed the document nearly anywhere.
To get the link; follow the same instructions as above for sending it in an email:
- Once you hit the ‘Send’ button navigate to the ‘Send Via’ option on the screen.

- Tap on the embed option (<>) Located in the upper right-hand side of the options menu

- Click on Copy or use the keyboard command Ctrl + C or Cmd + C (Mac) after highlighting
- Use Ctrl + V or Cmd + V (Mac) to paste it into your desired content


Getting the link is super easy and it’s a great simple way to share your Google Form.
Accessing the Responses
Once your Google Form is sent you can always log back in to check the responses. By opening the form, navigate to the top of the page with the options: ‘Questions’ and ‘Responses. If you’re using this a survey or for your student’s homework, you may want to check the ‘Responses’ regularly.

After everyone has submitted their responses or you’ve reached a deadline, you’ll need to close the form out. Following the same instructions above, simply toggle the ‘Accepting Responses’ switch off (from green to grey). This will ensure that you’re able to revisit the form at a later date but no one will submit answers once you’ve done this.
Related Posts
 How To Fix Error Code 0x8019019a with Yahoo Mail in Windows Mail
 How to Embed a YouTube Video in a Google Slide Presentation
 How To Embed a Google Calendar in Squarespace
 How To Edit a Form After Submit in Google Forms
 How to Make a Google Form Public & Open To Everone
 How To Add a Description to a Question When Creating a Google Form
 How To Get Notified When a Form is Submitted in Google Forms
 How to Automatically Forward an E-mail in Outlook
 How To Forward All Your E-mail From Hotmail to Gmail
Disclaimer: Some pages on this site may include an affiliate link. This does not effect our editorial in any way.


