How To Rotate Your Computer Screen
Windows 10 has built-in options that enable users to rotate their VDU displays. Graphic card control panels also include screen rotation settings. With those options, you can adjust the orientation of your VDU. That can be handy for customizing the display for documents and mounting monitors. This is how you can rotate the screen in Windows 10.
Rotate the VDU Orientation with Windows Settings and Graphics Card Control Panels
Firstly, you can rotate the VDU display with the Windows 10 Settings app. To do that, you can right-click the desktop and select Display settings to open the window below. That includes an Orientation drop-down menu.
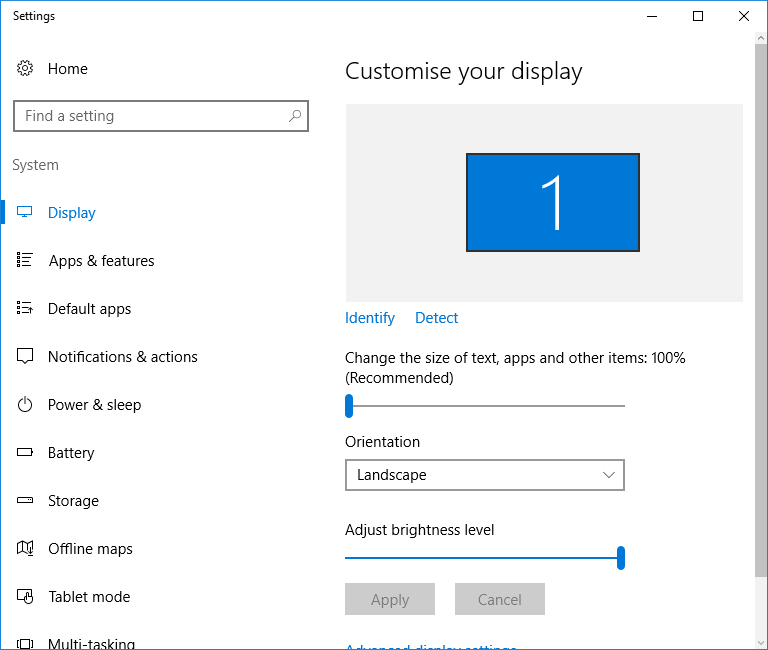
Now click the Orientation drop-down menu. You can select Landscape, Portrait, Portrait (flipped) and Landscape (flipped) from there. Select an option from the menu, press Apply and then click the Keep Changes button.
Alternatively, you might be able to rotate the VDU display with your graphics card control panel. For example, Nvidia, AMD or Intel graphics cards have alternative control panels from which you can configure settings. You can usually open the graphic card control panels from the desktop context menu.
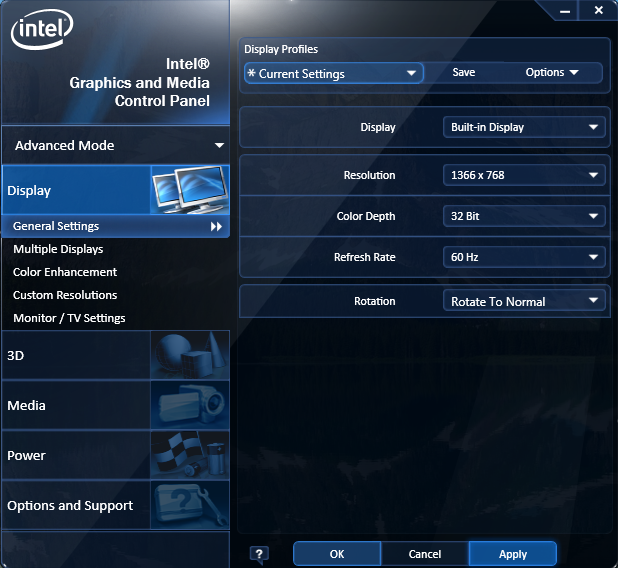
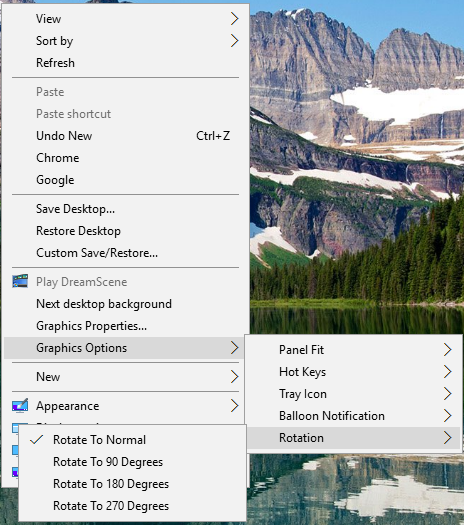
For example, in an Intel HD graphics PC you can right-click the desktop and select Graphics Properties. That opens the window shown in the snapshot directly below. The General Settings tab includes a Rotation drop-down menu. There you can select Rotate to 90 degrees, Rotate to 270 degrees and Rotate 180 degrees. Then click OK and Apply to confirm the settings.
Those rotation options are also on the Windows desktop context menu. Some users (specifically with Intel HD graphics) can rotate the VDU display by right-clicking the desktop and selecting Graphic Options. Then you can select Rotation to open the submenu in the snapshot directly below.
Rotate the VDU Display with Hotkeys
You might be able to rotate the VDU display in Windows with four additional hotkeys. This also depends on if your graphic card adapter supports the hotkeys. Intel HD graphics does support these keyboard shortcuts:
- Ctrl + Alt + Right arrow – Rotates the display 90 degrees to right
- Ctrl + Alt + Left arrow – Rotates the display 90 degrees left
- Ctrl + Alt + Down – This will flip the VDU display upside down
- Ctrl + Alt + Up – Press this hotkey to restore display orientation to default
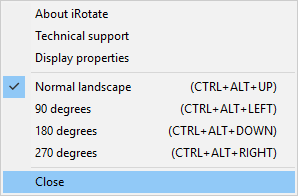
Those hotkeys might not work for Nvidia and AMD cards. If they don’t work, you can still rotate the VDU display with iRotate. This is a great tool if your graphics drivers don’t enable you to rotate the monitor display. Click the Download button on this Softpedia web page to save the program’s installer to Windows. Then run through the setup wizard to install and launch iRotate.
Now you can right-click an iRotate icon on your system tray as shown in the shot directly below. This includes four orientation options. Each rotation option also has a hotkey listed on the context menu. So you can press those keyboard shortcuts to rotate VDU display. The context menu also has a handy Display properties shortcut.
Customizing the Rotation Hotkeys
The iRotate software doesn’t include any customization options for its hotkeys. As such, you can’t set up custom keyboard shortcuts to rotate the VDU display with that software. However, you can set up rotation hotkeys with the Display program. That’s a command-line tool with which you can add display orientation shortcuts to the desktop. Press the program’s Download button on this page to save its Zip folder. Open the Zip in File Explorer, click Extract all and choose a path to extract the folder to.
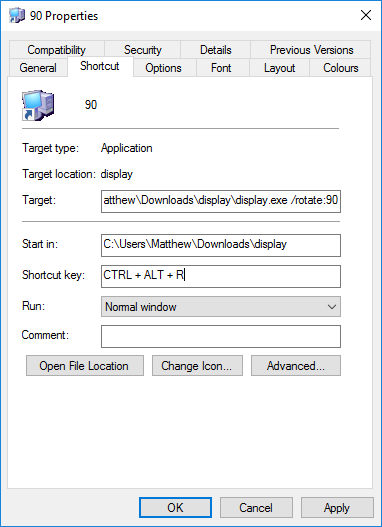
Now you should right-click the Windows desktop and select New > Shortcut from there. Click the Browse button on the Create Shortcut window and select the Display program’s path. Then modify the path by adding /rotate:90 to the end of it. So it could be something like C:\Users\Matthew\Downloads\display\display.exe /rotate:90, except that your folder path for the program obviously won’t be the same.
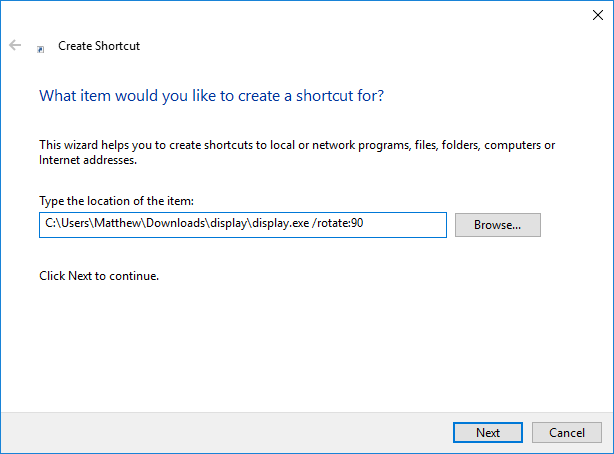
Click the Next button on the window. Then enter a suitable title for the shortcut. For example, the title could be ‘Rotate 90.’ Press the Finish button to add the shortcut to the desktop as below.
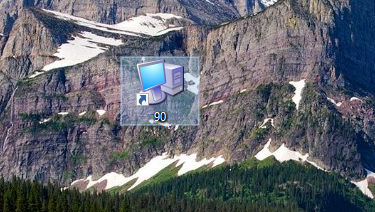
Now you can click on that shortcut to rotate the VDU display 90 degrees as shown below. Plus you can also set up shortcuts that rotate it 180 and 270 degrees and restore it to default. You can do that by setting up a desktop shortcut for them much the same, but instead add /rotate 180, /rotate270 or /rotate0 to the end of the Display folder path on Create Shortcut window.

Next, you can apply a hotkey to those rotate display desktop shortcuts by right-clicking them and selecting Properties to open the window below. Then click in the Shortcut key text box and press a key such as R. The hotkey will then become Ctrl + Alt + R. Press Apply and click OK to close the window, and then you can press the shortcut hotkey to rotate the VDU display.
So you can rotate the screen orientation with the Settings app options, graphics card control panel settings, hotkeys or extra third-party programs. To further configure display settings, check out this Tech Junkie post.