


‘IP address conflict’ – How To Manage & Fix

IP address conflicts are fortunately quite rare as modern routers and DHCP are very efficient at managing address pools. Windows and Mac also handle IP addressing well. That doesn’t mean you will never see an alert telling you there is an IP address conflict though.
As these mostly happen on Windows computers, I’ll concentrate there but the same principles apply to Mac.
In Windows, the error reads something like ‘Windows has detected an IP address conflict with another system on the network.’ You will not be able to access the internet and you will see a yellow triangle by your network icon in the Windows Taskbar. It may seem serious but it is relatively easy to address.
What are IP address conflicts?
For once, a Microsoft error message describes exactly what’s going on. Your computer is using an IP address allocated to another device. As IP addresses have to be unique, this is a problem and Windows has given the error. You will need to allocate a new IP address in order to access the network.
If you use dynamic IP addressing, meaning you let Windows or your router handle everything and haven’t set static IP addresses, this issue will often resolve itself. Windows will request a new IP address from your router and your router will assign one. Issue solved. Unfortunately, that doesn’t always work and may need a little help.
Fixing IP address conflicts
There are a couple of very simple steps you can take to fix IP address conflicts. The first is to restart your PC. Windows (or Mac OS) will request a new IP address when it boots and should be allocated a free one. Error solved and you can go about your day.
If that doesn’t work, try one of these fixes.
Reboot your router
If you use a router with DHCP, it may have run out of free addresses or may have errored or crashed. If rebooting your computer didn’t work, reboot your router instead. Turn it off at the mains or via a switch on the back, leave it for 1 or 2 minutes, turn it back on, leave for another minute to load its firmware and retry.
Change the static IP address
If you use static IP addressing, i.e. you manually assign an IP address to your devices, you have given the same IP address to two devices. If this is the case, you need to change the address of one device and that should solve your issue. Depending on what router you use, it should have a list or network map of all assigned IP addresses and authorized devices. Check to see which have the same IP and change one.
Assign all IP addresses to DHCP
For small or home networks, it may be tempting to use static IP addresses but you don’t really need to. Allowing DHCP to control addressing is much more efficient as it handles it all automatically.
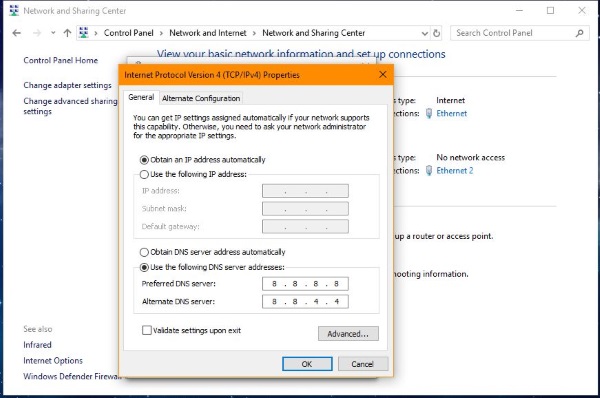
In Windows:
- Open Control Panel.
- Select Network and Internet and Network and Sharing Center.
- Select Ethernet or Wifi, whichever connection is active.
- Select Properties and IPv4.
- Select Properties again to access the IPv4 properties window.
- Toggle Obtain IP address automatically and select OK.
Windows should communicate with your router and request a new IP address. If that doesn’t happen and you don’t join the network, try this:
- Right click the Windows Start button and select Command prompt (Admin).
- Type ‘ipconfig /release’ and hit Enter.
- Type ‘ipconfig /renew’ and hit Enter.
This encourages Windows to request a new IP address from the router. Now you have enabled DHCP you should be assigned an available address.
Expand your IP address pool
Different routers offer different sized pools of IP addresses. For example, one manufacturer of router may offer 255 available IP addresses within a pool and another may offer 100. More security conscious routers may only offer 10. If you have used all your pool, you may need to expand it. It sounds complicated but it really isn’t.
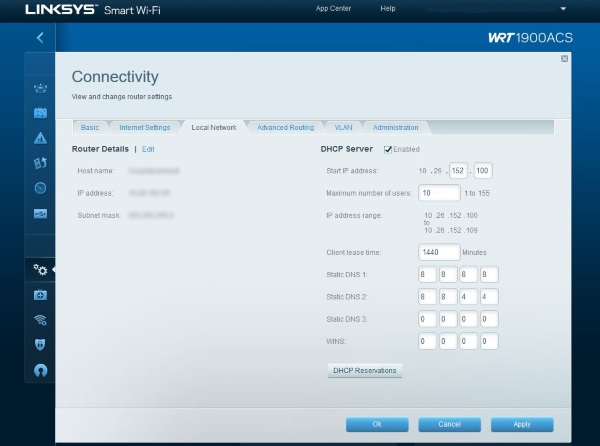
It is impossible to give specific instructions as all routers do things different but here is the general idea:
- Log into your router.
- Select Connectivity or Local Network, depending on what your router says.
- Look for DHCP and make sure it is enabled.
- Look for something that reads like ‘maximum available addresses’ or ‘maximum number of users’.
- Expand that number by 5 or 10.
- Save your changes.
Those are some of the most common ways to fix an IP address conflict. While I describe how to do it in Windows, the same principles apply whether you use Mac OS, Linux, Android or iOS.


