


Error in Component Session/Transport/kexHandler – What to Do

There are two main components of the Bitvise SSH package – Bitvise SSH Server and Bitvise SSH Client. The former can be used for remote control and administration of computers and servers, while the latter is Bitvise’s terminal emulator that offers dynamic port forwarding, command line and graphical SFTP support, and much more.
However, some users have experienced problems with Bitvise SSH Client on newer versions of Windows. The most common scenario is that after a terminated SSH2 session, a user would get the following error: Error in Component Session/Transport/kexHandler.
In this article, we’ll investigate how to solve this unpleasant issue.
Windows 1803 and Bitvise
Most of the users that reported persistent problems with the Component Session/Transport/kexHandler error began experiencing the issue after Windows updated to the 1803 version. This version of Windows rolled out in April 2018, around the same time the 8.31 version of Bitvise SSH Client was introduced.
Many users have reported abruptly terminated SSH2 sessions with the mentioned error message being the most prevalent one. It is not exactly known what causes the error and why the 1803 version of Windows 10 is particularly problematic. Luckily, there are several things you can try before throwing your digital towel into the ring. Keep reading for possible solutions.
NOTE: Both Windows 10 and Bitvise Client were updated multiple times since. At the moment of this writing, the latest version of Windows 10 is 20H1 (February 2019), while Bitvise is in version 8.35 (August 20, 2019).
What to Do?
In this section, we’ll investigate what you can do when the dreaded “Error in Component Session/Transport/kexHandler” message pops up. Let’s dive right in.
Restart Your Computer
First, restart your PC or laptop. This simple solution is routinely among the first in troubleshooters and tutorials related to Windows issues. The main reason behind this is that it lets your computer clear the RAM and stops potential memory leaks caused by improperly closed programs.
However, in this case, it might also solve some minor bugs in communication between Bitvise SSH Client and Windows. Additionally, it might fix any errors in internet connection that could cause problems with remote access.
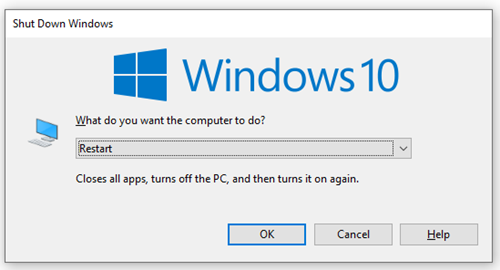
To safely restart your Windows 10 PC or laptop, do the following:
- Exit to desktop.
- Press Alt + F4 buttons at the same time.
- When the Shutdown menu appears, click on the drop-down menu.
- Select Restart.

- Click OK.
Run in Windows 7 Compatibility Mode
Some users have reported that running Bitvise SSH Client in Windows 7 compatibility mode helped them solve the issue. Follow these steps:
- Right-click on the Bitvise SSH Client icon on the desktop.
- Select Properties.
- Go to the Compatibility tab.
- Tick the Run this program in compatibility mode for box.
- Select Windows 7 from the drop-down menu.
- Click OK.
Update Bitvise
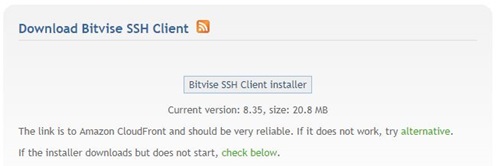
If none of the previous solutions were effective, you should try updating your Bitvise SSH Client. These are the steps:
- Launch your preferred browser.
- Go to the Bitvise download
- Click on the Bitvise SSH Client Installer button. This should automatically initiate the download.

- Double-click on the installer file and follow the on-screen instructions.
Don’t forget to restart your PC or laptop after the installation.
Uninstall and Reinstall Bitvise
Sometimes, updating Bitvise SSH Client won’t be sufficient. In that case, you might want to uninstall and then reinstall the program again. Here’s how it’s done:
- Click on the Windows logo to launch the Start menu.
- Type “Add or Remove Programs.”
- Click on the top result.
- The Apps & Features window will open. Locate Bitvise SSH Client and click on it.
- Select the Uninstall option.

- After the uninstallation process is done, double click on the installer file and follow the on-screen instructions to reinstall the program.
Reset Your Network
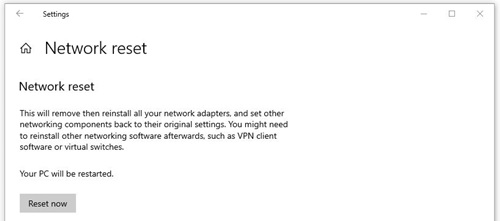
After you’ve restarted the computer, check if the issue persists. If it does, you should try resetting your internet connection. Have in mind that this procedure will uninstall and reinstall all your network adapters, as well as reset other networking components back to their original settings. You might also have to reinstall your networking programs including Bitvise SSH Client afterwards.
Here’s how to do it:
- Click on the Windows Logo in the bottom-left corner of the screen.
- Click on the Settings icon.
- Click on the Network & Internet section.
- When the Status windows opens, scroll down and click on the Network reset link.

- In the next window, you will see the disclaimer about what a network reset entails. Click on the Reset now button.
Update Windows
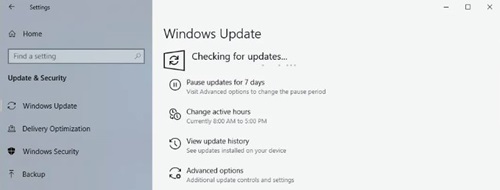
After the network reset, you should reinstall and set up networking programs and check whether you still get the Error in Component Session message from Bitvise SSH Client. If you do, then it’s time to update Windows to the latest version. Follow these steps:
- Click on the Windows logo in the bottom-left corner of the screen.
- Click on the Settings icon.
- The Settings window will open. Click on Update & Security.
- Click on the Check for updates button.
- If Windows finds updates, click on the Install button.
SSH Unlimited
Bitvise SSH Client can be stubborn sometimes, but the methods laid out in this write up should solve even the most persistent problems with the Component Session/Transport/kexHandler errors.
How long have you used Bitvise SSH Client and Server? How frequent are the errors and how hard is it for you to solve them? Let us know in the comments section below.


