How to Fix Bouncing Cursor Problem in Windows 11
If you encounter a bouncing cursor problem, chances are there’s something wrong with your PC’s mouse, whether it’s a hardware or a software issue. While there are several possible causes behind this problem, they can be typically solved by straightforward troubleshooting.
Quick Fixes to the Bouncing Cursor Problem in Windows 11
Before you start tinkering with settings across your operating system, there are a few quick methods that can solve the problem. Here’s what you can try, in no particular order:
- Make sure that the surface you’re using is clean, smooth, and most importantly, dark and matte. Reflective or refractive surfaces like glass distort the tracking laser, which may cause the cursor to move erratically.
- Disconnect and reconnect the mouse. If your mouse has an ON/OFF switch, turn it off and back on.
- Change the USB port you’re using for the mouse (even if it’s a wireless model). This can point you to a faulty USB port on your device.
- Remove excess USB-connected devices to ensure they’re not interfering.
- Change your mouse’s battery (if you’re using a wireless model).
- Run a malware scan with the integrated virus protection system or a third-party solution like Malwarebytes.
- Update Windows to the most recent version.
If none of these methods solve the bouncing cursor problem, changing some mouse settings or drivers might.
Fix 1. Disable Enhanced Pointer Precision and Inactive Scrolling
While the “enhanced pointer precision” feature can tone down sudden mouse movement, it can also cause erratic bouncing. The other “quality of life” feature that can also interfere is “inactive scrolling,” which can detect scrolling as cursor movement.
Step 1. Go to Settings (“Windows + I” shortcut).
Step 2. Search for “mouse” and click on “Mouse settings.”

Step 3. Toggle “Enhance pointer precision” off. If the option is not available straight in the Settings menu, choose “Additional mouse settings.” The same option will be in the “Pointer Options” tab there.
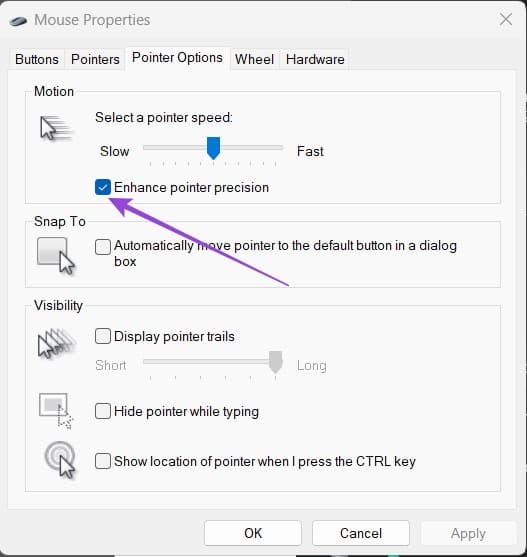
Step 3a. If you used Advanced settings, you need to click on “Apply” then on “OK” to confirm the changes.
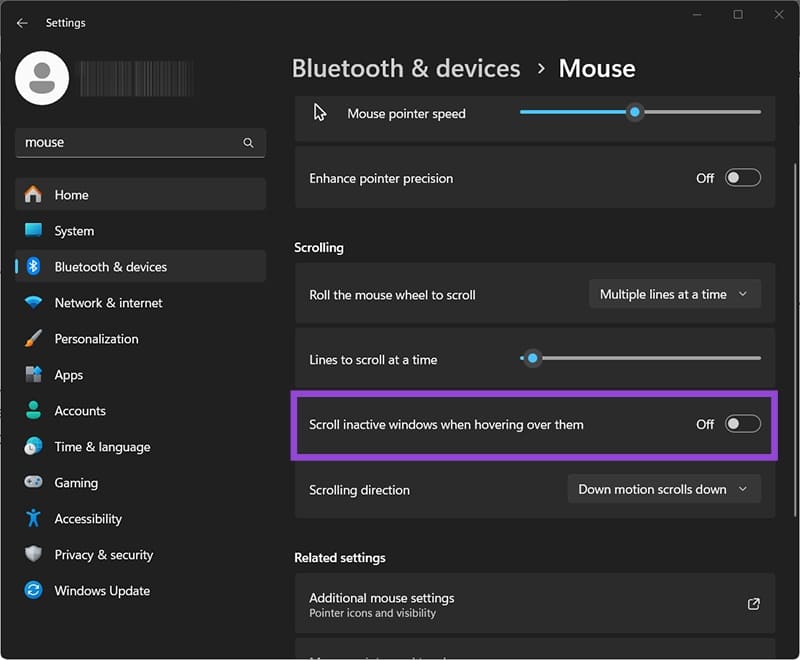
Step 4. In the Mouse Settings again, toggle off “Scroll inactive windows when hovering over them.”
Fix 2. Update Mouse Drivers
In general, Windows automatically keeps mouse drivers up-to-date, but they might get accidentally removed if you reroll Windows to an earlier state or delete a wrong folder.
Step 1. Press “Windows + X” and select “Device Manager.”
Step 2. Expand the “Mice and other pointing devices” section.
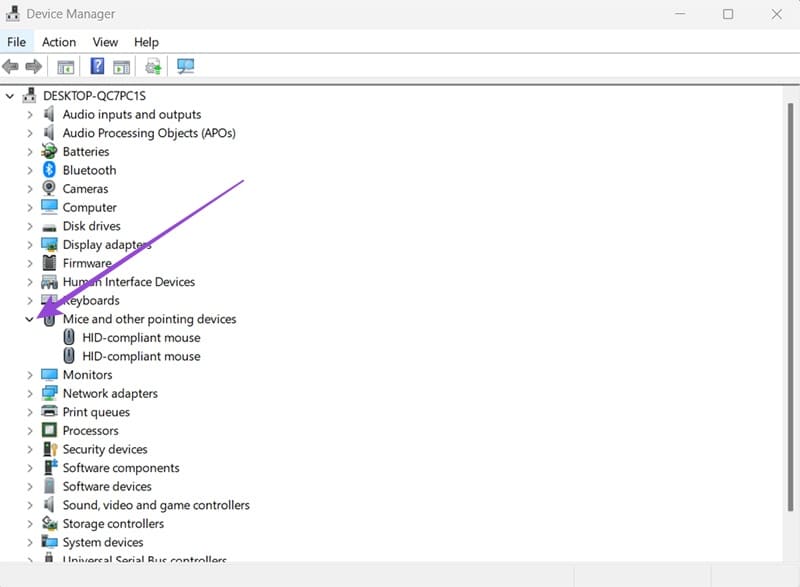
Step 3. Right-click on a mouse and select “Update driver.”
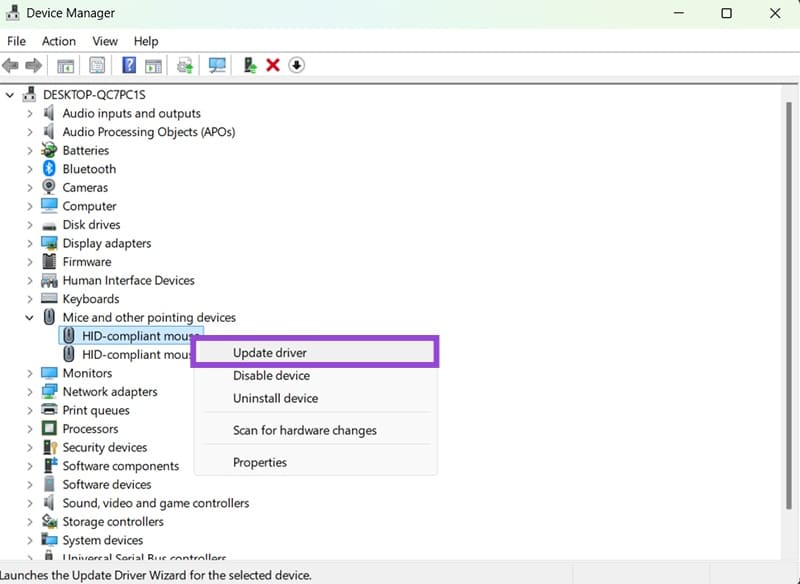
Step 4. Follow the troubleshooter instructions. Choose “Automatically search for drivers online” when prompted.
You may need to update the drivers for every device in that submenu, as wireless mice are detected as multiple devices (one for the receiver and the other for the actual mouse).
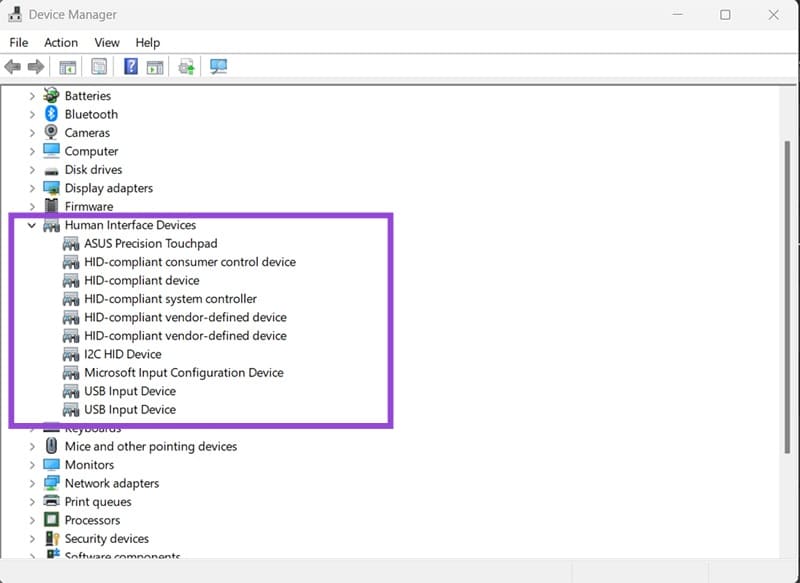
Step 5. If you can’t find a mouse in that submenu, repeat the process with “Human Interface Devices.” Note that the mouse might not be called as such in this section, so you may need to repeat updates for every generic-sounding name.
Alternatively, some mice come with third-party apps that perform driver updates (often if they have reprogrammable keys or RGB lighting). This app will vary depending on the make and model, but is usually available on your taskbar’s icons (on the bottom right). You can use the app to reset or update the mouse.
Fix 3. Remove Other Mice or Disable the Touchpad
If you have multiple mice connected to the same PC (which Windows supports natively unless you need a multi-cursor setup) or your touchpad is enabled, the other input device could be interfering with movement.
To disable the touchpad, press the associated shortcut on your laptop’s keyboard (“Fn” and one of the “F” keys on the top which will show a touchpad icon, commonly “F6”).
Fix 4. Use Another Mouse
If the issue persists through driver or settings updates, the device might just be broken. Connect a different mouse and check if the bouncing cursor problem persists. If it does, uninstall its driver, then plug it out and back in again.