What Is Error Code 0x80073712 on Windows 11 and How Do I Fix It?
Error code 0x80073712 (Windows 11) can appear in Windows Update when you try to download and install updates. The error message usually reads: “Some update files are missing or have problems. We’ll try to download the update again later.” The error can block you from performing future updates, so you can try to resolve it manually.
What Is Error Code 0x80073712 on Windows 11?
The code appears due to a few different issues:
- Corrupted or missing system files, particularly those for Windows Update
- Damaged component store for Windows Update validation
- Broken Windows Update service
- Hard disk errors or corrupted files
- Malware
- Interrupted update process
While it might seem complex, fixing the error usually boils down to performing a few simple procedures.
Fix 1: Run the Windows Update Troubleshooter
The Windows Update Troubleshooter is a built-in tool designed to automatically detect and resolve common update issues.
Step 1. Open Settings with “Win + I.”
Step 2. Click on “System” in the left sidebar, then click “Troubleshoot.”
Step 3. Click “Other troubleshooters” to see all available troubleshooting tools.
Step 4. Look for “Windows Update” in the list and click the “Run” button next to it.

Step 5. Allow the troubleshooter to scan your system. This may take several minutes. Don’t close the troubleshooter until it finishes.
Step 6. If the troubleshooter identifies any issues, it will present you with options to fix them. Click “Apply this fix” to let the tool make corrections if you get any.
Step 7. Restart your computer and attempt the update again.
Fix 2: Run the System File Checker (SFC) Scan
The System File Checker (SFC) scans your entire system for corrupted or damaged Windows files and repairs them automatically. This is one of the most effective fixes for the error code 0x80073712 Windows 11 can throw, as it directly addresses the root cause of missing or corrupted system files.
Step 1. Open the Command Prompt (you can right-click on start, choose “Terminal (Admin),” then move to the Command Prompt). When you get prompted by User Account Control, click “Yes” to allow the app to make changes.
Step 2. Insert the following command and hit “Enter”: sfc /scannow
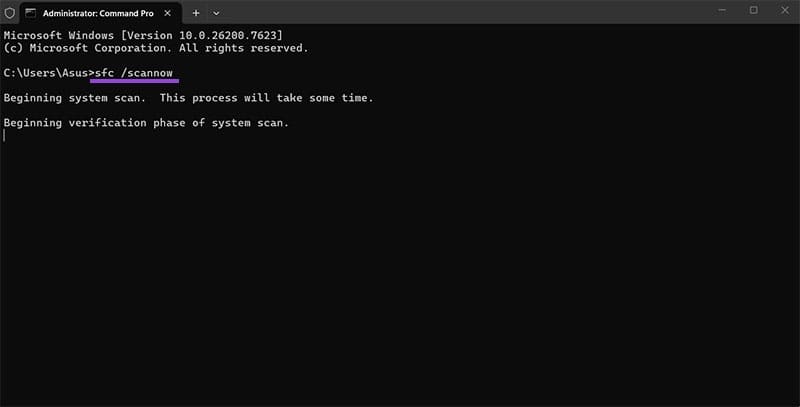
Step 3. This process can take up to an hour depending on your system speed and how many files need to be checked. Don’t close the Command Prompt window or turn off your computer during the scan.
Step 4. Once the scan completes, the tool will display one of three results:
- “Windows Resource Protection did not find any integrity violations,” meaning no corrupted files were found;
- “Windows Resource Protection found corrupt files and successfully repaired them,” meaning the issue was fixed;
- “Windows Resource Protection found corrupt files but was unable to fix some of them,” indicating you need another fix.
Step 5. Close the Command Prompt and restart your computer.
Fix 3: Run DISM Command to Repair Component Store
DISM (Deployment Image Servicing and Management) is a more powerful tool than SFC that can repair the Windows component store directly.
Step 1. Open the Command Prompts as an admin
Step 2. Use the following command: DISM /Online /Cleanup-Image /CheckHealth
Step 3. Wait for the process to complete. This command checks the health status of the Windows image. It will tell you if the component store is corrupted.
Step 4. If the report indicates corruption, run the repair command: DISM /Online /Cleanup-Image /RestoreHealth
This command will scan your system and repair any corruption found, and it can last a bit.
Step 5. Once the DISM repair completes, restart your computer.
Fix 4: Repair the Windows Update Service
Sometimes the Windows Update service itself becomes corrupted or is not running properly. Resetting the Windows Update service can resolve issues related to failed updates.
Step 1. Press “Win + R” to open the Run dialog.
Step 2. Type “services.msc” and hit “Enter.” The Services window will open.
Step 3. Locate “Windows Update” in the list of services. Right-click on it and select “Stop.”
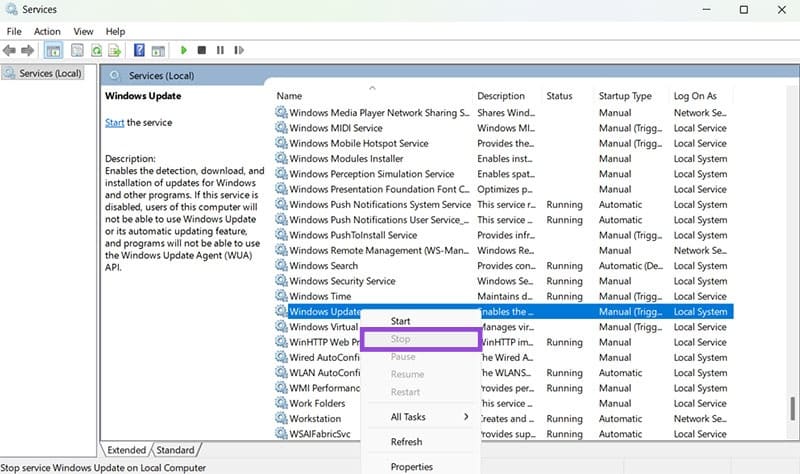
Step 4. Also locate “Background Intelligent Transfer Service” (BITS) and stop it as well.
Step 5. Open File Explorer and navigate to C:\Windows\SoftwareDistribution. This folder contains cached update files.
Step 6. Right-click on the SoftwareDistribution folder and select “Rename.” Change the name to “SoftwareDistribution.old.” This will force Windows to recreate the folder with fresh update files.
Step 7. Return to the Services window. Right-click on “Windows Update” and select “Start.” Also restart the BITS service.
Step 8. Restart your computer.
Fix 5: Disable Third-Party Antivirus Temporarily
Some third-party antivirus programs can interfere with Windows Update by scanning or blocking critical system files. Temporarily disabling your antivirus can help determine if it is the cause.
However, always re-enable your antivirus protection after updating. Leaving it disabled leaves your system vulnerable to malware. If you permanently add Windows Update to your exclusion list, ensure you trust the exclusion process.
Fix 6: Download and Install Updates Manually
If automatic updates continue to fail, you can manually download specific update packages from Microsoft and install them directly. This bypasses the automatic update mechanism that is causing the error.
Step 1. When you encounter the error, note the KB number of the update that failed. For example, KB5062553 or KB5010474. This information is often included in the error details or in Windows Update history.
Step 2. Open a web browser and go to the Microsoft Update Catalog.
Step 3. Search for the KB number of your failed update.
Step 4. Look for the .msu file that matches your Windows version and system architecture (x64 or x86) and downloaded.
Step 5. Once downloaded, double-click the .msu file to begin manual installation.
Step 6. Follow the on-screen prompts to complete the installation. Your computer will restart when finished.
Fix 7: Perform an In-Place Upgrade
If all other fixes fail and error 0x80073712 persists, an in-place upgrade (also called a repair install) may be necessary. This refreshes Windows system files while keeping your personal files, settings, and installed applications intact.
Step 1. Back up any important files to an external drive or cloud storage, just in case something goes wrong.
Step 2. Go to the Microsoft Windows 11 Download page and click “Download Now” under “Create Windows 11 Installation Media” to get the Media Creation Tool.
Step 3. Run the Media Creation Tool and follow the prompts. Select the option to “Upgrade this PC now” rather than creating installation media.
Step 4. The tool will download the latest Windows 11 files and begin the upgrade process. Your computer will restart several times.
Step 5. Follow all prompts and do not interrupt the upgrade process. This can take 30-90 minutes.
Step 6. Once complete, Windows will boot normally and all your files and settings will remain intact, but corrupted system files will be replaced with fresh copies.
An in-place upgrade fixes almost all Windows corruption issues and is much more thorough than individual repair tools. If this fails, a clean Windows 11 installation may be your only remaining option.