How to Create Watermarks in Adobe Illustrator

Adobe Illustrator is, without a doubt, one of the most powerful and comprehensive image editing programs out there. It is among the pricier options as well. Many professional and amateur graphic designers and artists use it on a daily basis. But for all its power, Illustrator doesn’t have a built-in watermark feature.
However, artists willing to protect their work have found a few ways to circumnavigate this issue. In this article, we’ll inspect the most popular and easiest way to make a watermark in Adobe Illustrator.
Make the Watermark
Since there is no option to add a watermark to your images in Adobe Illustrator, you’ll have to make one yourself. Luckily, it is not that hard to do and takes only a few minutes. Here’s how to do it.
Step 1
First, you’ll have to open a new file or create one from scratch. You can choose whether you want to create it in a separate file and import it or create it directly over the image you want to watermark.
Launch Illustrator and click on the File tab in the main menu. Next, click on the Open… option in the drop-down menu if you want to create a watermark directly over an existing file. Select the New option if you want to make your watermark in a blank file.
Step 2
In this step, you should open the textbox where you’ll type the text of your watermark. To do that, select the Type tool. You can find it in the toolbar on the left-hand side of the Illustrator’s window. Click on the Letter T and select the Type Tool option from the drop-down menu.
Step 3
Next, you should activate the text box. To do that, you should click anywhere on your image. It doesn’t matter where you click, as you’ll be able to reposition and resize the box later. Clicking near the top-left corner is always a good idea.
Step 4
When the text box opens, type in the text you’d like to see as your watermark. Some of the typical watermark text options include “Confidential,” “Sample,” “Don’t Touch,” and “Draft.” You can use one of them or you can come up with your own. Of course, you can write a longer text, as well. In such cases, it is common to go with the “Lorem ipsum” sequence.
Step 5
In this step, you should select the text box. To do so, pick the Selection arrow from the menu on the left side of the Illustrator window. It is located near the top of the menu. Now, click on the text box to select it.
Step 6
Now, it’s time to edit your text. That’s where the menus at the top of the window come into play.
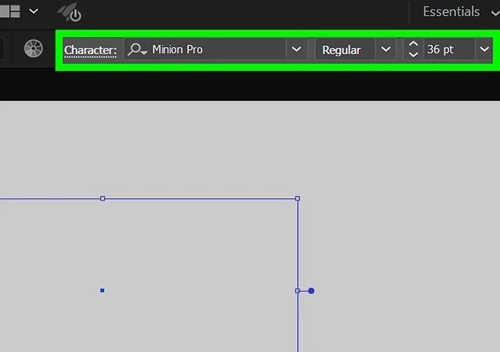
You can use the Character menu to change the font of the text. In the drop-down menu to its right, you can select whether you want your text to appear as bold, italic, or normal. The next option to the right lets you select the size you want. Have in mind that the bigger the text is, the easier it is to spot.
You can also change the color of the watermark text. To do so, click on the Color window. It is located in the upper-right corner. Finally, you can change the watermark’s angle. Just click on the rotate tool (vertical toolbar on the left side).
Step 7
It is time to position your watermark. Pick the Selection arrow from the menu on the left and click on your text box. This selects the text as an object. Move your watermark to the desired position on the canvas.
Step 8
In this step, you should set the opacity for your watermark. You can find the Opacity option in the top menu bar. You can click on the arrow next to it and select one of the pre-determined values. Alternatively, you can click on the box and enter your own custom value. It is generally recommended to keep opacity below 15%.
Step 9
Let’s place your watermark on top of your image. Click on the Object tab in the Main menu. Next, select the Arrange option from the drop-down menu. In the side menu, select the Bring to Front option (the keyboard shortcut is Shift + Ctrl + ])
Step 10
Now that your image is watermarked, it is time to lock and save it. To do that, you should click on the Select tab in the Main menu. Next, pick the All option in the drop-down menu.
Now click on the Object tab in the Main menu. When the drop-down menu opens, find and click on the Lock option. This will open a side menu. Click on the Selection option in the side menu (the keyboard shortcut is Ctrl + 2).
After that, you should click on the File tab in the main menu. When the drop-down menu opens, you should click on the Export option and then on Export As.
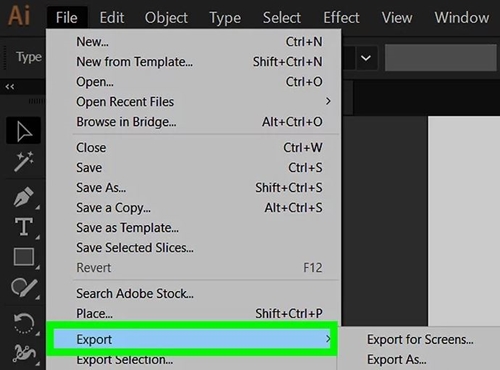
Give your watermarked image a name and select the file type. Commonly used extensions include JPEG, CSS, TIFF, and PNG. You can also save it as a PSD (Photoshop file) if you intend to work on it in Photoshop in the future.
Step 11
Next, click on the Export button. You will then see a window with the basic settings. You’ll be able to adjust the color mode (RGB is default), quality (size) of the file, resolution, compression method, and anti-aliasing. When you’re satisfied with the settings, click on the OK button. If you’ve picked the JPEG format, your image will be saved as a single-layer image file.
Protect Your Work
Placing a watermark on your original images is among the easiest and most effective ways to protect them. Even though there isn’t a native option to add one, it can easily be created and added to a photo.
Have you ever made a watermark in Adobe Illustrator? What method did you use? If you know a better way to make a watermark in AI, let us know in the comments section below.