


How To Disable Secure Boot on an ASUS Motherboard

By default, many ASUS motherboards that sport UEFI BIOS have the Secure Boot mode enabled. However, disabling this mode can help you install Windows more easily or set up dual boot on your computer.
On many models, there is no way to directly disable the Secure Boot mode. Because of that, we’ll need to clear the keys that enable it from BIOS. Don’t worry, you can always reverse this process and enable Secure Boot without any problems. You also won’t void the warranty by disabling or enabling Secure Boot.
Before You Start
Before you disable Secure Boot mode on your computer with an ASUS motherboard, you should enable GPT partitions. For example, if you want to install a copy of Windows on your computer, you won’t be able to do it if the system is not in UEFI mode. The hard drive partition style needs to support this mode or be compatible with it.
When you enable UEFI mode, you’ll also enable GPT partitioning on your hard drive. This will allow you to create partitions bigger than 4GB and you’ll be able to have as many of them as you want. There are two ways to go about it – Command Prompt or a third-party app.
Command Prompt
If you opt to do this via Command Prompt, follow these steps.
- Insert the Windows installation disk or plug in a USB stick and boot the computer in UEFI mode.
- When the setup opens, press the Shift and F10 keys simultaneously. This will bring up the Command Prompt console.
- Use the diskpart command to access the disk partition tool. Allow it to make changes to your computer.
- Use the listdisk command to identify and list the disk format.
- Pick the drive you’d like to format and to turn into GPT. Do it with following commands: Select disk <type the disk number here>, clean (this command wipes the disk), convert gpt (this one converts it to GPT).
Third-Party App
Jf you’re not willing to mess around with Command Prompt, you could use Partition Master by EaseUS to turn your hard drive into GPT. The app can also help delete, remove, wipe, merge, and create hard disk partitions.

The app’s available in three versions – Partition Master Pro (for a single computer), Partition Master Server (for servers), and Partition Master Unlimited (for multiple computers and servers). All three options are available with free trials. You can find them at EaseUS official site.


Disabling Secure Boot
With all the preparations out of the way, it is time to disable the Secure Boot on your ASUS. Just follow these steps.
- Plug a USB drive into your computer.
- Open the Start menu and opt to reboot your computer.
- Once the computer starts booting, press the DEL button on your keyboard to enter the BIOS. Depending on the model, you might need to press a different button.
- Open the Advanced Mode. Most commonly, pressing the F7 key will do it. However, there are models with different keyboard shortcuts.
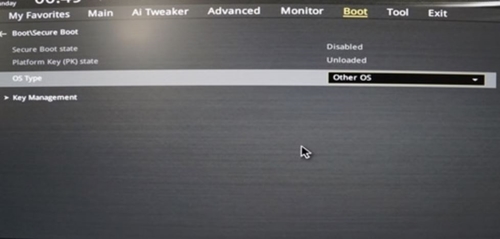
- Open the Boot section.
- Next, open the Secure Boot sub-menu.
- In the OS Type section, select the Windows UEFI mode option from the drop-down menu.

- Open the Key Management sub-menu.
- Pick the Save Secure Boot Keys option.
- Hit Enter.
- When BIOS prompts you to pick a file system, you should opt for the recently plugged USB drive.
- BIOS will then store DBX, DB, KEK, and PK key files onto the USB drive.
- Next, you should delete the Platform Key. This will disable Secure Boot. Be careful not to delete any other keys.
- To save your settings and exit BIOS, press the F10 key on your keyboard. This will restart your computer. Wait for it to boot outside of the Secure Boot mode.
Enabling Secure Boot
If you change your mind and wish to enable Secure Boot once more, here’s how to do it.
- Plug a USB drive into the PC.
- Launch the Start menu and select Restart from the Power menu.
- When your computer starts booting, press DEL on the Keyboard (or another assigned key) to enter BIOS.
- Press F7 (or another designated key) to enter the Advanced Mode section of the BIOS menu.
- Open the Boot section.
- After that, open the Secure Boot section.
- Navigate to the OS Type option and pick Windows UEFI mode from the drop-down menu.
- Next, head over to Key Management.
- Scroll down to the Load Default PK option and hit Enter.
- If you opt for Yes, you will load the default set of keys. When you’re done, save your settings and exit. Wait for the computer to reboot. If you choose No, you’ll be able to load the keys you backed up.
- Assuming that you’ve picked No, you should now pick the USB drive with the keys from the list named Select a File System.
- Next, select the PK key and click OK.
- In the Select Key file type, opt for UEFI Secure Variable and hit OK.
- When prompted Update ‘PK’ from selected file ‘PK’, select Yes.
- Save your settings and exit. Wait for the computer to boot in the Secure Boot mode.
Take Control of Your Computer
Disabling the Secure Boot mode allows you to do so much more with your computer. The best thing about it is that it’s completely reversible and doesn’t void the warranty.
Have you tried disabling Secure Boot? Did you have any problems along the way? Let us know in the comments below.


6 thoughts on “How To Disable Secure Boot on an ASUS Motherboard”
All keys are removed. Does it mean that Secure Boot disabled? There is no word “Disabled” :(