How To Disable the Webcam in Windows 10
Concerns over the privacy of your home and your children are not something to be taken lightly. When you hear or read about reported cases of computer users being watched, recorded, and stalked by creeps from the other side of the screen, it definitely triggers a few alarm bells. These vile individuals use remote access technology to gain access to your laptop or PC webcam and can watch your every move.
Given the appropriate permissions, apps and services can activate on their own. With so much rapid growth in the desire for home security and smart appliances, this sort of thing can often go overlooked. Regardless of all the cams inside and outside your home, the most vulnerable point of entry still remains your PC or laptop.
“Okay, you’re freaking me out. The laptop is going in the trash as we speak.”
So long as you take the necessary precaution in disabling your integrated webcam, you won’t need to go to such extreme lengths to safeguard your privacy.
“Good because this laptop was costly. How do I go about disabling my webcam?”
For those of you who may feel their privacy has been compromised or wish to prevent it from happening, this tutorial can help.
Disabling & Enabling The Webcam On Windows 10
Most laptops come with an integrated webcam already built-in. It’s incredibly convenient for those of you who use your laptop for business meetings and keeping in touch with relatives over long distances.
But for those who don’t need a webcam, this can serve as more of a curse than a boon. A webcam can provide unwanted access into your life from outsiders with malicious intent. What you need to do in order to bolster your security and rid yourself of prying intruders is disable the webcam when not in use.
I’ll begin with the steps in which you’ll need to take to disable the webcam and follow that section up with how to re-enable it should you choose to do so.
Disable The Webcam On Windows 10
You can’t ignore the security concerns that your integrated webcam presents. To avoid becoming a statistic, or worse, let’s look to turning off your webcam entirely. Disabling an external camera is simple. Just unplug the device from your laptop or PC. Doing so for an integrated webcam is also really easy and can be done in just a few steps.
In order to disable the webcam on your Windows 10 computer:
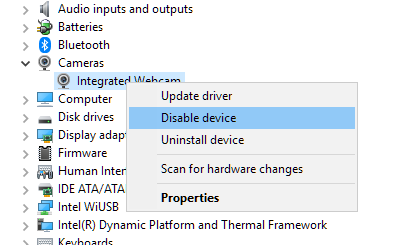
- Right-click on the Windows Start button found at the lower-left of your desktop screen.
- From the menu, select Device Manager.
- While in the Device Manager window, click on the drop-down arrow located next to Imaging Devices or Cameras.
- This should display what cameras you currently have connected or built-in to your laptop or PC.
- If using a laptop, it will likely show as Integrated Webcam.
- Right-click on the device and select Disable device from the menu presented.

- A dialog box will pop-up prompting a confirmation on your decision to disable your webcam.
- Click on Yes to follow through and disable your webcam.
Your integrated Webcam should now be disabled on your Windows 10 computer. This means that all apps and services that use or require your webcam will no longer have access to it. If the webcam still does not show as disabled, a restart may be required for the action to take full effect. In addition to the disabling process, it will also benefit you to cover your webcam with a piece of tape. This will block any prying eyes who may have gained access through the use of malware though this does not disable your microphone. You can never really go wrong with additional precautions.
Disable For Selected Services
You also have the option to disable your webcam another way. You can still grant access to your webcam for specified sites and apps if you so choose, though this does diminish the point of security.
If you don’t want your webcam completely disabled and instead, would enjoy still using it for specified services, you’ll need to:
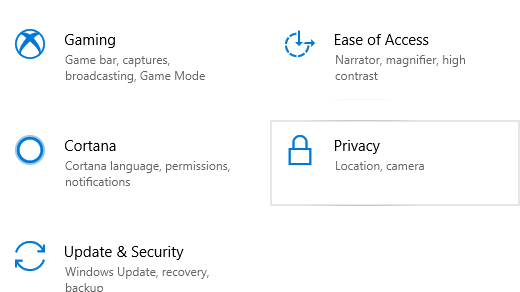
- Left-click the Windows Start menu at the lower left of the desktop screen.
- Open the Settings window by clicking on the icon in the menu.
- Locate Privacy and click on it.

- Scroll down the left side menu and select Camera.
- While in the “Camera” section, set the toggle under “Allow apps to access your camera” to On. This will allow some apps and services to still access your webcam.

- Below that, in the “Choose which apps can access your camera” section, toggle the switch to On for every app you want to allow access to your webcam. For those that you don’t want to grant access, toggle the switch to Off.
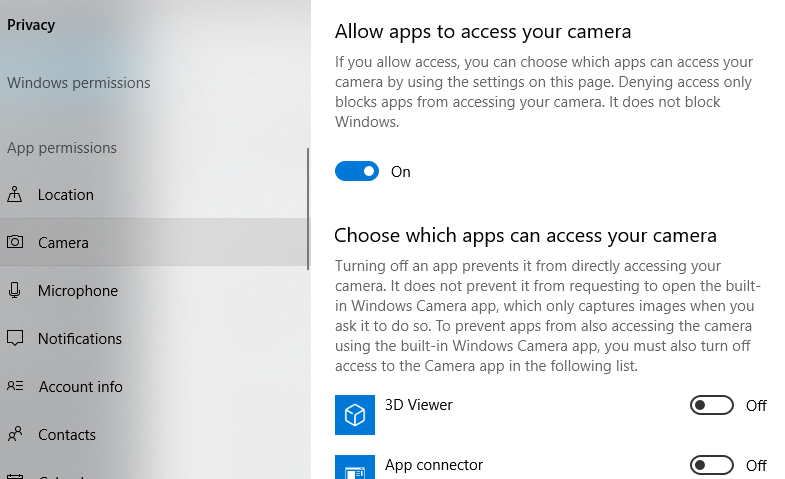
This option is particularly useful for allowing and preventing certain accesses to your webcam. Something like Skype, which you use to conversate with Grandma on a weekly basis may be granted access. Things like Tik Tok may be best set to disabled until you feel like using it.
Enable The Webcam On Windows 10
You can re-enable your webcam at any time you wish. Obviously, for an external webcam, just plug it back in and follow any instructions it may provide. For an integrated webcam, you just have to retrace your steps from when you disabled it.
In order to enable the webcam on your Windows 10 laptop or PC:
- Once again, right-click on the Windows Start button found at the lower-left of your desktop screen.
- From the menu, select Device Manager.
- While in the Device Manager window, click on the drop-down arrow located next to Imaging Devices or Cameras.
- This should display what cameras you currently have connected or built-in to your laptop or PC.
- If using a laptop, it will likely show as Integrated Webcam.
- Right-click on the device and select Enable device from the menu presented.
- A dialog box will pop-up prompting a confirmation on your decision to enable your webcam.
- Click on Yes to have your webcam enabled.
You can go back to using your webcam as usual, just don’t forget to disable it again when you’re finished using it.