


How to Dual Boot Windows 8 and Windows 7

Having two or more copies of Windows OS on your PC has many benefits. One of the reasons to keep an older version of Windows is that the newer edition might not retain full compatibility with whatever preferred software of yours22`. Also, having multiple operating systems will ensure that you have an option if one stops working. This is how to easily dual boot Windows 7 and Windows 8.
Dual Boot with Windows 7 Preinstalled
Partition Your HDD/SSD
Installing Windows 7 and Windows 8 on the same partition of your hard drive is not recommended. If you have a single partition, you’ll need to create at least one more using the Disk Management utility. Here are the necessary steps:
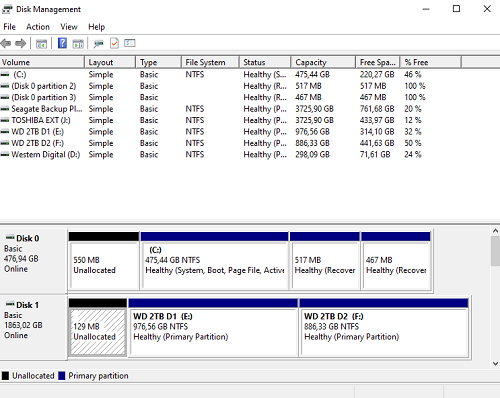
- In Windows, click Start and type “disk part” in the Search box and press Enter.
- After the Disk Management opens, right-click on the C:\ drive and choose Shrink Volume.

- Select how much you want to shrink your C:\ drive. Be aware that Windows 8 needs at least 20 GB to install. However, it’s recommended to have 100GB or more, as the system will grow over time.
- Once the shrinkage is done, you’ll notice a partition labeled Unallocated space. Right-click on it and select New Simple Volume
- In the wizard, select the drive letter and NTFS file format and then label the volume to make it easier to identify.

Install Windows 8 and Configure Dual Boot
- To install Windows 8, you’ll need to boot it from USB or the DVD. Go to your BIOS menu and set either the DVD or USB drive as the primary boot device.

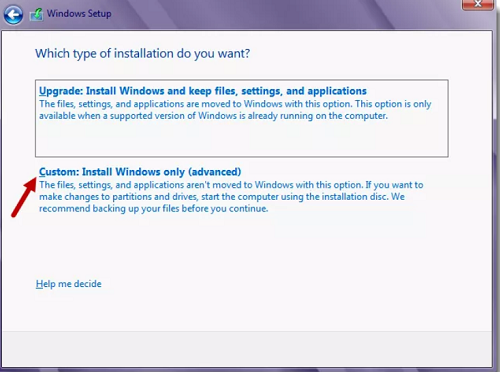
- Windows 8 installation will boot. Once you are on the install type screen, choose Custom: Install Windows only (advanced). Select the partition you’ve created using Disk Management. If you’ve labeled it, it’ll be easier to find.
- Wait for the Windows 8 install. This could take between 10 and 60 minutes, depending on your hardware.
- After the system reboots for the first time, go back to the BIOS and select HDD as your primary boot device.
- Complete the setup process. Once the installation has finished, restart the system.

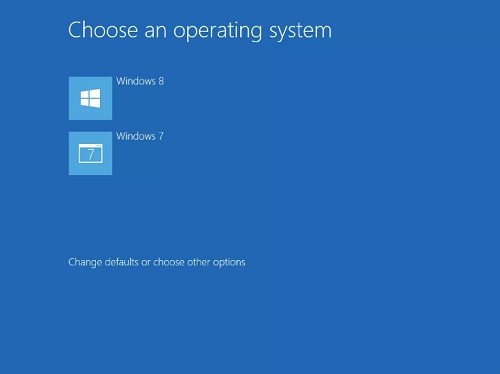
- You’ll see the screen asking you to select an operating system to boot. By default, Windows 8 will boot, but you can change that in the Options menu.
- The options include:
a) Change the timer – by default, the system will boot the more current Windows after 30 seconds. You can change the timer from five seconds to five minutes.
b) Choose a default operating system – Click on this option if you want to have Windows 7 as your primary OS.
c) Other options – A set of troubleshooting tools.
d) Next time you restart your PC, you’ll enter the Windows Boot Manager.
Dual Boot with Windows 8 Preinstalled
Installing an older version of Windows isn’t recommended by Microsoft. After installing Windows 7, the operating system won’t offer a dual boot menu, as it doesn’t recognize Windows 8 boot files. Luckily, you can fix this with a third party tool.
Before installing Windows 7, make sure to partition your HDD/SSD if needed, as described earlier.
Install Windows 7 and Configure Dual Boot
- Reset the computer and enter your BIOS menu.
- Enter the boot menu and set the DVD drive as the first option if you’re installing Windows 7 from DVD. Select the USB if you are installing Windows 7 from the USB drive.
- On the install screen, choose Custom and install Windows 7 on the partition created using Disk Management.
- Once the system reboots during the installation, enter the BIOS menu once again. Set your HDD/Set as a primary boot device.
- As previously described, the dual boot option won’t be available at this point. To enable it, you’ll need to download EasyBCD Community Edition. This is the last version of the software distributed as a freeware for personal use.
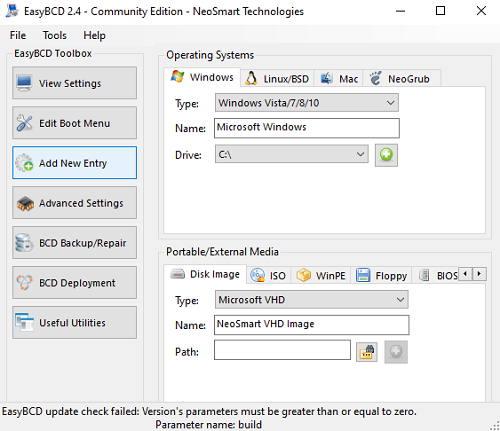
- In Windows 7, install EasyBCD 2.4 and run it.

- Click on Add New Entry.
- Under the type, select Windows Vista/7/8/10.
- Name your entry, for example, “Windows 8” (without quotes).
- Select the drive where Windows 8 is installed. You can check that in Explorer.
- Press Add Entry and wait for the confirmation.
- Optionally, you can click on Advanced Options to configure dual boot time and a few other entries.
- Reset Windows 7, and after rebooting, you’ll be greeted by the dual boot menu.
Note that you don’t need to install EasyBCD 2.4 if you’re adding Windows 8. You can even uninstall the app in Windows 7 and the dual boot menu will still work.
The Power of Choice
Windows 7 and Windows 8 can function together in perfect harmony. While it’s recommended to install Windows 7 first, this is not mandatory. Once you set up the dual boot menu, you won’t ever have to modify it, even after Windows updates. You can upgrade Windows 7/8 to Windows 10 at a later date, as the newer version of Windows will create its dual boot menu.
Which Windows are you currently using? Why do you need both Windows 7 and Windows 8? Please share your thoughts in the comments.


