How to Edit Photos or Pictures Using Pixlr

Why use Pixlr over a free tool like Microsoft Paint 3D, or over free downloadable programs like GIMP? The reason is that Pixlr sits in a weird middle ground. It has more tools and far more customizability than Windows Paint 3D, but it doesn’t have the complexity, sophistication, and the hard-to-learn tools of GIMP. Ultimately, Pixlr is more of an intermediate-beginner’s photo editor, but even intermediates can create pretty stunning results if they have the knowledge and talent.
Read on to learn how to edit photos and pictures using Pixlr.
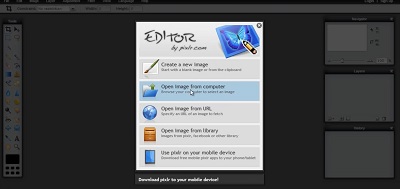
Create a Free Account and Launch the Pixlr Editor
There are three choices from when you first open up Pixlr you can choose between the Pixlr editor, Pixlr express, and Pixlr O-Matic. You have a free account, so you want the Pixlr Editor. Since this article assumes you already have a photo or image you wish to edit, simply click the button that says, “Open image from Computer”.
Pixlr is laid out in a similar way to Adobe photoshop, but for those of you who were playing with computers in the 90s, you’ll find it reminiscent of the old MS Bitmap Paint tool, except it uses movable windows in the GUI.
What the Toolbar Tools Do to Your Image
There’s a toolbar on the left of the screen. This is used to manipulate and alter your image and can be picked up and moved if required.
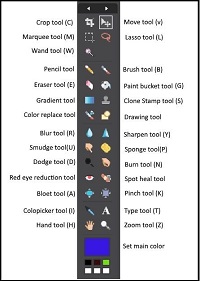
Crop (C)
Cut or re-frame parts of your image. You can snip parts of your image out, or set it bigger and add a frame.
Move (V)
This tool lets you move things around the canvas. For example, if you wrote a piece of text, you may move it around with this tool.
Marquee (M)
Some images are built in layers, and you can select layers using this tool while leaving other layers un-selected. It is handy for copying parts of an image to paste elsewhere.
Lasso (L)
You may wish to select parts that can’t be easily selected using a box, so this tool allows you to free-draw what you wish to select.
Wand (W)
This is similar to a marquee tool, but you simply press on the elements you wish to select.
Pencil (No Shortcut)
You may draw on the image freehand with this tool. You may also choose between many different pencil types.
Brush (B)
Similar to the pencil tool, but you may choose from a range of different brush types that offer different brush widths, opacity and so forth.
Erase (E)
You may remove elements from layers using this tool. Unlike the MS Paint eraser, you’re able to alter this erase tool to perhaps only remove a thin layer of an element and leaving a particularly opaque image behind.
Paint bucket (G)
This can be used as a fill tool, or you may alter how much “Paint” you dump onto the canvas with its tolerance tools.
Gradient (No Shortcut)
Create a gradual colored shading, a gradient, using this tool. It’s stuff like this that really makes it stand out from basic photo/picture editing tools.
Clone stamp (S)
Sample pixels from one area and replicate them elsewhere.
Color replace (No Shortcut)
While preserving the textures and shadows beneath, you are able to add new colors and shades.
Drawing (No Shortcut)
Create basic lines, rounded rectangles, ellipses, and rectangles with this tool. You may also alter the border line for your shapes too.
Blur (R)
This tool mixes up the pixels in an image to create a blur effect. You can change the size of the blur and its intensity.
Sharpen (Y)
This is a filter. Rather than applying it to all of your picture, you apply it to just the section that the brush touches.
Smudge (U)
A little like the blur tool, but instead it mixes up the different pixels to create new colors and shades.
Sponge (P)
You can sop up or enhance color with this tool. For example, you could saturate one area a desaturate another.
Dodge (O)
This is similar to the sharpen tool, but instead of adding a filter, it alters the contrast of an image. However, it only alters the contrast of the part the brush is touching.
Burn (N)
This also deals with the contrast in an image, but it darkens rather than lightens.
Red Eye Reduction (No Shortcut key)
This tool is applied just once, and it replaces red parts of an eye with very dark grays. Add a bit of close-up cloning, and you can sometimes remove red eye in a satisfactory way.
Spot Heal (No Shortcut Key)
Click on an area that you consider to be blemished, and it does a snapshot clone where everything around the blemish is cloned over the point you are clicking.
Bloat (A)
Distort an area as if you were looking at it through a convex lens.
Pinch (K)
This tool does the opposite of the bloat tool. It pinches things in as if you were seeing that part of an image through a concave lens.
Colorpicker (I)
Pick a color from your own image that you may then use as your drawing line color, or maybe as your paint bucket color.
Type (T)
Add in text. Pick its font, its color, and then move it around and resize it. Use the move tool to shift it around after you have finished.
Hand (H)
There are times when you need to grab the canvas. For example, you may be zoomed in and need to move things up a bit, so you use the hand shortcut, grab the canvas, and pull it in the direction you want it to move.
Zoom (Z)
As the name suggests, you can move in closer to your image to get a view of it in more detail.
Set Main Color (No Shortcut Key)
This tool brings up a big palette where you can pick colors. You may then apply such colors to your text, drawn lines, shapes, paint bucket, etc.
Does Pixlr Have Limits?
Pixlr lacks the convenience tools that many paid programs have, and yet Pixlr has all the fundamental tools needed for photo editing. A truly skilled person can work their photos and pictures to great effect if they have an eye for detail, color, setting and shot direction.
What do you think? Is Pixlr baby’s first image editor, or does it have some power under the hood? Let us know what you think in the comments section below.