How To Enable DHCP Windows

The Dynamic Host Configuration Protocol, or DHCP for short, is an Internet Protocol (IP) network protocol that automatically assigns IP and DNS (Domain Name Service) addresses to all devices on a network, saving you from the hassle of manually inputting these. It’s an option that’s enabled by default on most computers running Windows, but what if that’s not the case with your PC?
DHCP is not at all hard to configure, so keep reading and you’ll be done in no time.
Enabling DHCP in Windows 8/8.1 and Windows 10
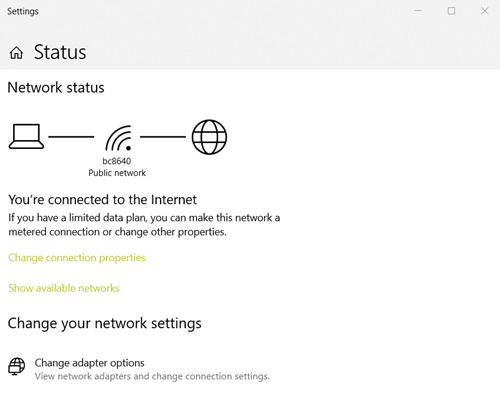
- Unlike older Windows versions, Windows 10 doesn’t have a classic “Control Panel.” Instead, you should right-click on the Windows button and choose “Network Connections.” Another way of opening the same menu is by pressing “Windows” and “X” buttons together on your keyboard.

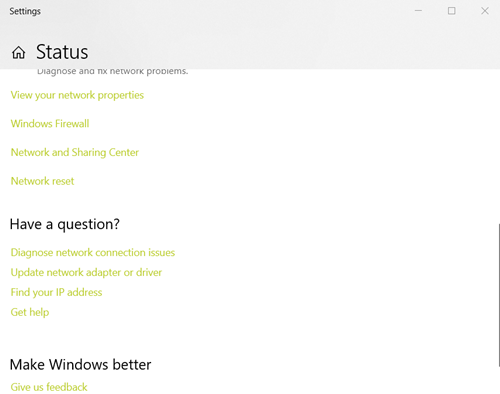
- Scroll down to find the “Network and Sharing Center” under the “Change your network settings” category.

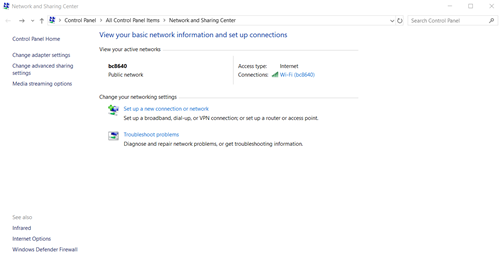
- In the “Network and Sharing Center,” click on “Change adapter settings,” which is located in the top-left corner. This will take you to the “Network Connections” window.
 Note: You can also access the “Network Connections” window directly. Open the “Run” command by pressing “Windows+R” on your keyboard, type “ncpa.cpl” and then click “OK.”
 - Here, right-click on the Ethernet or Wi-Fi, depending on which connection method you are using. From the dropdown menu, select “Properties.”

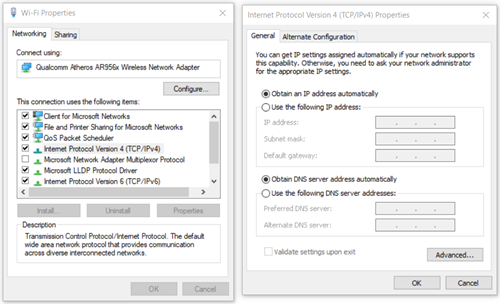
- This will open the Wi-Fi/Ethernet Properties. What you’re looking for is the list of items that your connection uses. Left-click on “Internet Protocol Version 4 (TCP/IPv4),” then click on the “Properties” button that’s just outside of the list.

- In the “IPv4 Properties” window, make sure that both the “Obtain an IP address automatically” and “Obtain DNS server address automatically” buttons are selected. If they are, your DHCP should be enabled.
- If there are changes, click on the “OK” button to save them.
 Note: You can also access the “Network Connections” window directly. Open the “Run” command by pressing “Windows+R” on your keyboard, type “ncpa.cpl” and then click “OK.”
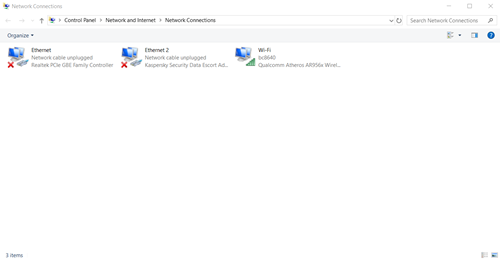
Enabling DHCP in Windows Vista and Windows 7
The process on these two versions of Windows is not the same as the one for Windows versions 8, 8.1, and 10:
- Click the “Start” button.
- In the “Start menu,” select “Control Panel.”
- Inside of the “Control Panel,” go to the “Network and Internet” category.
- Enter the “Network and Sharing Center.”
- In the sidebar to the left, click on “Change adapter settings.”
- Find your working connection, right-click on it, and choose “Properties.”
- While in the “Networking” tab, click on “Internet Protocol Version 4 (TCP/IPv4)”.
- While it’s selected, click on the “Properties” button, but make sure its checkbox is still ticked.
- Your DHCP should be working if both “Obtain an IP address automatically” and “Obtain DNS server address automatically” are selected.
- Click on “OK” to save the changes.
Enabling DHCP in Windows XP (and Older Windows Versions)
- Click the “Start” button.
- In the “Start menu,” select “Control Panel.”
- If you’re using the Windows XP’s “Category View” in the “Control Panel,” click on “Network and Internet Connections.” If you’re not using it, find the “Network Connections” icon and double-click on it.
- Find your working connection, right-click on it, and select “Properties.”
- The connection properties window will appear. It looks similar to the newer Windows versions’ properties window, but you’re looking for “Internet Protocol (TCP/IP)” this time around. Select it on the list without unchecking the checkbox and click on “Properties.”
- If they aren’t selected already, select the “Obtain an IP address automatically” and “Obtain DNS server address automatically” options.
- Click on the “OK” button if changes were made.
Setup Your Router
If this method doesn’t solve the problem, you can try enabling the DHCP in your router settings. Before proceeding, you’ll first need to find your Default Gateway IP. Here’s how to do so in Windows 8, 8.1, and 10:
- To begin, open the “Network Connections.”
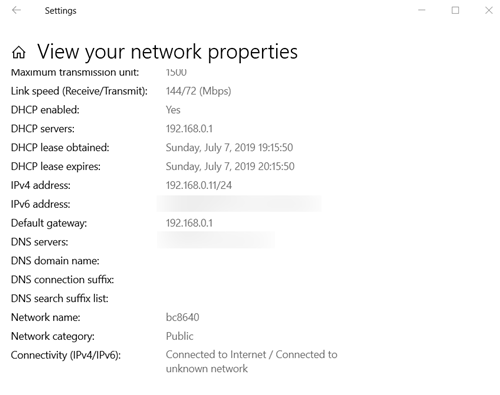
- Find the “View your network properties” option.
- Scroll down until you find the “Default gateway.” It’s near the bottom of the window.
In Windows Vista and Windows 7:
- Go to the “Network and Sharing Center.” Follow the previous method’s steps to find it.
- Click on “Change adapter settings.”
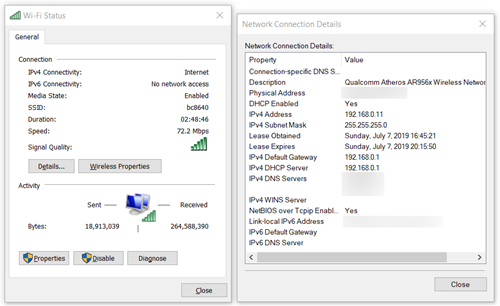
- On the list of internet connections, find the one you are currently using and double-click it.
- The “Wi-Fi Status” (or “Ethernet Status”) window will appear. Click on the “Details…” button and look for “IPv4 Default Gateway.”

Having found the Default Gateway, you can finally enable your DHCP:
- Open up your web browser and enter your Default Gateway in the “Address bar.” Press “Enter” when done. This will take you to your router page.
- Most routers require you to enter your username and password for security reasons straight away. If you don’t know your username and password because you aren’t the one who set them, look up the internet for the default values for your router. Alternatively, try checking the manual that came with your router. If you did set these, but you forgot them, consider resetting your router or just call your network provider for help.
- Find the “Setup” or similar section and follow that with “Network Settings” or similar option that contains the settings for your router.
- From here, you need to find “DHCP Settings” (or “DHCP Server Settings”).
- Look for “DHCP Server” or similar option. The setting you’re looking for will most likely just have the “Enabled” and “Disabled” options. Make sure that the former is selected.
- Click on the “Apply” or “Save Settings” button to save the changes. This button is usually on the bottom of the page you’re currently on.
Maintaining the Connection
DHCP is usually enabled by default, but because of issues within the network – or because of faulty software or outdated drivers – that may not be the case for you. Another possible reason it’s disabled is a malware infection, so if none of these methods helped, consider updating your router and modem drivers, scanning your system for malware, or just calling your internet provider to get help.
Did you manage to solve this problem? Were you able to figure out what caused your DHCP issues? Let us know in the comments below.