


Install and Use Basic FFMPEG Commands in Windows
FFMPEG is an extensive suite of video, audio and multimedia resources that offer seriously powerful editing for free. It is open source and designed mainly for Linux but can be used in Windows using the command line. If a GUI-driven program is not for you, it could be the media editing solution you are looking for. This tutorial will show you how to install and use FFMPEG commands in Windows.
FFMPEG was launched way back in 2000 and has been steadily developed since. New releases come quarterly and offer new features, bug fixes and general improvements. The software is free and open source and can be downloaded as a package or compiled yourself using Git.
As FFMPEG is primarily a Linux product, all the work is done from the command line. If you are familiar with how it works, you’re golden. If you’re used to the Windows GUI, you have a little more work to do. I’ll walk you through the entire process though.
Install FFMPEG on Windows
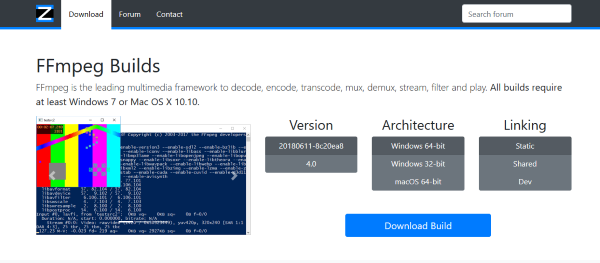
There are a bunch of Windows builds available depending on what type of computer you have. There are both 64-bit and 32-bit builds and I suggest always using the latest stable version. First you need to download and unzip the file and then register it with Windows so it knows to find it.
- Visit this site and download the correct version of FFMPEG.
- Unzip the file you downloaded and copy it onto the hard drive you want it to live on. Rename the folder to FFMPEG to make life easier.
- Right click on This PC and select Properties.
- Select Advanced system settings in the left menu.
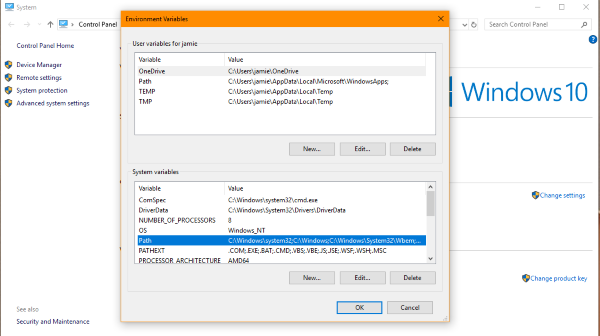
- Select Environment Variables in the bottom of the window that appears.
- Select Path in System variables and select Edit.
- Select New and add ‘C:\ffmpeg\bin’ to the list. You could use ‘%\FFMPEG\bin’ if you prefer. Change C: to the drive letter you stored your folder on if different. Also remember to capitalize FFMPEG if you renamed your folder that way.
- Select OK and close down all windows.
Now Windows knows where to find FFMPEG and you should be able to use it without having to type drive letters all the time.
Basic FFMPEG commands
Now FFMPEG has been installed, we can use it to edit or convert our videos. It will take a little getting used to, but once you know what you’re doing, you will find it much faster than using a program with menus.
First let us make sure it is working.
- Right-click the Windows Start button and select Command Prompt (Admin).
- Type ‘ffmpeg -codecs’ and hit Enter.
You should see a list of codecs available to FFMPEG once you hit Enter. If you see unrecognized command or something other than a list, go back to the previous task and try it again. If you do see the list, FFMPEG is ready to use.
Here are some more FFMPEG commands. Where you see video.mp4 or inputvideo.mp4, change this to the filename of the video you want to use. You can change either or both the name and format. It must match the file you’re editing exactly in order to work.
ffmpeg -i video.mp4 – Change video to filename and mp4 to format to display video file data.
ffmpeg -i inputvideo.mkv outputvideo.mp4 – Convert .mkv format to mp4.
ffmpeg -i inputaudio.mp3 outputaudio.wma – Convert audio in the same way.
ffmpeg -i inputvideo.mp4 -vn output.mp3 – Convert video to audio.
ffmpeg -i inputvideo.mp4 animation.gif – Convert an MP4 video into a GIF file.
ffmpeg -i inputvideo.mp4 -ss 00:56:34 -t 00:00:22 -c clip.mp4 – Create a video clip. SS is the start point, so this is (HH:MM:SS) 56 minutes and 34 seconds into the video. The clip will be 22 seconds long thanks to -t and the -c is to tell FFMPEG to make a copy rather than overwrite.
ffmpeg -i inputvideo.mp4 -i subtitlefile.srt -map 0 -map 1 -c copy -crf 23 outputvideo.mp4 – Adds subtitles to a video using subtitlefile.srt.
ffmpeg -i inputaudio.wav -ac 1 -ab 64000 -ar 22050 outputaudio.mp3 – Convert audio from .wav to .mp3 while changing bitrate to 64k.
ffmepg -i inputvideo.mp4 -vf scale=1280:720 outputvideo.mp4 – Scales a video to a new size. In this case, scaling to 1280 x 720.
ffmpeg -i inputvideo.mp4 -vf deshake outputvideo.mp4 – Remove some shake from homemade video.
Those are a bunch of FFMPEG commands to achieve most things you’re likely to want to use FFMPEG for. If you would like more advanced commands, the documentation page on FFMPEG.org’s website is extremely useful. The community is very active and are happy to help with questions should you not be able to find an answer yourself.


