


How to Add Vertical Divider in Notion?

With all collaboration platforms, one thing’s certain – everything needs to be as straightforward as possible. Pages of writing (like those often found in Notion) can be tedious and confusing.
But how do you make things more pleasing to the eye? Well, text breaks, page breaks, and dividers can make a body of tedious text much easier to read. Here’s how to add dividers in Notion.
Adding a Vertical Divider
In Notion, you’ll often find yourself adding textual content in the form of columns. A break from lengthy lines of text can make things more interesting to the reader. You can even make columns of different width, to improve readability.
Unfortunately, there isn’t a command for a vertical divider between columns in Notion. At least not a literal one. The only way to have something that looks and performs like a vertical divider is to add a quote. Yes, it may sound strange, but it actually works. To do so, go ahead and create a column.
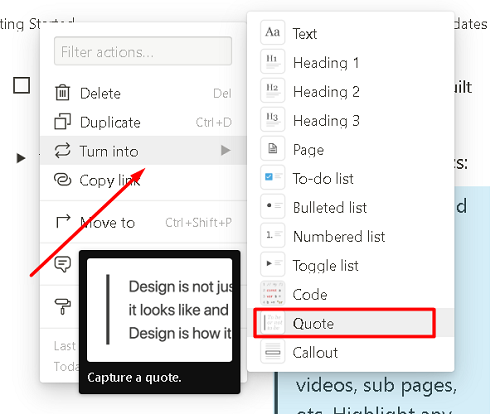
Select a body of content, click the six-dotted icon to the left, and drag it all the way to the right side of the screen. This will create a new column, but won’t have anything but empty space between it and the other column(s). Now, select that body of text again and click the six-dotted icon. A popup menu will appear. Select Turn into and then Quote from the list that appears to the right. This will create a visible black vertical line to the left of the body of the selected text. There you go, a vertical divider!
If your vertical divider is made out of an unevenly dashed line, that’s because you’ve used page breaks. Instead of adding page breaks in the new “quote” section, use Shift + Enter to go to the new line without breaking the page. Using Shift + Enter, you can create an entire column with a dividing line between it and the one to its left.
If you want to create a new quote column, use the command mentioned above. Alternatively, you can also type “/q” and hit Enter. Or type “ at the beginning of the line in question and hit Space. This will turn the content box into a quote immediately.
Use this tweak creatively and you’ll be able to create multiple columns for the reader’s pleasure.
Adding a Horizontal Divider
To complement your impromptu vertical divider, you may want to use horizontal dividers, as well. Fortunately, a horizontal divider is very easy to add and quite straightforward to use. The most basic way to add a horizontal divider is to click the + icon that appears when you hover over a line (towards the line’s left). Then, select Divider from the menu that appears.
Alternatively, you can type “/div” and then hit Enter. This will also cause the horizontal divider to appear.
Finally, you can add three hyphens in a row (—) and the divider will appear. You don’t even have to hit Enter.
Keep in mind that the horizontal dividers, unlike the impromptu vertical dividers, can be dragged and dropped like any block of content in Notion. Look for the six-dotted icon next to the divider and drag it wherever you want to.
With that said, this horizontal divider is bright grey in color, which makes it very different from the impromptu vertical divider from above. So, don’t expect the two dividers to vibe perfectly. However, they do bring some neat creative options to the table, so go ahead and put them to good use.
Using Tables to Add Vertical Dividers
This may have crossed your mind. In theory, tables are divided both vertically and horizontally. So, maybe you can format the body of text as a table and expand it. Sure, in this way, you’ll get visible horizontal and vertical dividers. Also, they’ll look identical, which may sound great.
However, in Notion, tables aren’t too tweakable. You can change the size of each field, apparently turning it into a block of text. However, all you can do with this body of text is balding it, italicizing it, and turning it into strikethrough text. You can also add hyperlinks, turn it into code, and change the background color. However, you can’t change fonts, resize the text, add headings mention people, etc. This limits the use of tables to create vertical dividers.
Additionally, the block of content is still going to be a table. There’s no way that you can hide the fact that the block of text is still a Notion table.
So, using tables to create vertical dividers isn’t the best idea and it may not do the trick.
Making Your Text More Interesting to Read
Vertical and horizontal lines aren’t the only tools to create more organized, attractive text in Notion. There’s a wide variety of other things that you can do to make things better-looking.
For one, you should always keep headers in mind. H1, H2, and H3 will help you create a more coherent body of text that will help you access certain sections faster.
Then, you can use various quotes, lists, even tables. You don’t have to use the impromptu separators with every column, either. Instead, creatively resort to this cool feature to create emphasis in your writing.
In truth, coming up with a good-looking body of text is much more complex than you’d think. It borders on web design and has a lot to do with UX.
Dividers in Notion
Adding a horizontal divider is common amongst content creators. However, using the quote feature to create a vertical divider for your text isn’t often seen in Notion documents. Although the two divider types are vastly different, they can be used to create a better-organized text. Either way, avoid using tables to achieve this effect. It probably won’t work.
Have you tried using the quote feature to create a vertical divider for your texts? Do you know a better way to create one in Notion? Feel free to add your thoughts, questions, or tips in the comment section below.


One thought on “How to Add Vertical Divider in Notion?”