


How to Create an OS X 10.10 Yosemite USB Installer for the Developer Preview
Creating a bootable OS X installer isn’t as simple as it used to be, and things are a little bit more complex with the Developer Preview of OS X Yosemite. While there are multiple methods that will work, here’s the easiest way to create a bootable OS X 10.10 Yosemite USB Installer.
Note: As mentioned, these steps are for the OS X Yosemite Developer Preview, which is provided to registered members of the Mac Developer Program. If you’re a consumer using the free Yosemite Public Beta, follow these similar, but specialized, instructions.
Step 1: Obtain the Yosemite Developer Preview Installer
Download the OS X Yosemite Developer Preview installer from the Mac App Store. This will put a file called Install OS X 10.10 Developer Preview.app in your /Applications folder. It will also launch the Yosemite installer app when the download completes. Quit the app by pressing Command+Q.
Step 2: Format and Prepare USB Drive
Grab a USB flash drive that’s at least 8GB in size. While it’s possible to create a separate partition for the Yosemite USB installer, it’s safest and easiest to use an empty drive or one that you don’t mind erasing. Plug the drive into a Mac running OS X 10.7 Lion or higher and launch Disk Utility from the /Applications/Utilities folder.
In Disk Utility, select the USB flash drive from the list on the left. Note that you want to select the drive and not the volume. We’re using a SanDisk Cruzer flash drive, so in our case we choose 8 GB SanDisk Cruzer Media and not the default “No Name” volume.
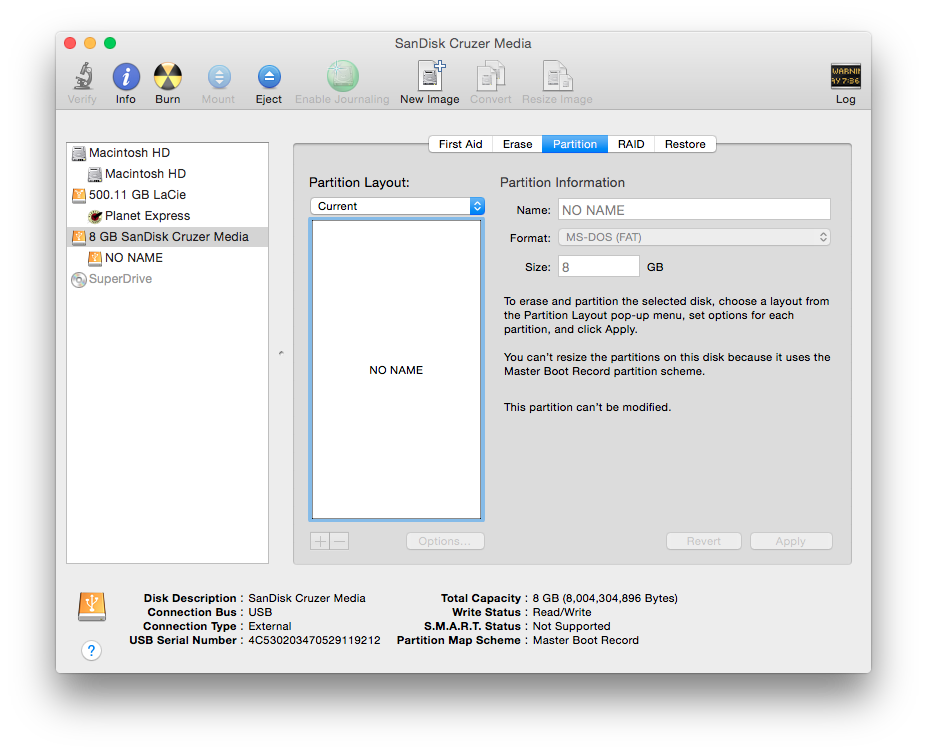
With the USB drive selected, choose the Partition tab on the right side of the window. The partition scheme and volume properties of your flash drive will vary depending on manufacturer and previous configuration. In our case, our drive is brand new and formatted as a FAT volume with a Master Boot Record partition scheme. This won’t work for Yosemite, so we need to change it.
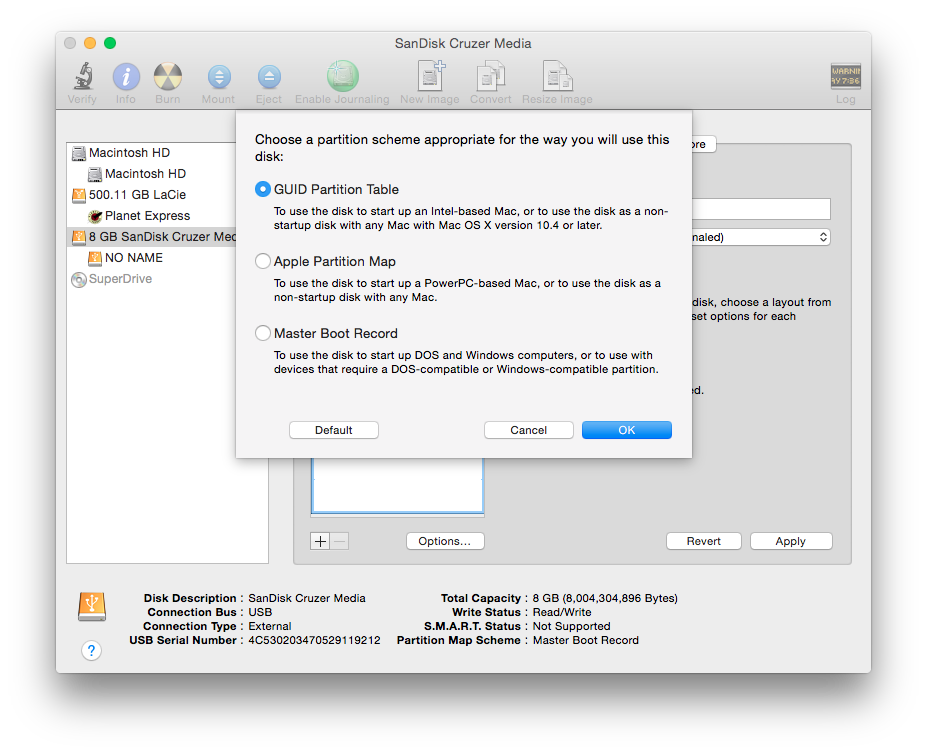
In the drop-down menu under Partition Layout, choose 1 to create a single new partition. Then click Options, choose GUID Partition Table, and click OK to save the change. Under Partition Information, change Format to Mac OS Extended (Journaled) and give the drive the name “Untitled” (this allows your drive to work with the Terminal commands below; you can rename the drive when the process is complete).
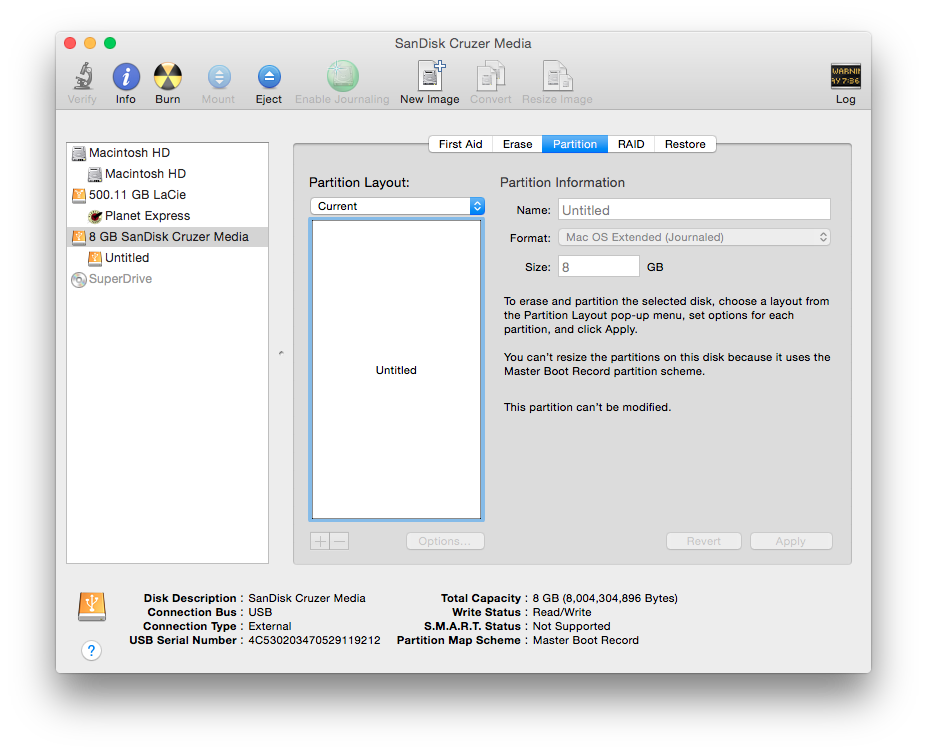
Press Apply to restructure the USB volume with the new parameters. Note that this will erase all contents of the USB drive so, as mentioned above, be sure to back up any files on the drive or use a blank drive to begin with.
Step 3: Modify the Yosemite Installer’s Preference File
This is one step that consumers running the public Yosemite beta don’t have to worry about. By default, the process of creating a bootable Yosemite USB installer via the method outlined in this article won’t work unless we make a slight change to a .plist file in the Yosemite installer app.

Locate the Install OS X 10.10 Developer Preview.app file in your Applications folder, right-click, and choose Show Package Contents. Then open the Contents folder and find Info.plist. Open this file in your text editor of choice and find the line <key>CFBundleShortVersionString</key>. The default value for this key, listed in the string below it, is 1.4.3. Change this to 1.4.1, and save the file, authenticating with an admin password if requested.
Step 4: Create the Bootable Yosemite USB Installer with Terminal
Now that the Developer Preview’s preference file has been modified, we can complete the process of creating a bootable Yosemite USB installer with a simple Terminal command. Open Terminal from /Applications/Utilities and then enter the following command:
sudo /Applications/Install OS X 10.10 Developer Preview.app/Contents/Resources/createinstallmedia --volume /Volumes/Untitled --applicationpath /Applications/Install OS X 10.10 Developer Preview.app --nointeraction
Press the Return key on your keyboard to execute the command, and enter your admin password when requested. This will create a bootable Yosemite USB installer using OS X’s createinstallmedia tool, which can take quite a while depending on the speed of your flash drive.
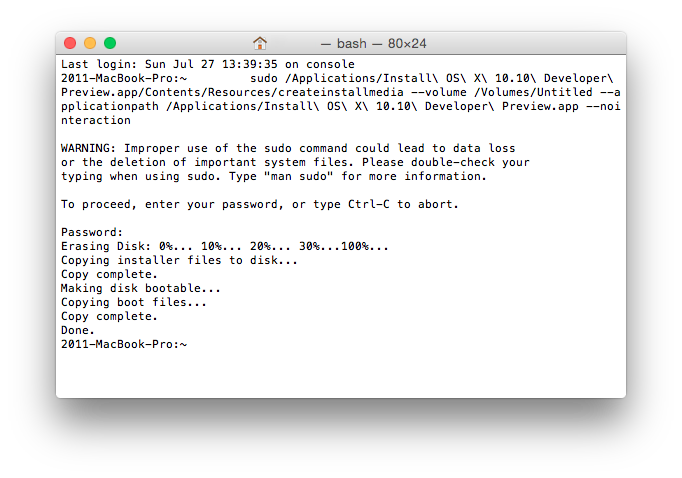
Let the tool do it’s thing and don’t interrupt the process until you see Terminal output Done and return your window to the user prompt. When it’s complete, you’ll see that your USB flash drive is now mounted to your desktop with the name “InstallAssistant.” You can now rename this drive (highlight it on the Desktop and press Return), as well as supply it with its own custom icon.
Eject your new Yosemite USB installer and connect it to any Mac you wish to upgrade to the Yosemite Developer Preview. Reboot the Mac holding the Alt/Option key on the keyboard and you’ll see the installer appear in the EFI boot menu. Select it and follow the prompts to install OS X Yosemite.


2 thoughts on “How to Create an OS X 10.10 Yosemite USB Installer for the Developer Preview”
sudo /Applications/Install OS X Yosemite Developer Preview.app/Contents/Resources/createinstallmedia –volume /Volumes/Untitled –applicationpath /Applications/Install OS X Yosemite Developer Preview.app –nointeraction