The Semaphore Timeout Period Has Expired – Can You Extend?

Windows 10, like any other OS, is riddled with its own problems and errors. Some of these are common, others less so. The semaphore timeout period has expired 0x80070079 error occurs when you try transferring files between an external device and Windows 10. It has also been known to happen when trying to access a driver that’s connected to your computer.
Naturally, this error blocks the offending action and stops the transfer process dead in its tracks. Here’s a list of possible solutions that can help.
Update All Drivers
In order to perform normally, every single hardware component on Windows 10 has to be equipped with functioning, up-to-date drivers. An un-updated driver may work normally but still cause issues, much like the error at hand. You can try updating all the drivers manually from the Device Manager but your best bet would be downloading software for automatic driver updates.
Auto driver update programs will automatically scan your computer for its hardware, find the necessary drivers online, download, and install them for you. Some auto-update programs aren’t free but they’ll definitely worth the money. This software can prevent this issue and many other potential problems from occurring.

Perform a Clean Boot
Perform a clean boot in order to make sure that there isn’t a file/program conflict causing this error. With a clean boot, you’ll be able to disable startup programs and non-windows services that are unnecessary. Don’t worry about your data – it will remain secure and safe throughout the operation. Here’s how to do it.
Hit Windows Key + R to start the Run box. In the Open: field, enter “msconfig”. Hit Enter. You’ll see the System Configuration window open. Navigate to the Service tab. Check the box in front of Hide all Microsoft services and then select Disable all. Now, restart your device.
NTFS Instead of FAT32
Performing a transfer of large files can be done only if the drivers are formatted as NTFS. This is especially true if you’re using an USB external drive. Converting FAT32 to NTFS should help here.
Find the driver in question and right-click it. Then, select Format from the list the pops up. In the next window, you’ll get to choose between FAT32 and NTFS. Select NTFS. Click Quick Format to commence formatting and wait until the process is completed.
Remove HDD Entries
The worst consequence of the semaphore timeout period has expired 0x80070079 error is that it may prevent you from using your drive normally. If this happens, go to the Device Manager, expand the USB category and see if there are old external drives entries.
To do this, navigate to the Universal Serial Bus controllers category and right-click any of the old HDD entries. Then, select Disable Device. Do this for all old HDD entries.
Disable Firewall and Antivirus
Your antivirus program or Windows Firewall itself can mislabel a file as a threat. If this happens during the transfer, you may receive the semaphore timeout period has expired 0x80070079 error. Therefore, try disabling your computer’s security measures and retry the process. Bear in mind that you should be absolutely certain that the file in question isn’t a potential virus.
To disable Windows Firewall, press Win + X or right-click the Start button. Then, select Control Panel. Once the Control Panel opens, find the firewall manually or type “windows firewall” in the search box. Follow the instructions to disable the firewall protection.
Disabling your antivirus is different. Each antivirus has its own interface. Your best bet would be finding how to turn it off on Google.
Update the Drivers for Your Network Adapter
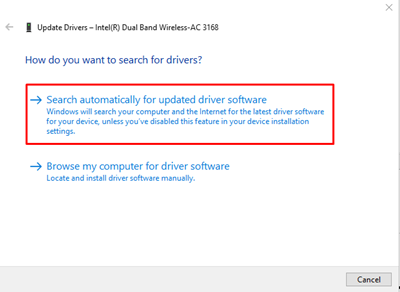
Your network drivers might be out-of-date. Try updating them manually. To do this, press Win + R to open the Run box. Inside the Open: field, enter “devmgmt.msc”. The Device Manager will open. Find the Network Adapters entry in the list and expand it by clicking the arrow to its left. Right-click the adapter and then select Properties. Go to the Driver tab and select Update Driver. Select Search automatically for updated driver software. Wait until the process is done and restart your system.
Perform the Integrity Check
If the semaphore timeout period has expired 0x80070079 error occurs when trying to transfer files inside a LAN (local area network), you need to perform an integrity check. For a successful LAN transfer, there can’t be any problems with your signal and every connection must be set up properly. It’s recommended that you perform the integrity check using the Administrator privileges.
Run the System File Checker (SFC) and Deployment Image Servicing Scans (DISM)
If the semaphore error is a result of corrupt, damaged, or missing files, an SFC or a DISM check should take care of it. To run these checks, press Win + R to open the Run dialog box and type “cmd” in the empty field. Then, press Ctrl + Shift + Enter to launch an advanced version of Command Prompt. Inside the Command Prompt, type “sfc/scannow” and hit Enter.
The System File Checker will scan your PC for any problematic files. When it’s done, you’ll see instructions on how to resolve the semaphore timeout period has expired 0x80070079 error.
When the SFC is complete, run a Deployment Image Servicing Scans by executing the “DISM /Online /Cleanup-Image /RestoreHealth” command in Command Prompt. DISM finds an issue, resolve it by following the on-screen instructions.
Pro Tip: Backup Everything
This is an important disclaimer. Whatever you’re working on, you should always have a backup somewhere. If the semaphore timeout period has expired 0x80070079 error occurs, you’re risking losing all the involved files, which can turn into quite a nightmare. Always backup everything properly before attempting a transfer.
The Error Number 0x80070079
This annoying transfer error can be time-consuming to fix. Hopefully, this guide will help you find the solution as soon as possible and get your drivers working properly again.
Has any of these tips helped? Do you have another one that wasn’t featured here? Feel free to join the discussion below and add any tips/questions/experiences that you may have.