


How to Print Barcodes on Shopify
Shopify is an excellent e-commerce platform that helps you manage online sales easily. It has a user-friendly interface, and from the admin panel, you take orders, add new products, keep records, and more.
Your online store can also collaborate with large retailers and distributors, not only individual customers. However, your products need to have barcodes if you’re planning on going big. This article will provide you with useful info on how to get barcodes for your products, and how to print them.
How to Print Barcodes on Shopify
There are two simple ways to generate and print barcodes for your products. The first is to visit the Shopify app store and download the Retail Barcode Labels app. Another way is to use the products list view.
Printing with Retail Barcode Labels App
The app is available on the Shopify official website. It allows you to create automatically generated barcode labels, including prices and other important info about your product necessary for inventory and selling purposes. You can adjust the size of the tags, and print them in bunches or individually.
The app is compatible with many printer brands. Note that Dymo and Avery label printers may be excellent choices for you. However, you can print from any printer connected to your computer. You can also print from a mobile device using Wi-Fi and air-printing.
Here’s how to print:
- Open your Shopify account and visit the admin page.
- Select Apps and then Retail Barcode Labels.
- From this section, choose Print labels.
- When you choose the desired products, select Add.
- You can change or confirm printer settings before you finalize the task.
- Click or tap on Print labels.
Before you create and print barcodes, you can adjust some of the settings to suit your needs. Before you proceed to confirm the print job, you can preview the labels and make sure they’re correct. Also, you can save your barcodes in a PDF file.
Here are a couple of tips to make sure your labels turn out correctly. If you’re printing from a Mac, ensure that Orientation is set to Portrait, and the Output Resolution is set to 300×600 DPI. If you’re using another PC with Google Chrome, use the same features. The option names may slightly differ – you should find the resolution under Print Quality.

Printing from Products View List
If you decide to skip the Retail Barcode Labels app, you can print barcodes from the Products view list. Here’s how:
- Go to the admin’s panel within the Shopify app.
- Click or tap on Products.
- From this section, choose All products.
- Choose all the products you need the barcode for.
- Select Actions above the product list.
- From the drop-down menu, choose Print barcode labels.
- Choose how you want your label to look.
- Below the template, set the number of labels you want for each product.
- Confirm your printer and select Print labels.
Before you finalize the task, you can preview the labels. This way, you can ensure that they’re appropriate. Also, you can save the labels as a PDF file.
How to Create Barcodes
Are you confused about creating barcodes and templates in the first place? Follow these instructions to generate barcodes for your products before you get to printing. Be aware that you can create templates, barcodes for all or specific products.
Creating Barcodes for All Products
- From your admin panel, open the Retail Barcode Labels app.
- Select Create barcodes.
- From this menu, choose Create barcodes for all products.
- Choose if you want to replace the existent barcodes with new ones for all products, or just add them for products that don’t have a barcode yet.
- Select Create barcodes to confirm the action.
Creating Barcodes for Specific Products
- Open the admin dashboard and then the Retail Barcode Labels app.
- Choose Create barcodes.
- From here, select Create barcodes for specific products.
- Choose the products you need barcodes for.
- Click on Add.
- Choose either to add new barcodes for all selected products, or just for those that don’t have one yet.
- Select Create barcodes to finish the task.
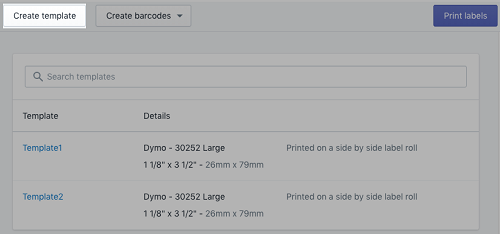
Creating Templates
If you’d like to create a template for your barcodes, here’s what to do:
- From the Retail Barcode Labels app, choose Create template.
- Choose Get started.
- Click Skip to proceed to create the template.
- Give your template a name.
- Choose how your label is going to look by picking a template from Popular or Other label types.
- Select the code and paper brand.
- Choose what details you want to be displayed on the label.
- Choose Create template to finish.

Create and Print Barcodes in Minutes
With Shopify, creating and printing barcodes for your products is made simple. Whether you’re printing individual labels or labels for a whole bunch of products, you need only a few clicks and a compatible printer. The best thing is you can use your mobile device as Shopify lets you airprint! This means you can really get your barcodes ready in no more than a couple of minutes.
What will be your way of printing barcodes? Is your printer compatible with airprinting? Let us know in the comments section below.


