How to Upload Images to Shopify

If you like to shop online, you know the importance of product descriptions. You want to see a picture of a product before you place it in your cart.
As an online shop owner, you should provide your customers with the most accurate image of your products possible. But how do you upload images to your Shopify store? Can you optimize them? Keep reading if you want to learn the answers.
How to Upload Images
Uploading images on Shopify doesn’t require special skills. You can even let buyers download the photos. Here are the steps you should follow to upload pictures of your products, and any other files you want to appear in your online shop:
From Desktop
- Open your admin dashboard on Shopify.
- Click on Settings.
- Choose Files.
- From Files, select Upload files, and from the pop-up window, choose the ones you want to upload.
- Select Open.


From Mobile Devices
You can also upload pictures from your iPhone or Android smartphone. Here’s how:
- Open the Shopify app on your phone.
- Select Store.
- Select Settings and locate the Store settings section.
- Choose Files.
- Choose Upload files.
- Select all the desired files and tap on the Open button to finish.
You can access all your uploaded images any time by opening Files and scrolling through the library. When you don’t need them anymore, you can delete the images one by one, or use a bulk action to remove multiple photos simultaneously.
Uploading with Rich Text Editor
If you upload a picture with the rich text editor, it will also be available in the Files section. It will appear on your web store with the product description, a collection, or a blog post, for example, depending on where you want to display it. Here’s how to use this editor:
- Open the admin panel and choose the product or collection where you want to add a photo.
- Open the rich text editor and choose the place where you want the image to display.
- Click on the image icon from the bar at the top. It’s close to the right corner.

- Select Upload file to insert an image to the desired place.
- After you choose a photo, select the image size and, optionally, add the alt text to optimize the image.
- Finally, select Insert image, and it will appear in the selected place in the editor. Once the image is there, you can change its location, size, alignment, and more.
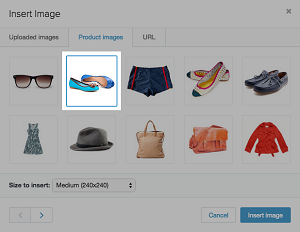
You don’t need to upload a new picture to use it in the rich text editor. You can also use an existing one from your Files. When you click on the Insert image icon and a new window pops up, select the Product images tab to see the photos you’ve uploaded for your products. Choose the desired photo and click on Insert image in the bottom-right corner.
Make sure you add PNG or JPG files to the rich text editor. These picture formats work best here.
You can also use a public image using its URL. When you click on the Insert image icon, the third tab says URL. Click on this tab and paste or manually enter the URL of the desired photo. Make sure the URL is valid and accessible. When you’re done, select the Insert image button in the lower right corner.
Extra Tips for Great Images
If you want to make sure your webshop looks attractive to your customers, your images should be optimized and in a suitable format. Apply these tips to add even more value to your shop with some high-quality photos!
- Use the following formats when uploading images: JPG, JPEG, PNG, or GIF. These formats won’t cause any problems when loading the pictures, and everyone will be able to see them. JPEG is excellent for product images, blog posts, and banners, while you should use PNG for logos, borders, and icons.
- Your images shouldn’t be larger than 20 megapixels and 20 megabytes.
- Try to upload square images whenever possible. This is important because of the different types of screens people use. For instance, a wide image can be cropped when viewed on a mobile device or a tablet.
- Name your photos as descriptively as you can. This will help with SEO and increase your visibility and ranking on Google. Use simple language and keywords related to your brand and products.
- Don’t forget the thumbnails. They’re visible on your category pages and should also be optimized. These files won’t slow down your page load speed if they’re small. Also, make sure you use different alt attribute text for thumbnails and the actual, full-size images on your website.
- Upload images of different angles of your product, if relevant. For example, if you sell cosmetics, make sure you upload the label image as well, so your customers can see the ingredients.
- Don’t use too many unrelated images just to add color to your webshop. They can compromise your page load speed.
- You don’t need special design skills to quickly learn how to optimize your images and create simple but effective visuals. Apart from the well-known Photoshop, you can also use simple websites and programs such as Canva, PicMonkey, or PIXLR.
Images That Make You Look Pro
Images are an essential part of the online shopping experience. You should always make sure they’re high quality and properly optimized before you upload them.
Shopify allows you to upload product images, banners, and other types of pictures in different ways and different places on your website. Images will complement your copy in the best possible way and help with conversion and keeping your loyal customers.
How often do you upload new images to your Shopify web store? Do you use the rich text editor? Let us know in the comments section below.