How to Dual Boot Windows 11 and Linux (And Why)
Windows and macOS have become giants by providing their users with the best features of their respective operating system. But that comes at the price of allowing near-constant data collection and requiring consistent updates. Both systems also put constraints on what you can do as the user.
Linux, on the other hand, is a free open-source platform that works wonders for network development and system administration, giving you higher customization. However, you don’t have to choose between them when you can dual boot Windows 11 and Linux.
Part 1 – Dual Boot Windows 11 and Linux Hardware Requirements
Linux is a more lightweight system, so any PC that can run Windows 11 should feasibly work with the most common Ubuntu versions. However, if you’re using a laptop, you might not have the hard drive partition to store it. This is because each operating system has a separate partition requirement (in fact, Windows 10 self-compartmentalizes into five partitions).
This tutorial supposes you’ve installed Windows 11 first (as that’s more common), but you can theoretically do the process in reverse since both systems can work with one another. Note that if you have a version of Windows 11 other than Home, you’ll need to disable BitLocker.
Newer versions of Ubuntu can perform this during the installation process, so you can skip it if you plan to install it unless you want to manually set the partition size or allow for additional systems.
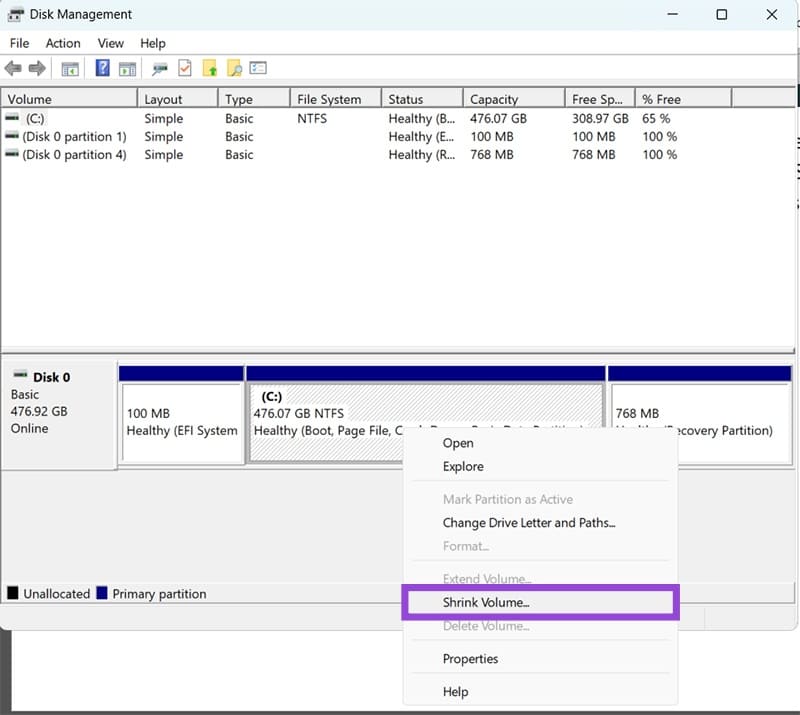
Step 1. Search for “disk management” and open the “Create and format disk partitions” programs.

Step 2. In the Disk Management program, select the partition where you want the operating system. In most cases, you’ll use two or more separate hard disk drives (or SSDs). Since laptops usually won’t have this, you’ll need to take a chunk out of C drive, which is typically disk 0.
Step 3. Right-click on the drive and select “Shrink Volume.”
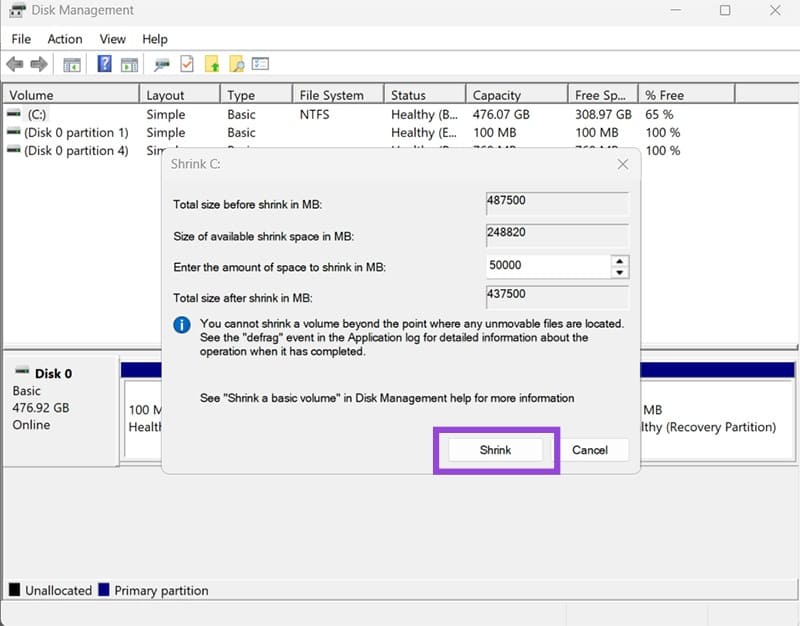
Step 4. In the pop-up dialog, you can enter how much storage space you want to “give” to the Linux system. Enter at least 30 GB of storage (30,000 MB), but more is better.
Step 5. Click on “Shrink.”
Step 6. Wait for the process to finish. You should see a new partition (named D) pop up to the right, which will be used when you want to dual boot Windows 11 and Linux.
Part 2 – Creating a USB Bootable Drive
In most cases, the simplest way to install a new operating system is via a bootable USB, as even laptops have USB slots.
Step 1. Download the Linux installation of your choice as an ISO file to your PC. You can use Ubuntu’s official page for a list of available downloads.
Step 2. Use a third-party program that makes bootable USBs from ISO files. Ubuntu recommends balenaEtcher, but Rufus is also a great choice. Download the tool on your device.
Step 3. Insert an empty USB file.
Step 4. Run the USB-creation program. Select the USB from the list and the ISO file you downloaded.
Step 5. Follow the instructions and keep the bootable USB inside the PC when you’re done.
Part 3 – Installing the Second Operating System
There are a few different ways to get to BIOS and change the boot order. In fact, some systems will prioritize USB boot from the get-go. The simplest option is to enter BIOS when restarting to get the Win 11 Linux dual boot setup.
Step 1. Restart your PC.
Step 2. When the system is booting (you get a screen that shows your PC or motherboard manufacturer), hit “Escape” or “F11” or “F2.” If one of these options work (other won’t), you’ll get redirected to BIOS.
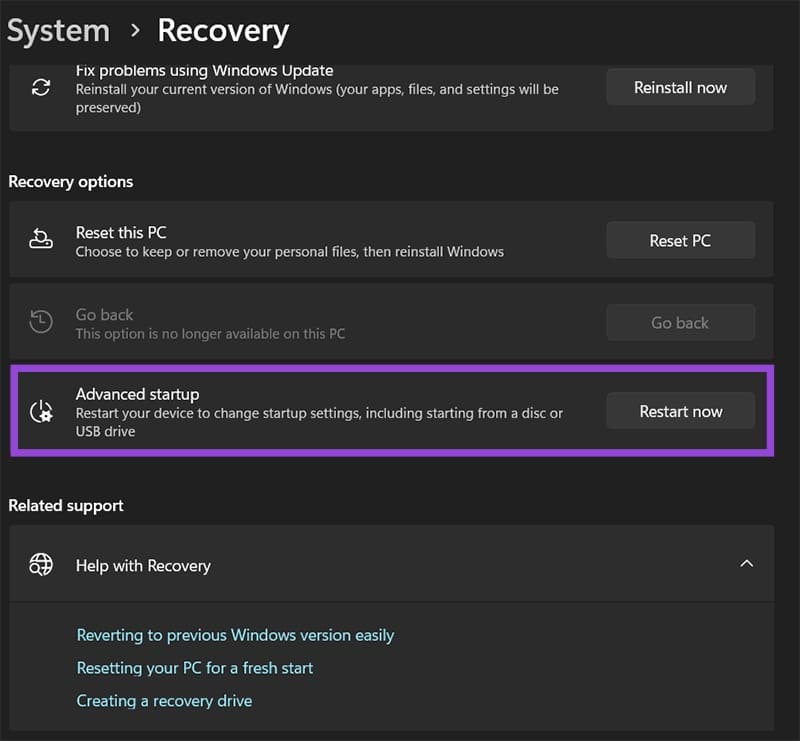
An alternative to this is to go to “Advanced startup” via Settings in Recovery.
Step 3. In the BIOS, change the boot order so the USB slots go before hard drive partitions. Typically, the system detects and lists all USB slots with drives in them, so you should have one if the bootable USB is the only inserted drive.
Step 4. Click on “Save and Exit” in the BIOS to let the system load further.
Step 5. You’ll get a prompt to install Ubuntu if you’ve done everything correctly.
Follow the installation instructions, choosing the newly-made partition (you should be able to identify it as it’ll have the exact amount of storage you put in Part 1).
When prompted, you can choose to install recommended software (as stock Ubuntu won’t even run MP3 files). Additionally, the installer should detect that you have another system installed and will ask you to install the Windows Boot Manager, which you should accept.
Once you complete the settings and dual boot Windows 11 and Linux, you’ll automatically get the GRUB boot loader which will pop up to let you choose which system (or drive) to load whenever you start the PC. This can replace changing BIOS settings in the future.