


Screenshot Not Working (Windows 11) – Try These 6 Fixes
Both Windows 10 and 11 make it easy and convenient to grab screenshots without the need for third-party software. Thanks to the Snipping Tool app, screen capture is just a keyboard shortcut away. However, things don’t always work, and you might be in need of a fix or two to get the screenshot working again.
We’ve got six fixes to help with screenshot not working (Windows 11).
What’s the Problem Here?
Screenshot errors can have quite a few potential causes. Some major ones include:
- Trouble with the clipboard, such as disabled history
- Corruption of the Snipping Tool App itself
- Focus Assist or another overlay blocking Snipping Tool
- A remapped keyboard shortcut
- File or user account corruption
Screenshot Not Working (Windows 11) – Fixes to Try
Let’s get into troubleshooting screenshots not working (Windows 11) with six different ways to fix the problem:
Enable Clipboard History
If you’re having trouble accessing screenshots through Clipboard History, a disabled clipboard history can prevent you from viewing previously captured screenshots there. Here’s how to enable it:
Step 1. Open “Settings” (Win + I) and click “System” in the side panel.
Step 2. Navigate to “Clipboard” and click it.
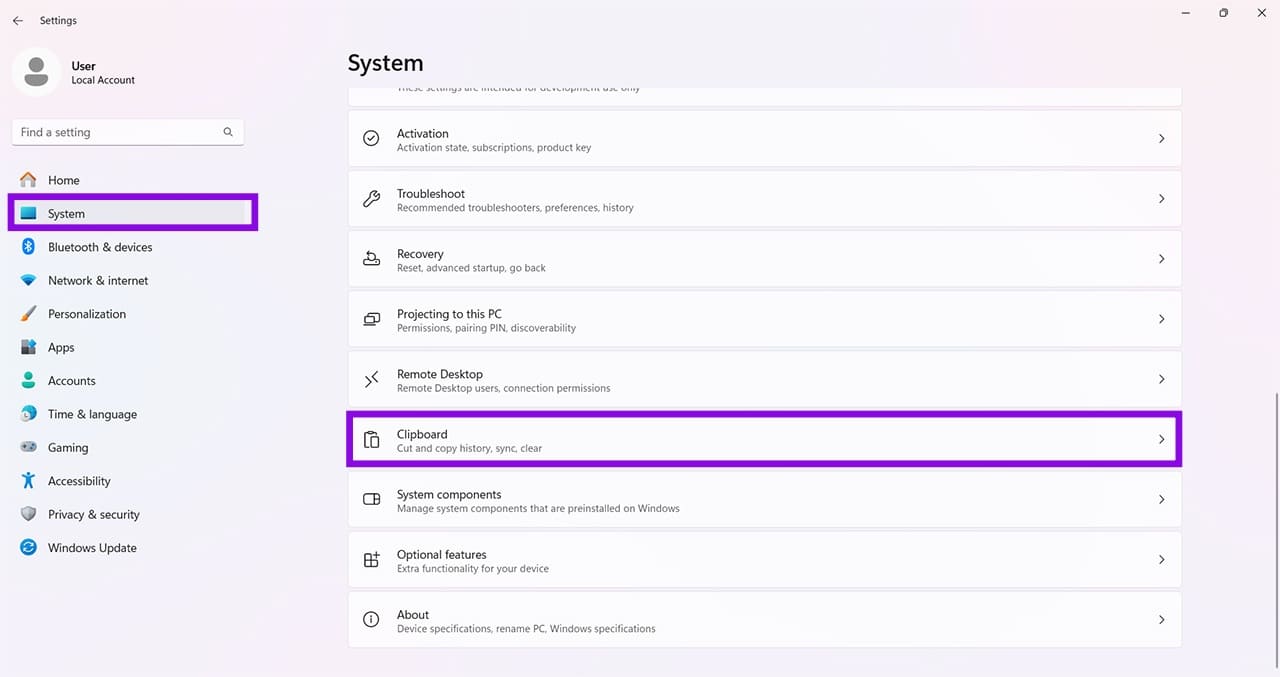
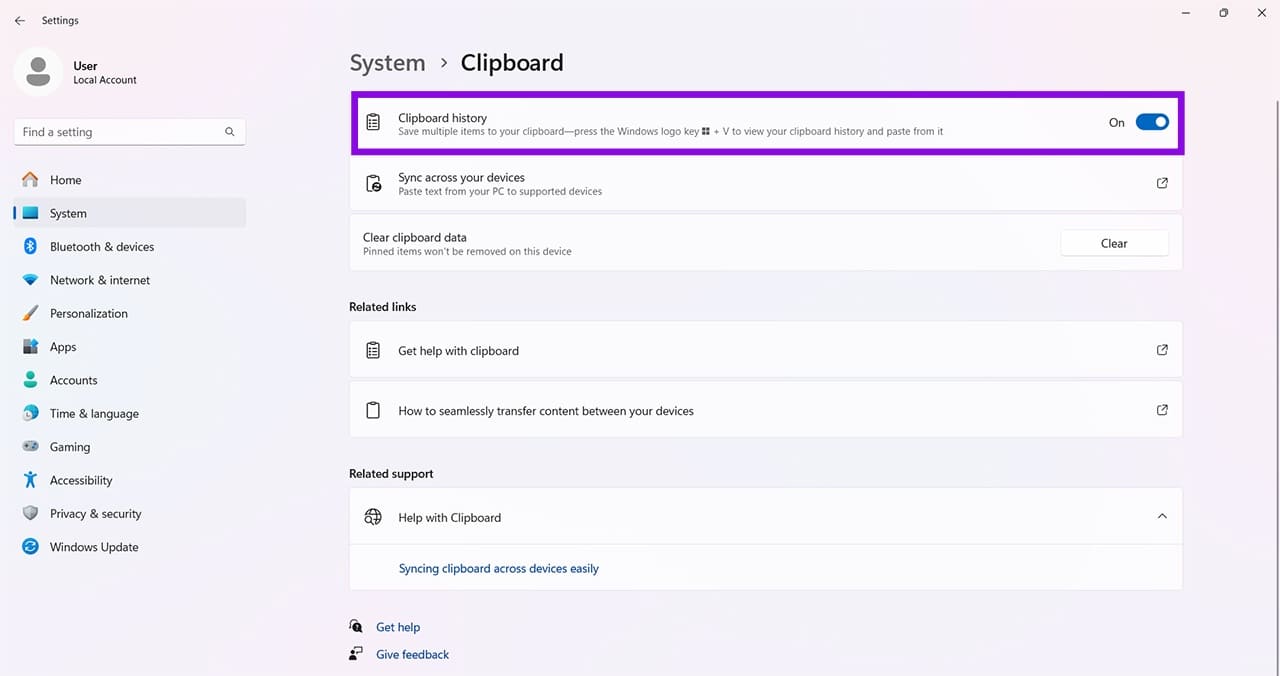
Step 3. Check that “Clipboard history” is toggled to “On,” then press Win + V to check whether your screenshots appear in Clipboard History.
Restart Windows Explorer
A PC that’s been running a long time often becomes more erratic in its behavior. This is equally true of Windows Explorer, which controls a lot of processes. Giving this a quick restart might help:
Step 1. Open Task Manager by pressing Ctrl + Shift + Esc.
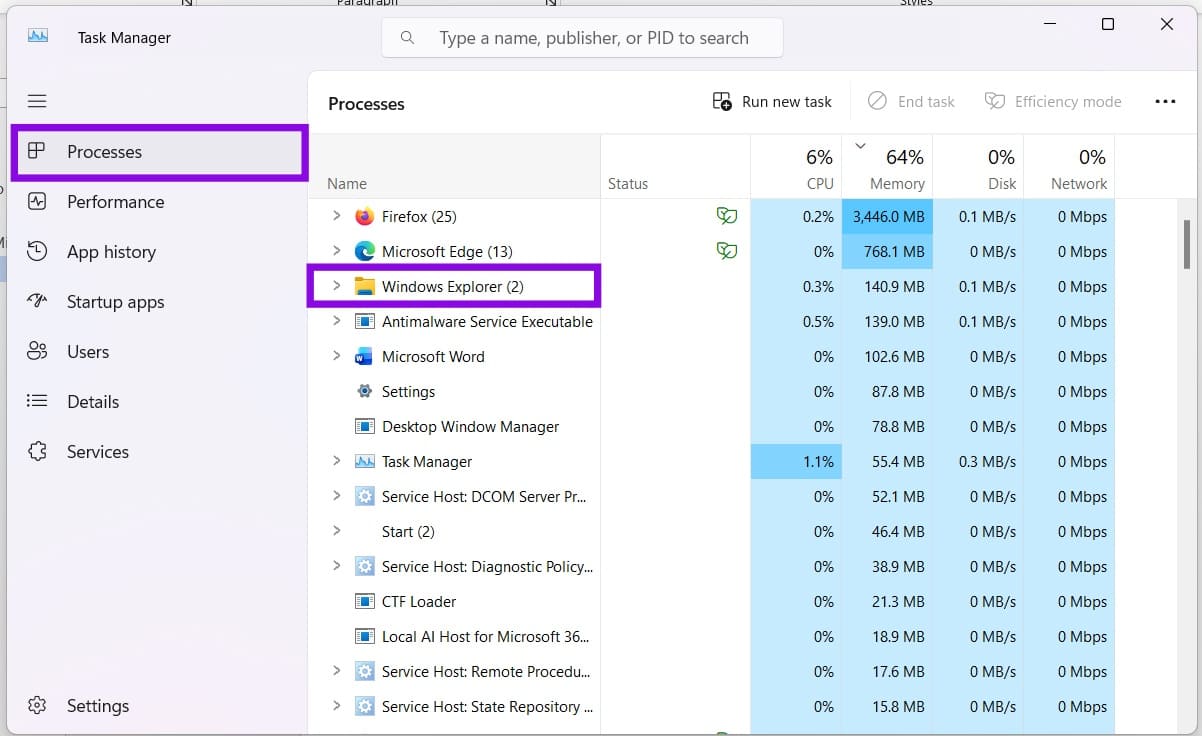
Step 2. Click the “Processes” tab and find “Windows Explorer” in the main window.
Step 3. Select it and then click the “Restart task” button to restart Explorer.
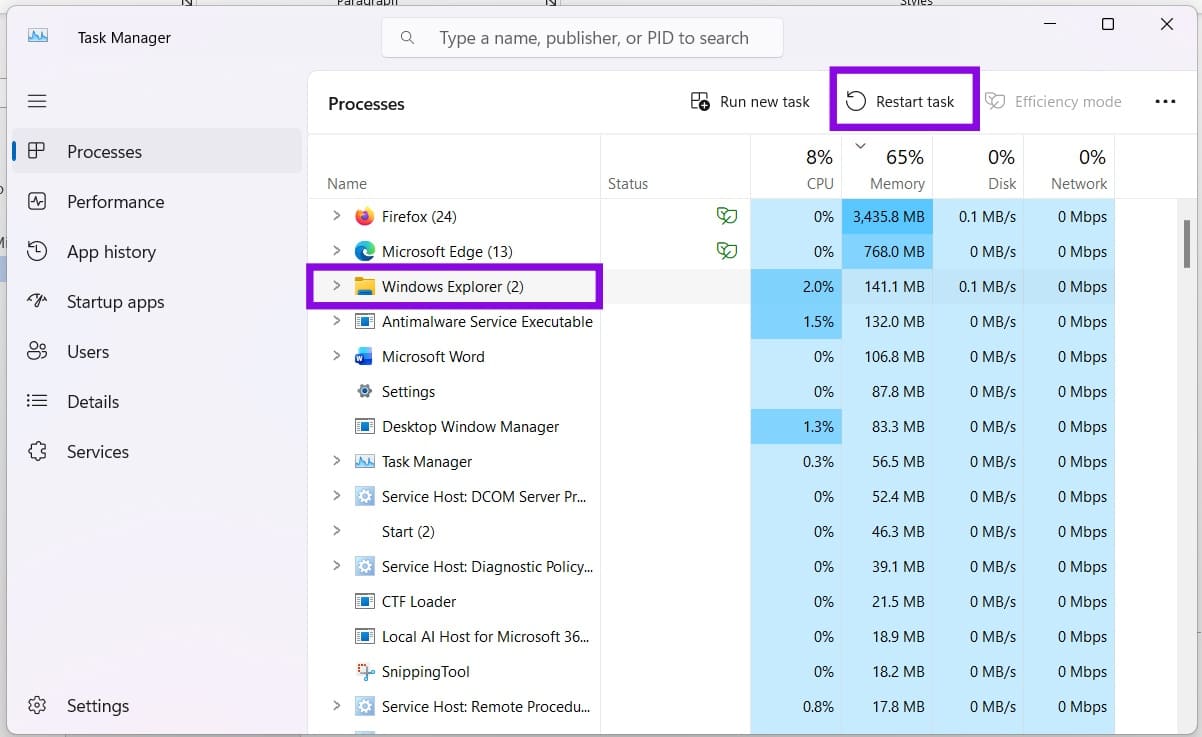
Step 4. Explorer will restart. Try taking a screenshot again.
If this doesn’t work, try restarting your whole PC.
Enable Notifications
If you’re not getting a pop-up after taking a screenshot, the Snipping Tool might still be working, even if its notifications are disabled. Here’s how to activate or reactivate them:
Step 1. Open “Settings” (Win + I) and choose “System.”
Step 2. Scroll down to “Notifications” and click it.
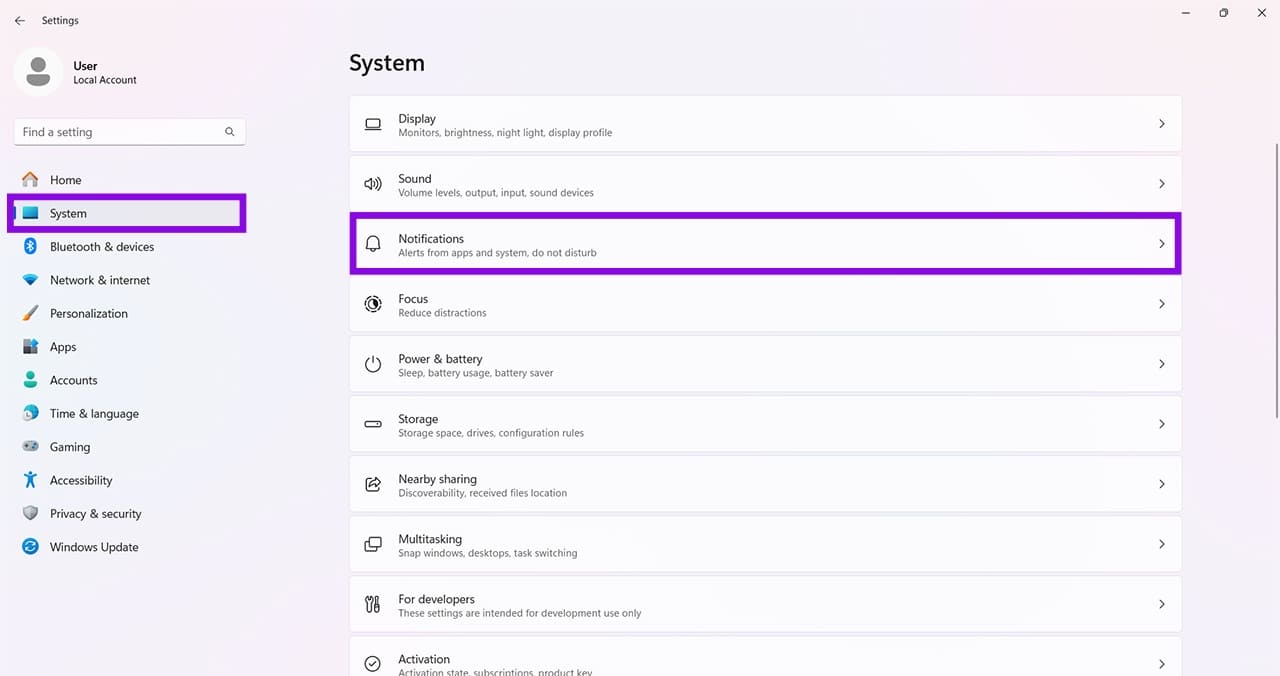
Step 3. Ensure that “Snipping Tool” is toggled on.
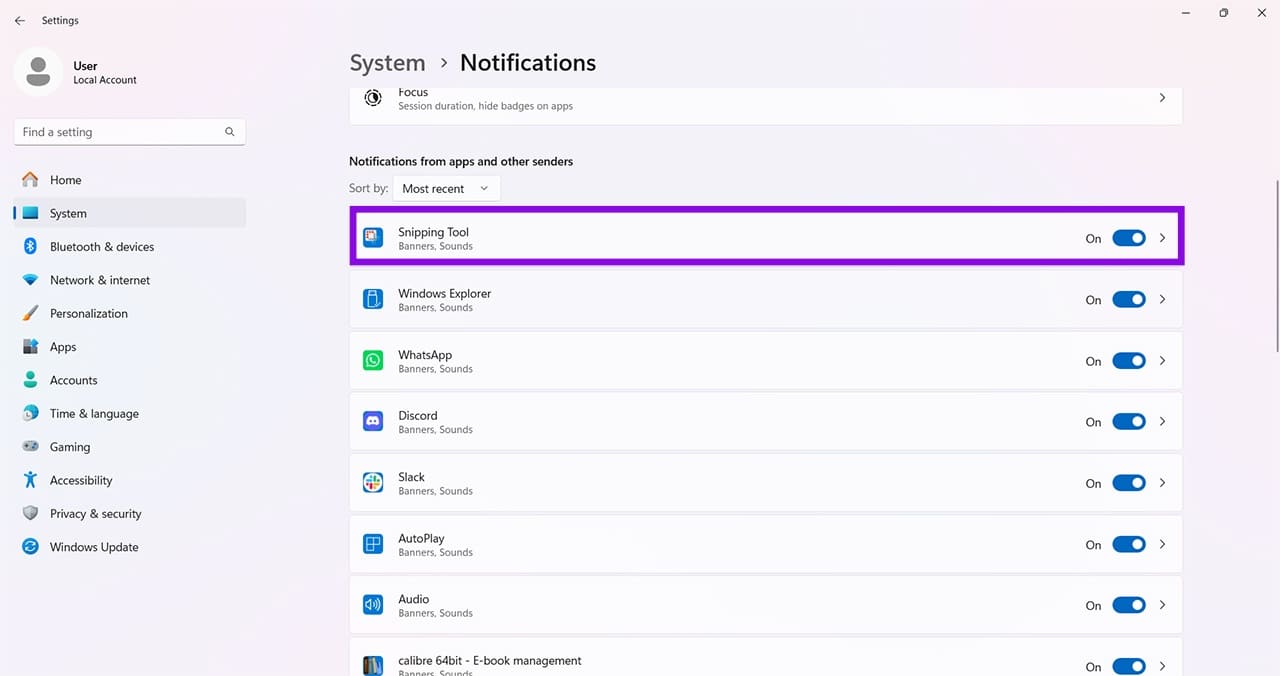
Step 4. Click the arrow next to the toggle to access more notification settings and ensure “Notifications” is toggled on here too.
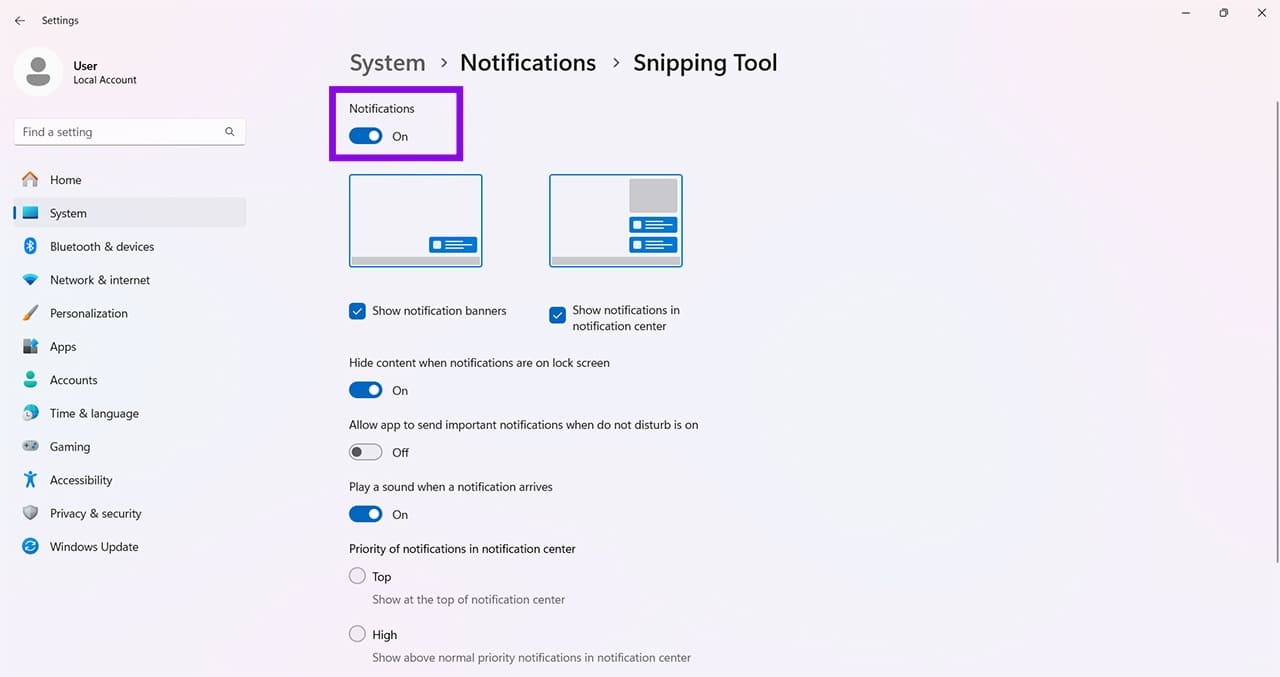
Step 5. Once done, test with a screenshot again.
Turn Off Do Not Disturb
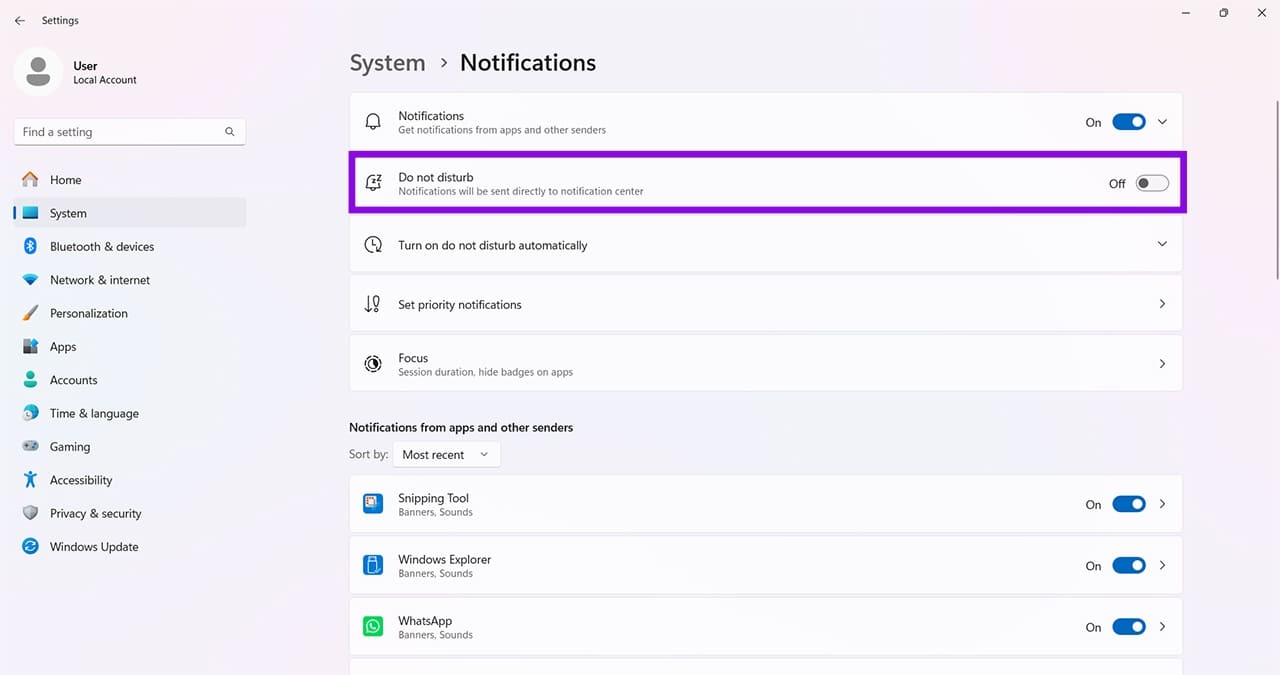
While you’re in the Notification Settings, ensure that “Do Not Disturb” isn’t on, as it can silence or suppress notifications from apps. If it is, toggle it off.
Enable Print Screen Capture
If you want the Print Screen key to open the Snipping Tool, here’s how to make sure that option is enabled:
Step 1. Open “Settings” (Win + I) and choose “Accessibility.”
Step 2. Scroll down to “Keyboard” and click it.
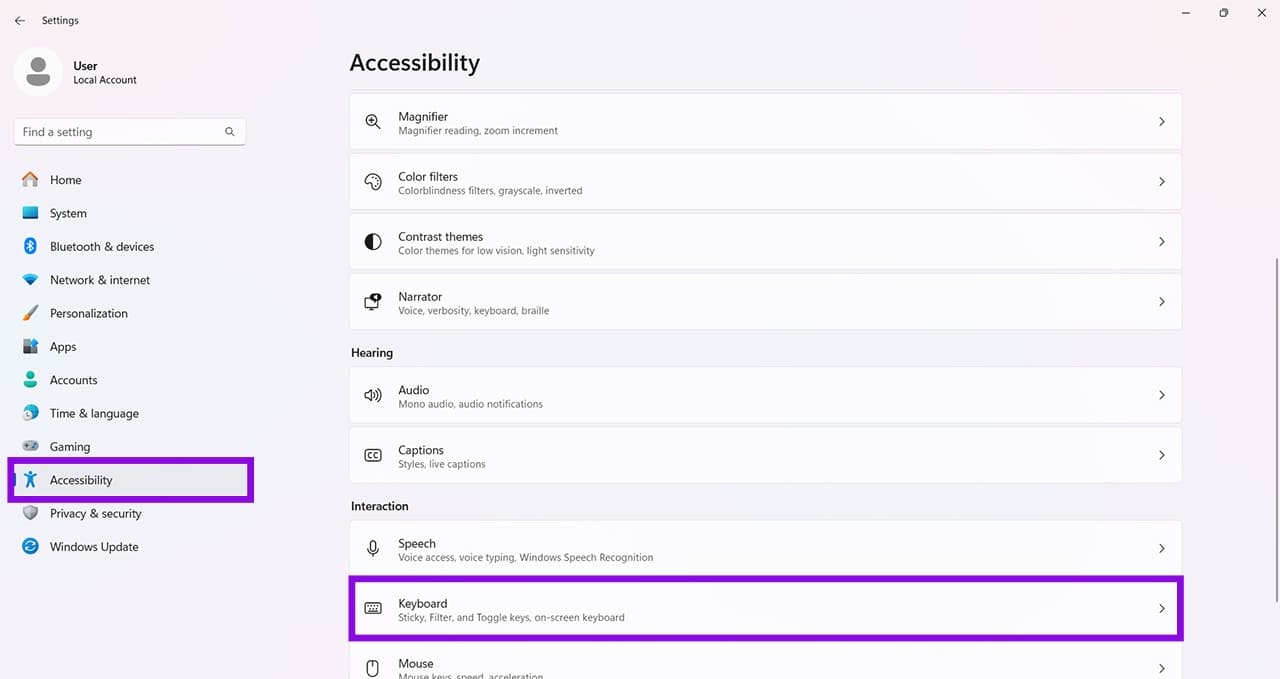
Step 3. In the next screen, find “Use the Print Screen key to open screen capture” and ensure it’s toggled on.
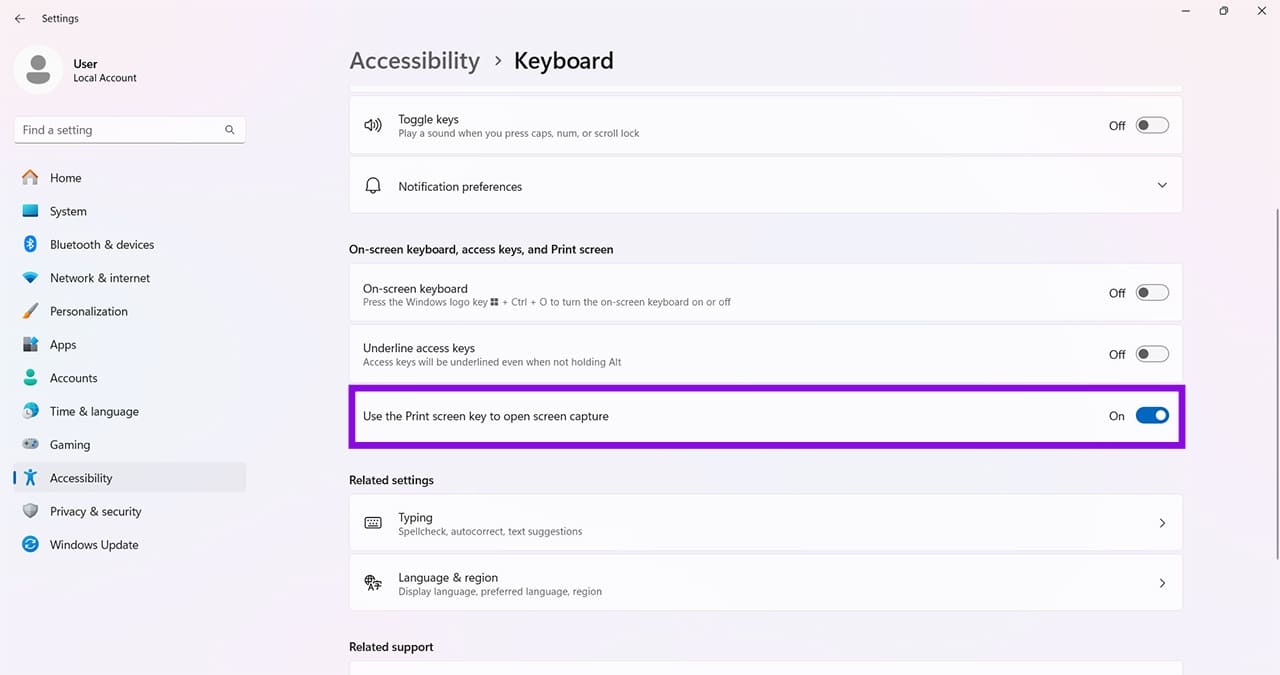
Step 4. Try using the button again and see if it works.
Repair and Reset
If you suspect the Snipping Tool app might have been corrupted, you can Repair and Reset, in that order. Reset will start your app with a clean slate, while Repair maintains all settings. Here’s what to do:
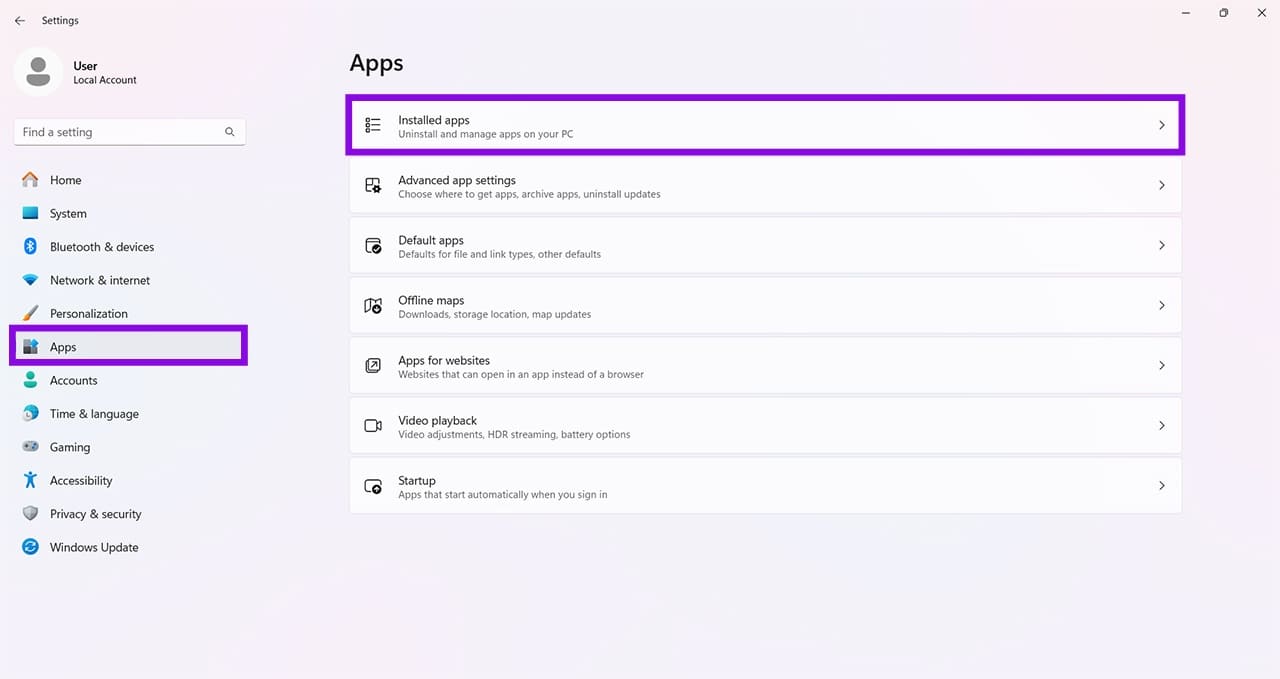
Step 1. Open “Settings” (Win + I) and choose “Apps.”
Step 2. Click “Installed apps.”
Step 3. Navigate to “Snipping Tool” and click the three dots on the right side.
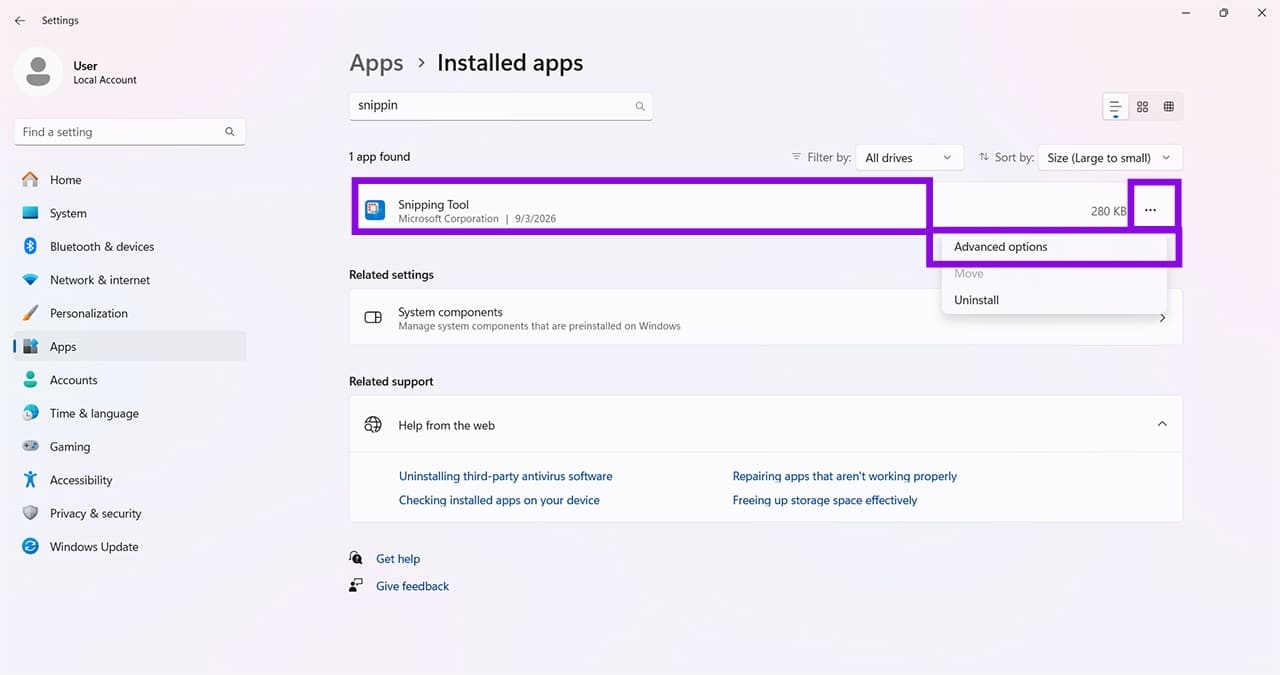
Step 4. Click “Advanced options.”
Step 5. Scroll down to the “Reset” section. Click “Repair” and let the process complete.
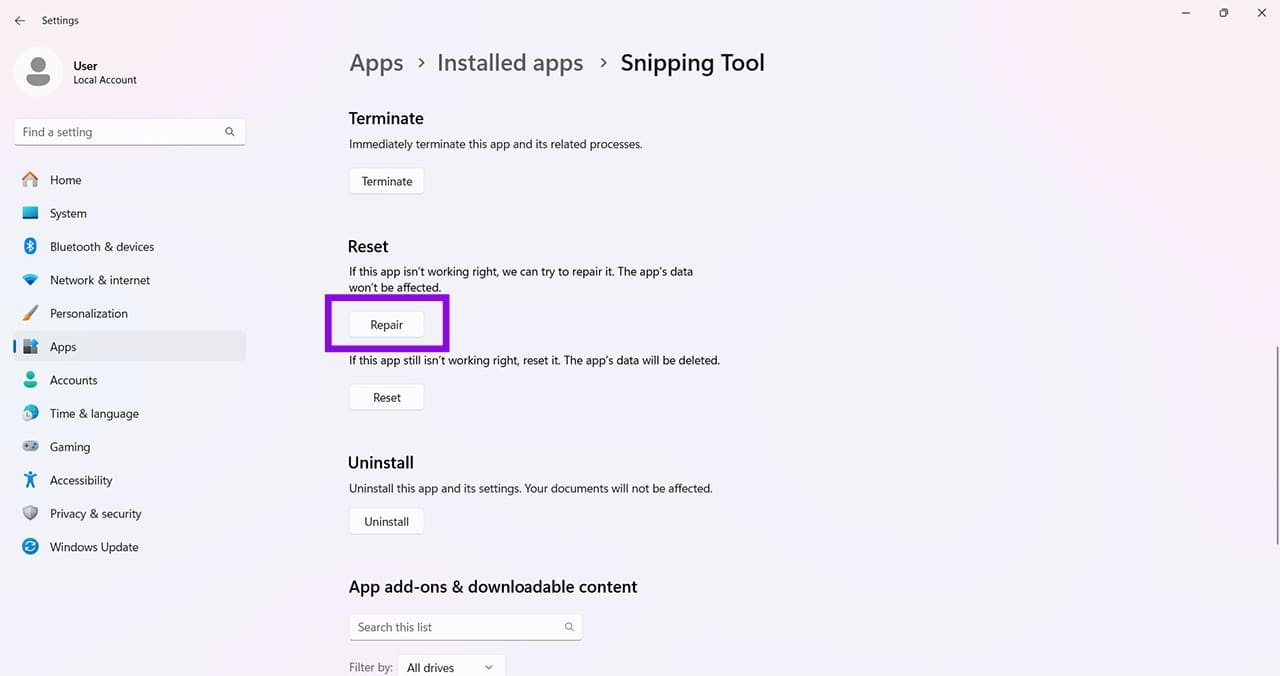
Step 6. Test the screenshot again and, if it doesn’t work, try “Reset.”
How to Fix Group Policy Settings Resetting Automatically on Windows
Read Next