How to Automatically Add Date in Excel

Excel provides many options to help you handle date and time in your worksheets.
You can have a cell that will always update to the current date when you open the sheet. That can help with documents that need to be printed or saved as a PDF on an exact date, such as contracts or invoices.
You might need to create a sheet that lists all the days in a year to help you make plans for the future. How about making a 5-year plan? What if you only need workdays in your planning? Instead of wasting time adding hundreds of dates manually, Excel can simplify that process significantly.
Before you start, you need to be aware that Excel uses and recognizes specific date formats. If not formatted properly, Excel can treat your date entry as a number or a string of text, preventing any further automation.
Date Formats in Excel
There are two sides to formatting dates in Excel.
- How you enter the date.
- How Excel displays it.
Entering the Date
Excel accepts numerous formats for date input. If you enter it correctly, you will see that the cell value is aligned to the right. Otherwise, it will be aligned to left, indicating that Excel treats your entry as text and will not apply any date formatting to that cell.
If you want to enter July 1, 2019, you can do it in several ways:
- 7/1/19
- 7/1/2019
- 07/01/2019
- 1-jul-2019 or 1-july-2019
- 1 jul 2019 or 1 july 2019
You can also use either slash (7/1/2019) or dash (7-1-2019). Although you can use space when entering “1 jul 2019”, Excel will not recognize “1 7 2019” as a date. Also, Excel will not accept “jul 1 2019”.
If you are entering dates for the current year, you can enter the date in one of the following short formats:
- 7/1
- 7-1
- jul 1 or jul-1 or jul/1
- 1 jul or 1-jul or 1/jul
For example, if the current year is 2019, Excel will automatically read these entries as July 1, 2019.
Please note that depending on the regional settings in your operating system, the first figure may indicate either a month or a day. That translates to the second figure as well. If you enter 7/1/19 and your settings are, for example, set to one of the European countries, Excel would understand that date as January 7, 2019.
Displaying Dates in Excel
Once you have properly entered the date, Excel will display it in one of the default formats. If you have entered the month, day, and year as numbers (7-1-19 or 07-01-2019), Excel will display the date as “7/1/2019”. In all other cases, as listed in the previous section, the date will show up as “1-jul” in your sheet.
If you would like to see the date in another format, you can choose one from the settings menu.
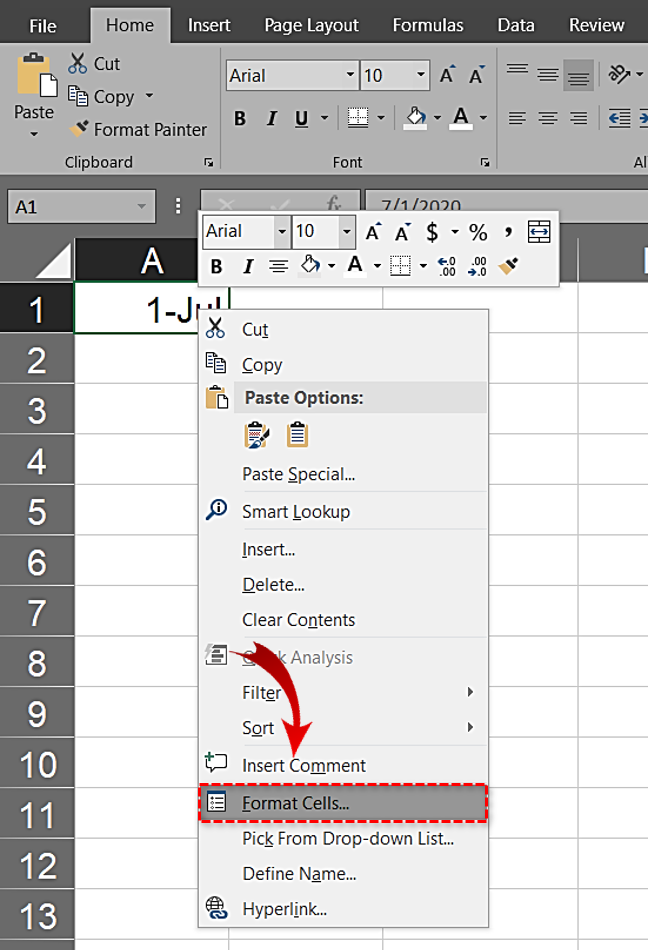
- Right click on the cell (or a selection of cells) you wish to format.
- Click “Format Cells…”.

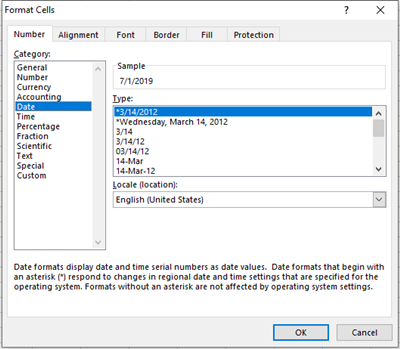
- The “Format Cells” menu will open, showing the “Number” tab.

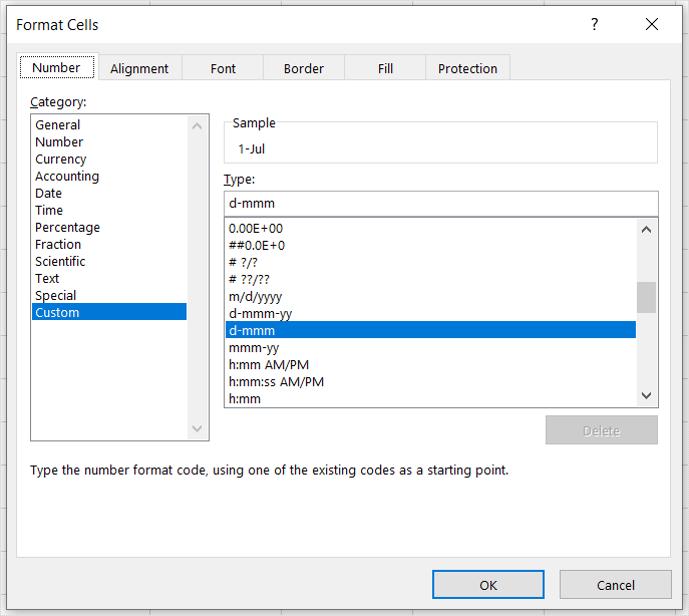
Notice that the selected category to the left is “Custom”. That’s because it is a default format which Excel uses. Here you can choose from one of the suggested formats or you can define your own. In the “Type:” field, right above the list of the suggested formats, you can type exactly how you’d like the date to appear.
Here are some useful guidelines:
- d = 1
- dd = 01
- ddd = Mon
- dddd = Monday
- m = 7
- mm = 07
- mmm = Jul
- mmmm = July
- y or yy = 19
- yyy or yyyy = 2019
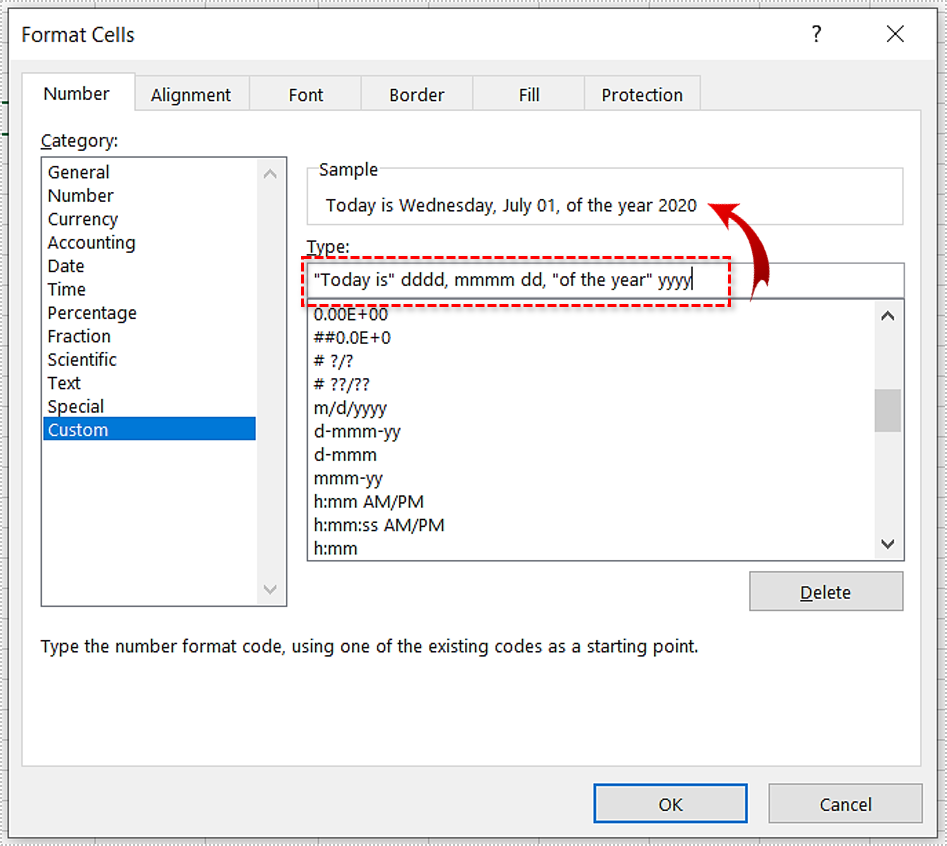
Since this is a custom field, you can type anything you want. If you’d like the cell to display a weekday and the date, along with some additional text, you can easily do that. For example, type the following and see what happens:
- “Today is” dddd, mmmm dd, “of the year” yyyy.
Of course, you can always go to the “Date” category of this menu and choose from the many available date formats.
Note that when you select a format, it may happen that the cell becomes filled with the number signs (#). That’s because the cell is not wide enough to display all the characters. To sort this out, simply double-click the right border of the column’s header to automatically set the cell’s width. You can also drag the border to the right until your date appears.
Auto-filling Dates
When you need to add a series of consecutive dates, like an entire week or a month, do the following:
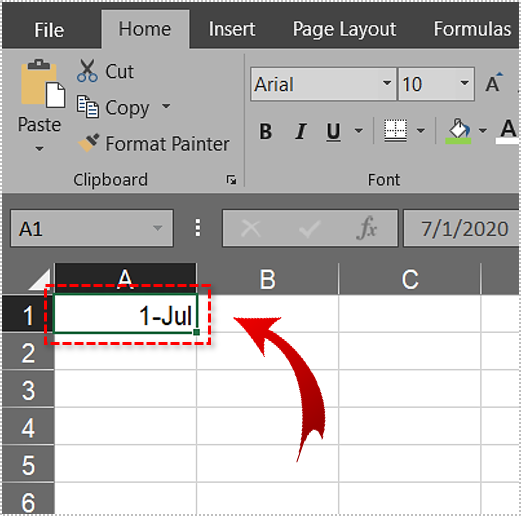
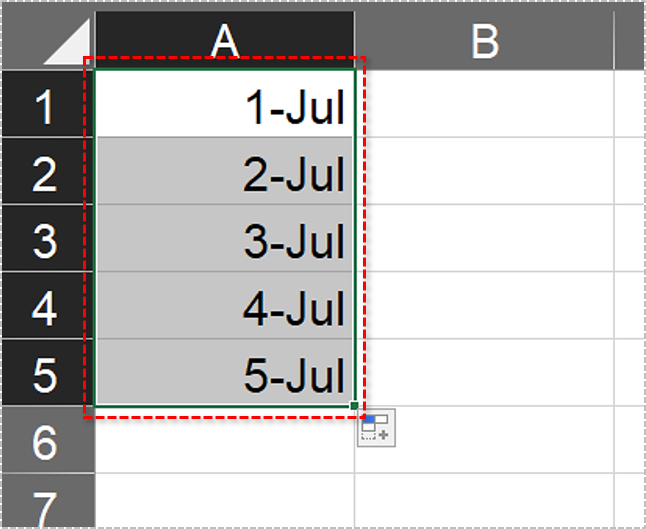
- Enter the first date in a cell where you want your series to start.

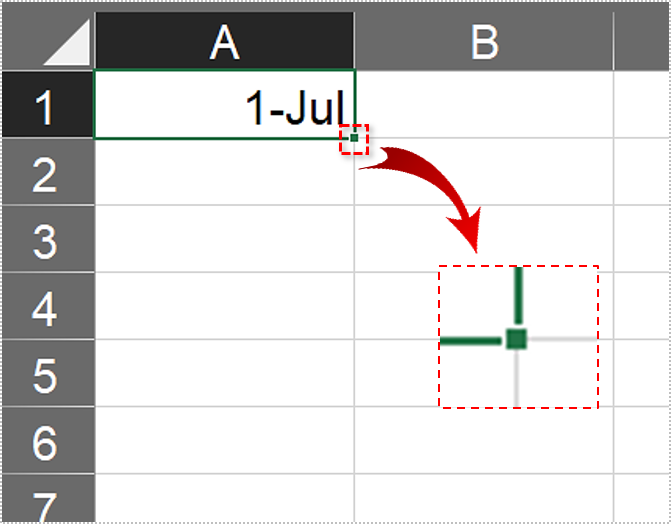
- In the lower right corner of the cell selection rectangle, you will see a small square. That’s the fill handle.

- Click and hold the handle to drag the selection across the range you wish to fill.

- When you release it, you will see that the selected cells now contain consecutive dates.

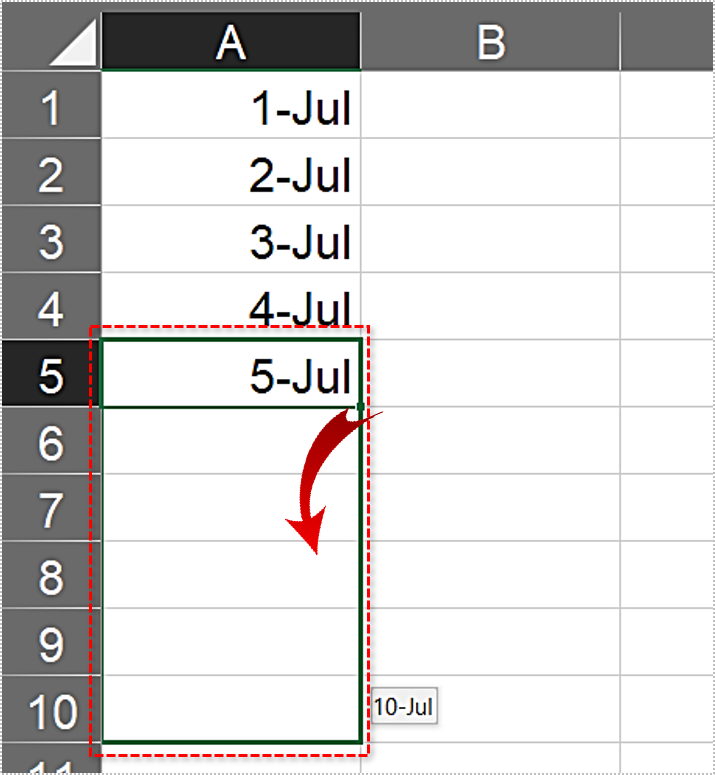
- If you want to continue the series, simply select the last cell in the series and drag it until you reach the desired date.

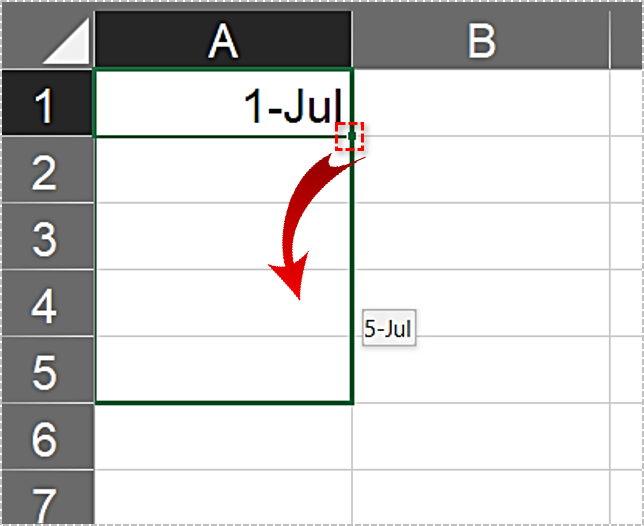
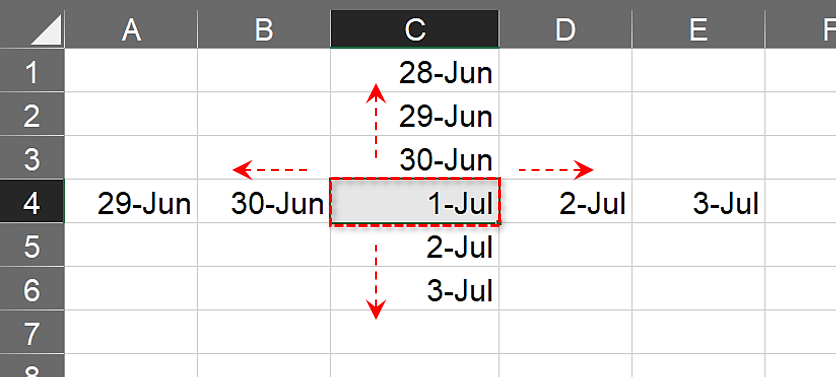
Also, auto-fill works in all four directions. If you drag to the right, the row will fill with dates. If you drag down, the column will fill. If you drag up or to the left, the dates will start going backward.
You may also wish to fill your sheet with non-consecutive dates, such as only weekdays. Or perhaps months, or even years.
To do that, repeat the previous process, except now drag the fill handle using the right mouse button. When you release it, a menu will pop up. Here you can choose to fill the selected cells with either days, weekdays, months, or years.

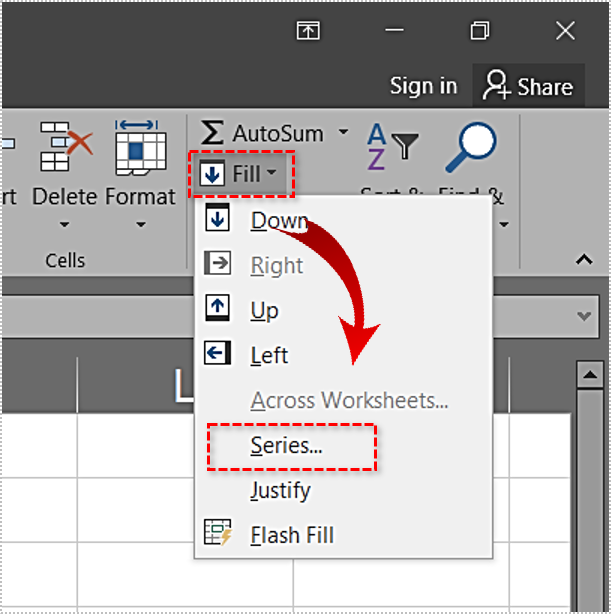
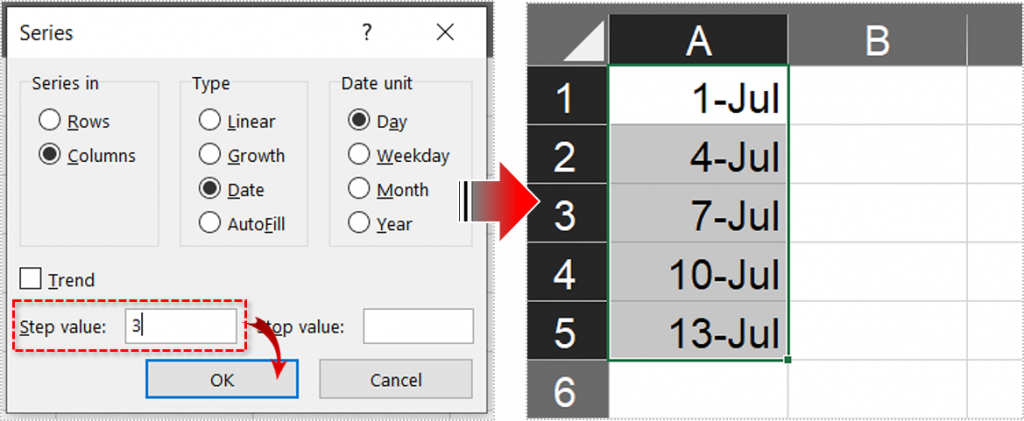
If you need even more options for automatic dates, select “Series…” instead of one of the previous options. After dragging the fill handle, click on Home tab. In the Editing section select Fill, on the dropdown menu, choose Series.. For example, if you’re planning an activity that should repeat every three days, set “Date unit” to “Day” and “Step value” to 3.
Adding Current Date and Time
To quickly add current date and time in Excel, you don’t have to waste time typing them. Instead, you can use keyboard shortcuts to do the work for you:
- To enter today’s date, press Ctrl+;
- To enter the current time, press Ctrl+Shift+;
- To enter both the current date and time, press Ctrl+; then Space and finally Ctrl+Shift+;
This way, you will keep the date and time the same as when they were first set. As a timestamp, they won’t change after you recalculate your cells or when you open the sheet on another occasion.
If you need the date and time to change every time you open the document, Excel solves this with the following functions:
- To always have the current date in a cell, type =TODAY().
- To update the cell value with both the current date and time, type =NOW().
To update these cells without reopening your worksheet, simply edit any cell and the values will update.
A Lot of Time Saved
Hopefully, these tips will help you save a lot of time when working with complex worksheets. Rather than inserting each date manually, you can have years’ worth of dates filled in mere seconds. Just make sure that you enter the initial date in a proper format that Excel recognizes.
Did you find this automation useful? Do you have additional tips that can help in this area? Please share your thoughts in the comments section below.