


Connected to Wi-Fi, but the Internet is Not Working – How To Fix
It’s hard to really gauge the aggravation and confusion one may feel when you know that you’re connected to the WiFi but for some reason, the internet doesn’t want to play along. Ever since WiFi was a thing, we’ve all encountered this particular error at one point or another, yet the frustration never dissipates.
Fortunately, there are several fixes to this problem.
Unfortunately, it can be difficult to pin down exactly which fix is necessary. It could be due to changes in your operating systems settings, or the router, but you can’t really know at first glance. This, like so many other tech fixes, means you’ll have to run through a list of different solutions until you’ll be able to identify the correct one.
Down below, we’ll go over a few different fixes, in preferred order, to get your WiFi and internet back on the same page and operating on full cylinders.
Culprit #1: The Router
In order to identify any router problems, you can first connect other mobile devices to the WiFi and see if it’s working as normal. A cell phone or tablet will do. If the Internet is working as intended for these devices, then the problem is specifically attributed to the original device and its WiFi adapter. However, should the Internet not work with any of the additional devices, then the problem is most likely with either the router or the Internet connection.
First thing you should do to attempt a router fix is to restart it. This will flush all caches and fix any potential network or software problems that could be hindering connectivity. If your modem is separate from the router, make sure to restart both.
- Turn off both the router and modem (if separate)
- Wait approximately 30 seconds. Counting down in your head could head.
- Turn on the modem first and wait an additional 60 seconds before booting up the router.
- Wait to see if all appropriate lights are lit and then proceed to check if you can now connect.
This solution will often fix the bulk of router issues and get your WiFi back on track. If this solution doesn’t work…
Culprit #2: Internet Connection
If the WiFi is connected but you’re still not receiving an internet connection, the error may lie with the Internet connection itself. This could be a great many things, some of which are outside your control. There could be a service disruption in your area, broken cables, or any other kind of interference.
A good start would be to rule out your internet service provider. You can check if the “Internet” light on the modem is currently lit (as most should be). You’ll also want to make sure that the power and DSL lights are turned on. Pay close attention to any out of the ordinary flickering or dimming of the LED lights.
If any of the above mentioned occurs, it would be in your best interest to contact your internet service provider and see if they have any issues on their end. In the case of flickering or dimming LEDS, you may need to get a modem replacement. Your internet service provider should also be able to cover your needs for this situation as well.
Culprit #3: The Device You’re Using
If in fix #1 you attempted to connect different devices to the internet and they worked fine, the problem then lies with the initial device.
You should always begin troubleshooting with a restart. Turn the device off and on again to see if that fixes the problem. Similarly to the router, the simple off and on again approach tends to fix the bulk majority of internet connectivity complications.
If that doesn’t work, you can:
Scroll over to and right-click (or tap) on the Network icon located within your taskbar. You can find it at the bottom right-hand corner of the screen. If you’re on a laptop, you may need to click the upward pointing arrow to get to the Network icon. From the dialog box, click on “Troubleshoot problems”.
Windows will try to diagnose the problem automatically and attempt to fix it for you. If you’re lucky, you’ll be cruising the internet on your device of choice instead of here, trying to find a solution.
If Windows is unable to find fix, it might tell you what the problem is and provide an option to search for an online solution or ask experts.
Culprit #4: DNS Cache
A DNS cache gathers information on all recent website visits (yes, even the naughty ones), and stores them for quicker web page loading should you return.
The way it works is when you enter a URL into the browser (like techjunkie.com), your OS will check your DNS cache for a match. If one is found, the OS will retrieve the pages saved instead of downloading them from the internet therefore saving you a bit of time.
Unfortunately, there are times when the DNS cache becomes corrupted either by technical glitches, malicious code, or unauthorized domain names brought on by third-party software that may contain viruses. This can often prevent you from connecting to the internet if there is an IP address mismatch.
The only fix for this is to flush the DNS cache. To do so:
- Open up your RUN window by pressing the Windows + R keys. Type “cmd” into the box, which will bring up your Command Prompt.
- Type in the following command: ipconfig/flushdns and press enter.
Your DNS cache will now be flushed out. Restart your computer and once again attempt to connect to the internet.
Still a problem? Moving on.
Culprit #5: Wireless Mode Outdated
Your router’s wireless mode has a standard that indicates internet speeds and coverage. The standards are defined by the IEEE and are typically displayed on the router as 802.11g, 802.11n, 802.11b, and 802.11ac, etc. This is to ensure uniformity across all router models.
The oldest out of those mentioned is the 802.11b which coincidentally also makes it the slowest. The 802.11ac is on the opposite side of the speed spectrum and is also the latest model.
“Why do I need to know this information?”
Well, let’s say your laptop is a bit older and can only connect to a standard of 802.11g but your router is based on the latest version, 802.11ac. This then creates a conflict between your laptop and the router meaning that your laptop will be unable to connect.
In order to fix this problem, you’ll want to open up your command prompt (like in #4) and identify your router details. This time with the Command Prompt open, type in ipconfig. The information received should look something like this:
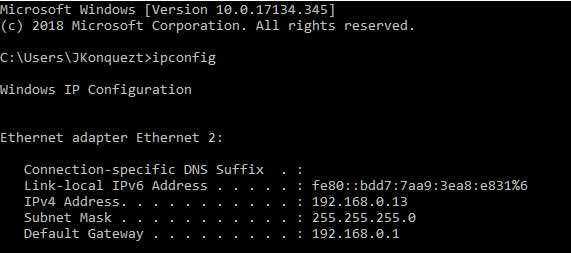
The IP address of your router is located to the right of Default Gateway.
This information can also be found using the GUI. You’ll need to get to the Network and Sharing Center. In order to this, you can:
- Right-click on the Windows icon in the lower left of the screen.
- Click on Network Go to Network Connections.
- From here, scroll down and click on Network and Sharing Center.
OR
- Right-click on the Network icon like you did in #3.
- Select “Open Network & Internet settings”.
- From here, scroll down and click on Network and Sharing Center.
With Network and Sharing Center pulled up:
- Click on your router (usually located to the right of Connections.)
- Click on the Details button.

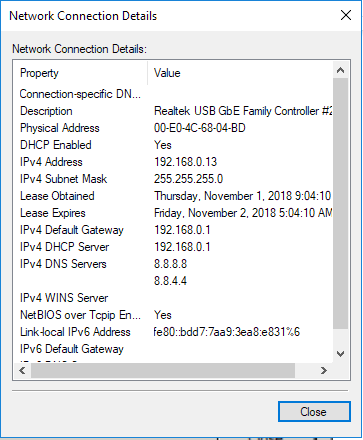
Your router’s IP is indicated by the IPv4 address.
Now we’re going to login to the router itself. You’ll need the login credentials so make sure you know them ahead of time. Enter the IP address into your browser’s URL box. Enter your login information. In most cases, the username and password is admin by default.
Once inside the router, locate the “wireless mode” option. This can often be found under “Wireless Settings,” but the GUI may vary for each router.
Change the wireless mode to reflect the mode that is standard for your laptop and save the changes. Restart your WiFi and cross your fingers.
Continue to the next solution if necessary.
Culprit #6: Conflicting IP Address
It’s possible that more than one of your devices was assigned an identical IP address. This is a conflicting issue as the IP address must be unique per device. When two or more devices share an IP address, none of them will be able to connect to the internet.
This complication can occur when:
- Two devices are assigned the same static IP address.
- One device is assigned a static IP address that happens to fall in the DHCP range and the same IP address is automatically assigned by the DHCP server to an additional device on the same network.
- A laptop is in sleep mode, it’s IP address can be assigned to another device on the same network. This creates a network conflict when the laptop is turned back on.
- You have multiple wireless routers connected to the same network.
Head back to the Command Prompt and type in ipconfig /release
This will force the DHCP server to release the currently assigned IP address for your computer.
Follow this up by typing in ipconfig /renew to assign a new IP address for your computer.
If that doesn’t work:
- Press Windows + R. In the box provided type in ncpa.cpl. This opens all your network connections.
- Find your network, right-click on it, and select “properties”.
- Locate Internet protocol 4 (IPv4) and highlight it. This will enable you to press the Properties button just below.
- Click on the Properties button.
You should see this:
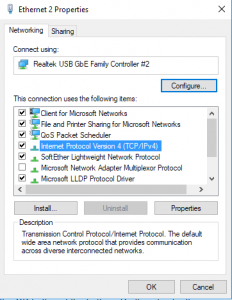
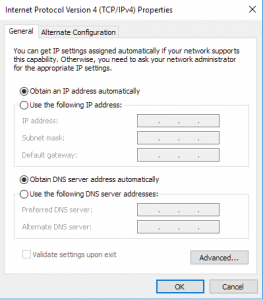
Ensure that “obtain an IP address automatically” and “obtain DNS server address automatically” are selected and click on the OK button at the bottom. Do this also for the previous screen.
Restart your router and see if everything is working correctly.
It’s possible that your router has a faulty DHCP server. If you feel this may be the case, get in contact with the manufacturer and have your firmware upgraded.
Culprit #7: Network Driver Possibly Outdated
Over time your network driver can become corrupted or outdated which will cause complications with your internet connectivity. In order to avoid this problem, it’s best to keep all device software updated as often as possible. You can take a look at all your devices by opening up the Device Manager.
To do this:
- Windows + R for RUN dialog, and type in devmgmt.msc
- Extend the ‘Network Adapters’ tab and right-click on your network.
- From the options, select “Update Network Driver”. This will prompt two options and, unless you’ve gone directly to the website to download it yourself, you’ll want to choose “search automatically for updated driver software”.
This will have Windows attempt to find and update the driver for you automatically. If one cannot be found, you’ll need to head to the website of the manufacturer in order to acquire the update.You can also try using a third-party program like Driver Easy to search out all driver updates your computer currently needs.


One thought on “Connected to Wi-Fi, but the Internet is Not Working – How To Fix”