Failed To Obtain IP Address in Android – How To Fix
Seeing ‘Failed to obtain IP address’ when trying to connect your Android phone to your wireless network? You’re not alone. Of all of the network issues we deal with to do with phones, this is one of the most common. This tutorial will show you how to fix it.
The vast majority of our time, connecting to WiFi is simply a matter of toggling it on and waiting five seconds for it to connect. It is designed to be simple and as straightforward as possible. But on those occasions when you cannot connect to a network, the fact that it is usually so easy makes it even more annoying.
Routers use a system called DHCP, Dynamic Host Control Protocol, to assign IP addresses. A pool is set within the router configuration that limits how many IP addresses it can use and sets the IP range. As devices try to connect, as long as they authenticate, DHCP assigns an IP address and the device gets network access.
IP addresses are ‘leased’, so if you connect your phone to your router, it will be assigned an IP address for a given amount of time. The default DHCP lease period is 8 days. So if your phone is assigned a particular IP address, the router reserves that address for 8 days. Every time it connects, it will automatically be given that address. After that time is up, the router consults DHCP again and will assign another IP address.
That address can often the same one, depending on how busy your network is. When you see ‘Failed to obtain IP address’, it means something interrupted this process. It could be both router or phone and our job is to figure out which it is.
Fix failed to obtain IP address errors on Android
The DHCP process is the same whether you’re using Android, iOS, Windows, a tablet, phone, desktop or laptop. So if you have issues with those, many of these fixes will work there too.
Reboot your phone
As always, with any issue that won’t go away, reboot. It will clear the phone cache, settings, memory and operating system. If the phone is misbehaving in any way, reboot it. You would be amazed at just how many faults get fixed this way.
Reboot your phone and try reconnecting to WiFi.
Reboot your router
If rebooting your phone doesn’t work, try rebooting your router. As it is in charge of DHCP, this is the next logical place to go. You need to know whether your ISP modem or router or any home router is the DHCP server. There should only be one in any network to avoid confusion.
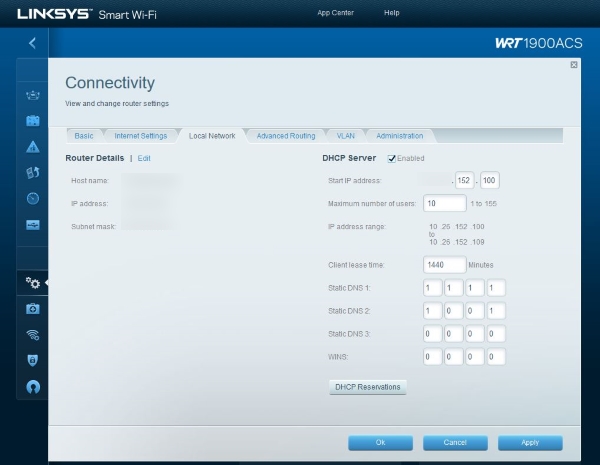
Different routers will call these different things. On my Linksys, it’s in the Connectivity menu and Local Network tab. Your router may have it somewhere else.
- If your ISP modem is also a router and that’s all you have, reboot that.
- If you have an ISP modem and your own router and moved DHCP to your router, reboot your router.
- If you don’t know which is your DHCP server, log into one and look to see which has DHCP server enabled. Reboot that.
If your router and modem both have DHCP enabled, disable it on the ISP device. There should only ever be one per network.
Forget the network
Forgetting the network on your phone means searching for it and reauthenticating with it all over again. This can be useful for forcing DHCP to reallocate an IP address and can be enough to get you up and running.
- Turn on WiFi on your phone.
- Swipe down until your network name appears.
- Press and hold the network name.
- Select Forget when the popup appears.
You will need to scan for mobile networks again and enter your network password but you should now be assigned an IP and no longer see ‘Failed to obtain IP address’.

Check IP address range
By default, a router will have an IP address range of 100 addresses it can use to manage your network. Some don’t have that many and in busier households, this can cause issues.
- Log into the router you have as the DHCP server.
- Select the page that lists Start IP address and Maximum number of users/IP addresses.
If you located the DHCP setting from above, you will already know where this is. There should be a selectable number within the number of users or number of IP addresses. Expand that by 5 and save the change. Then retry your phone.
There are lots more involved techniques for checking connectivity but they usually involve firmware updates and checking of logs. Fortunately, the fixed listed on this page should address the vast majority of failed to obtain IP address errors on Android!